After installing a WordPress website, it's common to install caching plugins to improve website speed.
Nginx FastCGI Page Cache is a technology that stores copies of PHP-generated web pages at the Nginx level. Compared to other WordPress caching plugins, using Nginx FastCGI Page Cache is faster and more efficient. The only difference is that it's a bit more complicated to configure.
Fortunately, there are now simple VPS management tools like Baota Panel (Baota Installation Tutorial) that even beginners can follow this tutorial to configure successfully.
Read carefully and operate meticulously. Follow Naiba step by step to enable Nginx FastCGI cache for WordPress.
Can't figure out the configuration?Try WP Panel, ready to use out of the box。
Nginx FastCGI Cache Single Site Configuration Steps
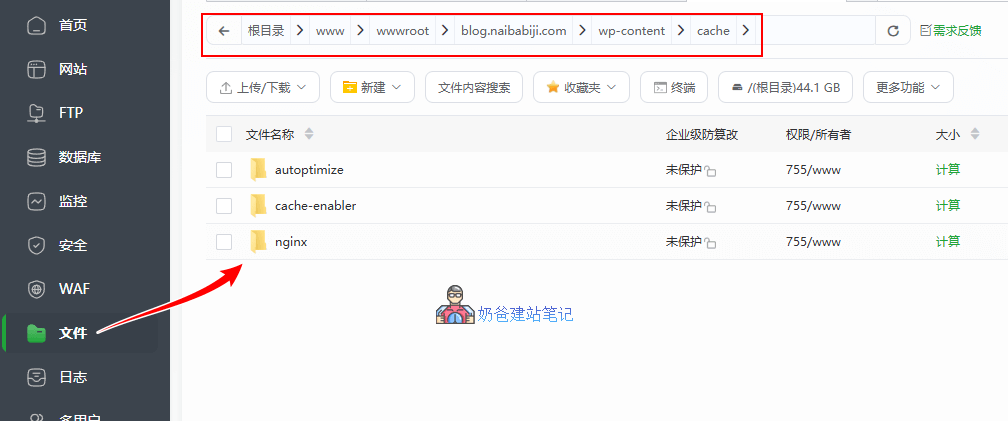
Create Cache Folder
Enter the Baota Panel backend, go to the file management interface, and create an nginx folder under /www/wwwroot/[your website folder]/wp-content/cache/.
Modify Website NGINX Configuration File
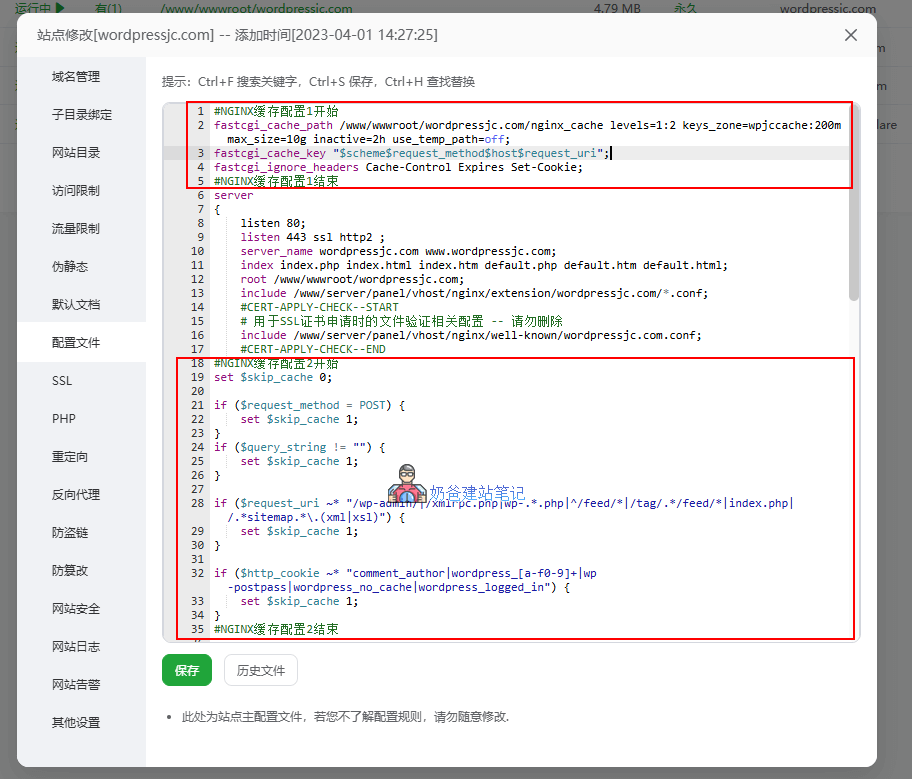
Return to the website list, select the settings for the website you want to configure, the pop-up interface shown above, select the configuration file, and then add the following content.
#NGINX缓存配置1开始(blog.naibabiji.com替换为你网站正确文件夹名称)
fastcgi_cache_path /www/wwwroot/blog.naibabiji.com/wp-content/cache/ levels=1:2 keys_zone=blogcache:200m max_size=10g inactive=2h use_temp_path=off;
fastcgi_cache_key "$scheme$request_method$host$request_uri";
fastcgi_ignore_headers Cache-Control Expires Set-Cookie;
#NGINX缓存配置1结束Tip, if an error occurs when saving, indicating a conflict with /www/server/panel/vhost/nginx/0.fastcgi_cache.conf, simply delete the 0.fastcgi_cache.conf file.
Then add the following code below the security certificate configuration:
#NGINX缓存配置2开始
set $skip_cache 0;

if ($request_method = POST) {
    set $skip_cache 1;
}
if ($query_string != "") {
    set $skip_cache 1;
}

if ($request_uri ~* "/wp-admin/|/xmlrpc.php|wp-.*.php|^/feed/*|/tag/.*/feed/*|index.php|/.*sitemap.*\.(xml|xsl)") {
    set $skip_cache 1;
}

if ($http_cookie ~* "comment_author|wordpress_[a-f0-9]+|wp-postpass|wordpress_no_cache|wordpress_logged_in") {
    set $skip_cache 1;
}
#NGINX缓存配置2结束
Modify PHP Software Configuration File
Using the Baota file function, enter the /www/server/nginx/conf folder, select the file corresponding to your own PHP version. For example, Naibabiji currently uses PHP 8.4, so select and edit the enable-php-84.conf file.
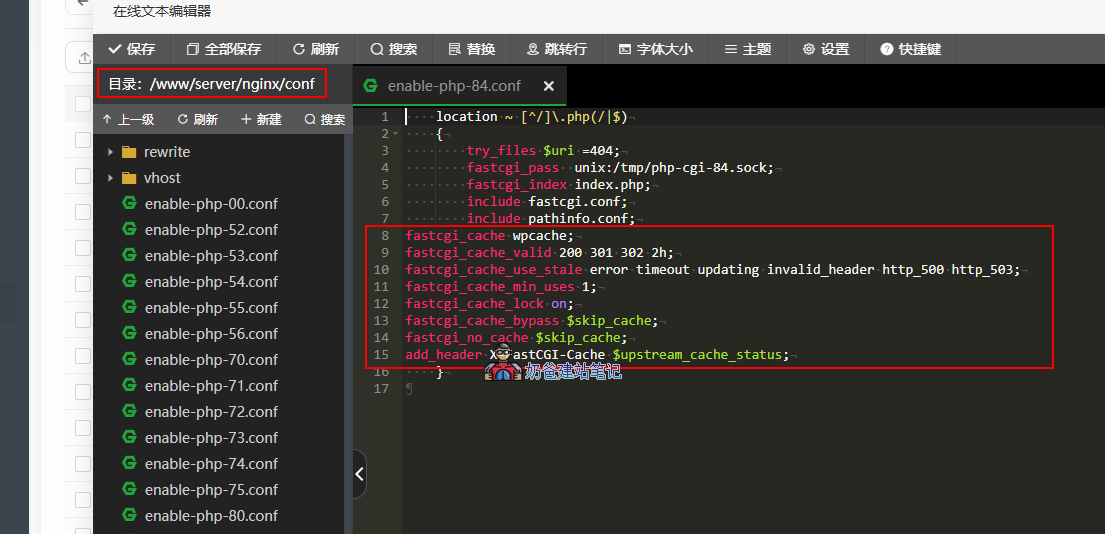
Add the following content before the last closing brace
fastcgi_cache blogcache;
fastcgi_cache_valid 200 301 302 2h;
fastcgi_cache_use_stale error timeout updating invalid_header http_500 http_503;
fastcgi_cache_min_uses 1;
fastcgi_cache_lock on;
fastcgi_cache_bypass $skip_cache;
fastcgi_no_cache $skip_cache;
add_header X-FastCGI-Cache $upstream_cache_status;
After adding this code, return to the Baota backend, Software Store, Installed, click on nginx to restart or reload the configuration. If there are no errors, it means the code was added correctly.
Test if Configuration is Effective
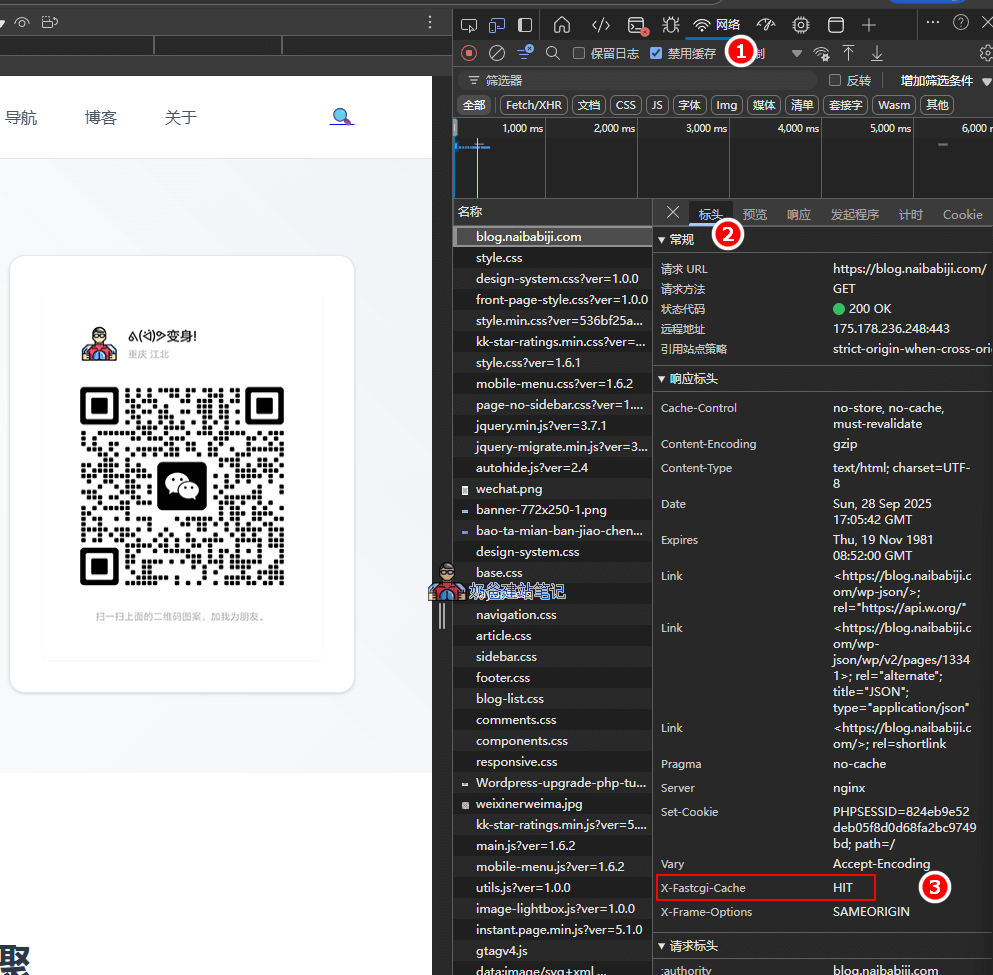
Use private/incognito mode or log out of your account, right-click in the browser and select Inspect Element or use the shortcut F12, click Network, under Name select the URL you visited, and then in the Headers you can see X-Fastcgi-Cache HIT, which indicates the cache is working.
Alternatively, you can directly observe the cache folder you created. If new folders appear, it also indicates it's working.
Configuring Nginx FastCGI Cache for Multiple Sites on the Same Server
If your server contains multiple WordPress websites, all requiring Nginx FastCGI cache configuration, you can follow the steps below.
1. Create an nginx folder in the directory of the website you want to configure, e.g., /www/wwwroot/blog.naibabiji.com/wp-content/cache/nginx
2. Open the nginx.php file under /www/server/nginx/conf, and insert the following code below 'access_log off;' (replace the URL with your own).
# FastCGI缓存配置 - WordPress网站专用
        # blog.naibabiji.com缓存区域
        fastcgi_cache_path /www/wwwroot/blog.naibabiji.com/wp-content/cache/nginx
                          levels=1:2
                          keys_zone=blog_cache:100m
                          max_size=2g
                          inactive=2h
                          use_temp_path=off;

        # wordpressjc.com缓存区域
        fastcgi_cache_path /www/wwwroot/wordpressjc.com/wp-content/cache/nginx
                          levels=1:2
                          keys_zone=wordpressjc_cache:100m
                          max_size=2g
                          inactive=2h
                          use_temp_path=off;

        # quhenet.com缓存区域
        fastcgi_cache_path /www/wwwroot/quhenet.com/wp-content/cache/nginx
                          levels=1:2
                          keys_zone=quhenet_cache:100m
                          max_size=2g
                          inactive=2h
                          use_temp_path=off;

        # FastCGI缓存相关变量设置
        fastcgi_cache_key "$scheme$request_method$host$request_uri";
fastcgi_cache_use_stale error timeout invalid_header http_500;Tip, if an error occurs when saving, indicating a conflict with /www/server/panel/vhost/nginx/0.fastcgi_cache.conf, simply delete the 0.fastcgi_cache.conf file.
3. Create a wordpress-fastcgi-cache.conf file in the /www/server/nginx/conf folder with the following content:
# WordPress FastCGI缓存配置模板
# 适用于所有WordPress网站的通用缓存规则

# 设置不缓存的条件
set $skip_cache 0;

# POST请求不缓存
if ($request_method = POST) {
    set $skip_cache 1;
}

# URL包含查询字符串不缓存
if ($query_string != "") {
    set $skip_cache 1;
}

# WordPress管理后台和特殊页面不缓存
if ($request_uri ~* "/wp-admin/|/xmlrpc.php|wp-.*.php|^/feed/*|/tag/.*/feed/*|index.php|/.*sitemap.*\.(xml|xsl)") {
    set $skip_cache 1;
}

# 已登录用户不缓存
if ($http_cookie ~* "comment_author|wordpress_[a-f0-9]+|wp-postpass|wordpress_no_cache|wordpress_logged_in") {
    set $skip_cache 1;
}

# WooCommerce相关页面不缓存(如果有电商功能)
if ($request_uri ~* "/(cart|my-account|checkout|addons)") {
    set $skip_cache 1;
}

# 包含购物车Cookie不缓存
if ($http_cookie ~* "woocommerce_items_in_cart|woocommerce_cart_hash") {
    set $skip_cache 1;
}
4. Still in the /www/server/nginx/conf directory, create the enable-php-84.conf file corresponding to the website you need to configure (the file corresponding to the PHP version used by the website). You can refer to Naiba's naming convention:
- enable-php-84-cache-quhenet.conf
- enable-php-84-cache-wordpressjc.conf
- enable-php-84-cache-blog.conf
After creation, each file's code has only one difference. The complete code is as follows:
location ~ [^/]\.php(/|$) {
    try_files $uri =404;
    fastcgi_pass  unix:/tmp/php-cgi-84.sock;
    fastcgi_index index.php;
    include fastcgi.conf;
    include pathinfo.conf;

    # FastCGI缓存配置(替换下方blog_cache为第2步创建的keys_zone值)
    fastcgi_cache blog_cache;
    fastcgi_cache_valid 200 301 302 2h;
    fastcgi_cache_use_stale error timeout updating invalid_header http_500 http_503;
    fastcgi_cache_min_uses 1;
    fastcgi_cache_lock on;
    fastcgi_cache_bypass $skip_cache;
    fastcgi_no_cache $skip_cache;

    # 忽略上游的缓存控制头(重要!)
    fastcgi_ignore_headers Cache-Control Expires Set-Cookie;

    # 添加缓存状态头部信息(用于调试)
    add_header X-FastCGI-Cache $upstream_cache_status;
    add_header X-Cache-Skip $skip_cache;
}
5. Navigate to the /www/server/panel/vhost/nginx folder and edit the corresponding virtual host configuration file.
Replace the existing line 'include enable-php-84.conf;' with the following content.
# WordPress FastCGI缓存配置 - 必须在PHP配置之前
    include /www/server/nginx/conf/wordpress-fastcgi-cache.conf;
    include enable-php-84-cache-blog.conf;
# 上面这个php文件记得修改为你网站对应的文件
6. After completing the operations, restart nginx, then test on the frontend or directly check if new folders appear in the cache directory.
How to Clear Cache
In the website Admin Dashboard, go to Plugins, click „Add New“, search for „Nginx cache“, install and activate it.

Then, enter the plugin settings and fill in the input box after 'Cache Zone Path' with your cache directory: /www/wwwroot/blog.naibabiji.com/wp-content/cache/nginx.
Working with Other Plugins
To further enhance website access speed and improve performance, we can also use it in conjunction with the following plugins.
1. Redis Object Cache
To use this plugin, first go to the Baota Panel backend, then to App Store, Installed Apps, select the PHP version your website is using, install the redis extension, and then visitors can use it.
2. Autoptimize
This plugin can compress and consolidate static resources.
There is no need to install other caching plugins because the web pages are already using Nginx FastCGI cache. Installing additional caching plugins will likely have no effect and may even cause conflicts.