
Founded in 2012, DigitalOcean aims to meet developers' needs for simple and affordable cloud computing solutions, covering a full suite of services including cloud computing, containers, Kubernetes, managed databases, storage, networking, AI/GPU inference, and security & management. In this tutorial, Naiba will teach youhow to register a DigitalOcean account, create a cloud server, and install your first website。
Why Choose DigitalOcean?
DigitalOcean is a cloud service provider that Naiba himself uses. The reasons for choosing them are simple:
- Long-standing reputation and stability, no worries about the provider shutting down or the server suddenly disconnecting;
- Rich product offerings, including AI inference and intelligent services, compute and application services, data services, networking services, and storage services. Almost all services a developer needs can be found here.
- Billing-friendly, charged by usage duration, can be used and deleted as needed.
- Global data centers, with data centers in multiple regions worldwide for convenient selection.
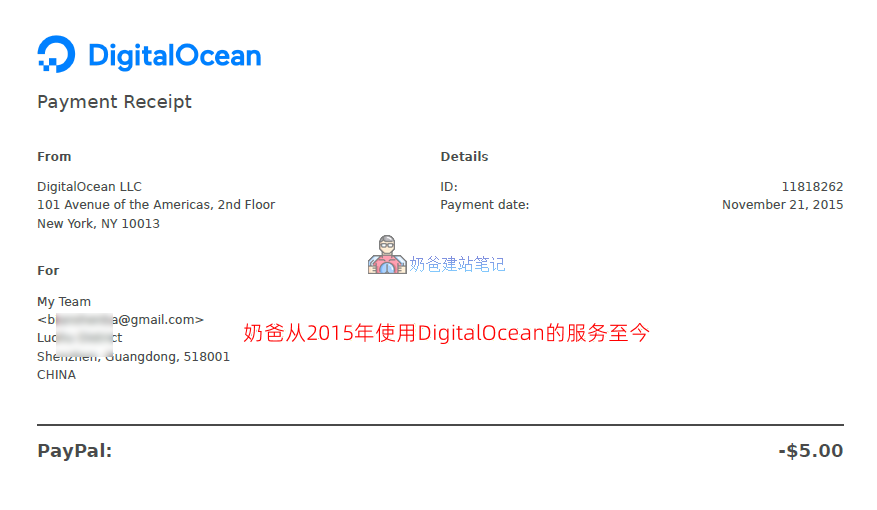
When using a cloud server to build any service, stability is the most important factor. Although there are many VPS providers cheaper than DigitalOcean on the market, few are both cheap and stable. Naiba has been using DigitalOcean's services since 2015 and has never encountered any server stability issues.
DigitalOcean vs Vultr: Which One to Choose in 2026?
When mentioning DigitalOcean, one must mentionVultr, Vultr is DigitalOcean's most direct competitor: both target developers, both have simple pricing, both are billed hourly. So how to choose between the two?
Naiba chose to use both. Currently, Naiba still uses services from both providers. However, for first-time beginners choosing between the two, you can refer to the comparison table below.
| Comparison Dimensions | DigitalOcean | Vultr | Winner |
|---|---|---|---|
| Starting Price | $4/month (512MB/10GB/500GB) | $2.50/month (512MB/10GB/500GB) | Vultr (Cheaper) |
| Number of Data Centers | 15+ Regions | 30+ Regions (including Africa, Middle East) | Vultr (Wider Coverage) |
| Control Panel Usability | Minimalist, logical, beginner-friendly | Minimalist, logical, beginner-friendly | Comparable |
| One-Click App Marketplace | 200+ Pre-configured Images | 100+ Pre-configured Images | DigitalOcean (Richer Ecosystem) |
| Bare Metal Servers | Not Supported | Supported (Bare Metal) | Vultr (High Performance Needs) |
| GPU Servers | GPU Droplets | Cloud GPU Instances | Both out of stock, tie |
| Object Storage | Supported | Supported | Tie |
| Load Balancers | $12/month | $10/month | Vultr (Slightly Cheaper) |
| API and Documentation Quality | Industry-leading documentation | Documentation is relatively brief | DigitalOcean (Better Developer Experience) |
| Payment Method | Supports Alipay | Supports Alipay | Tie |
| New User Discount | Promotion expired at time of writing | $300 Free Credit (30 days) | Vultr |
Final Recommendation:
If you value price, discounts, and more data centers, choose Vultr; (Vultr Tutorial)
If price is not a concern, data centers are sufficient, and you need more one-click installation images, choose DigitalOcean.
PS:In fact, the two are quite similar. You can simply choose whichever you prefer. Apart from being slightly more expensive than smaller vendors, there are no other issues.
DigitalOceanTutorial
After registeringDigitalOcean
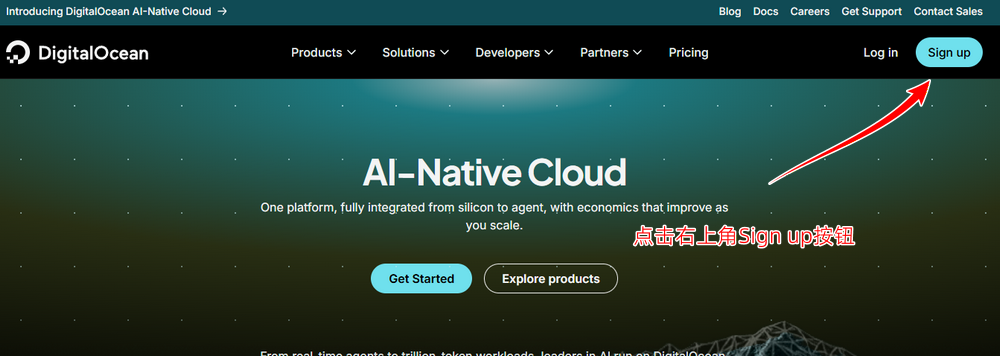
Click here to visit the DigitalOcean official website, then click the Sign up button in the upper right corner to register.
On the new registration page, you can choose to register using a Google account or a GitHub account, or directly use an email address. Naiba recommends registering with an email address, so you can log in to the DO backend even if you cannot access Google or GitHub.

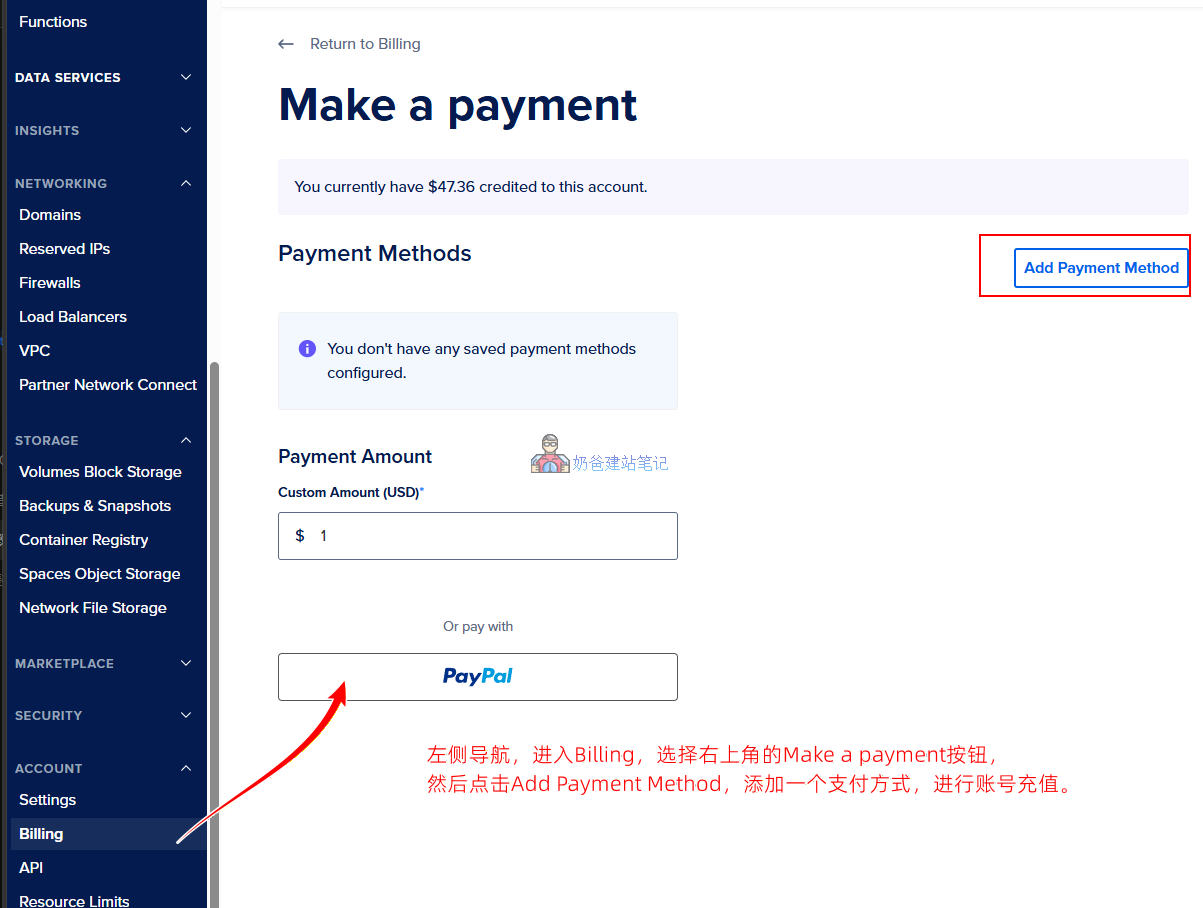
Funding Your DigitalOcean Account
After registering your account, go to the left navigation and clickBilling, select theMake a paymentbutton in the upper right corner, then on the new page clickAdd Payment Method to add a payment method and top up your account.
Payment methods include bank card, Alipay, cryptocurrency, and PayPal.
Tip: DigitalOcean charges based on usage time; no charge if not used. However, if a created service is not deleted, it will still be billed. So if you no longer need it, delete the service directly; shutting it down is still useless.
Creating Your First Droplet (Cloud Server)
DigitalOcean's term for cloud servers is Droplet, which is essentially a virtual private server (VPS). This is what we use to build websites or install other programs.
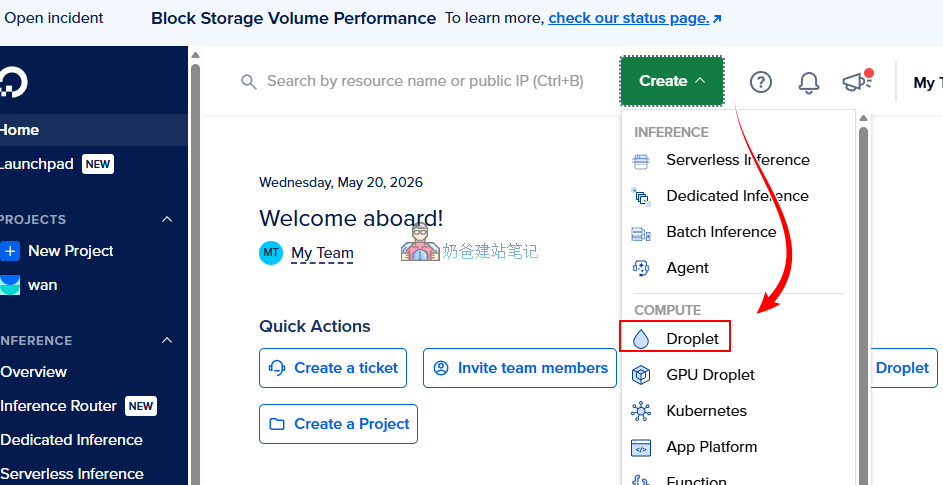
Click theCreatebutton, pop-up menu to selectDroplet。
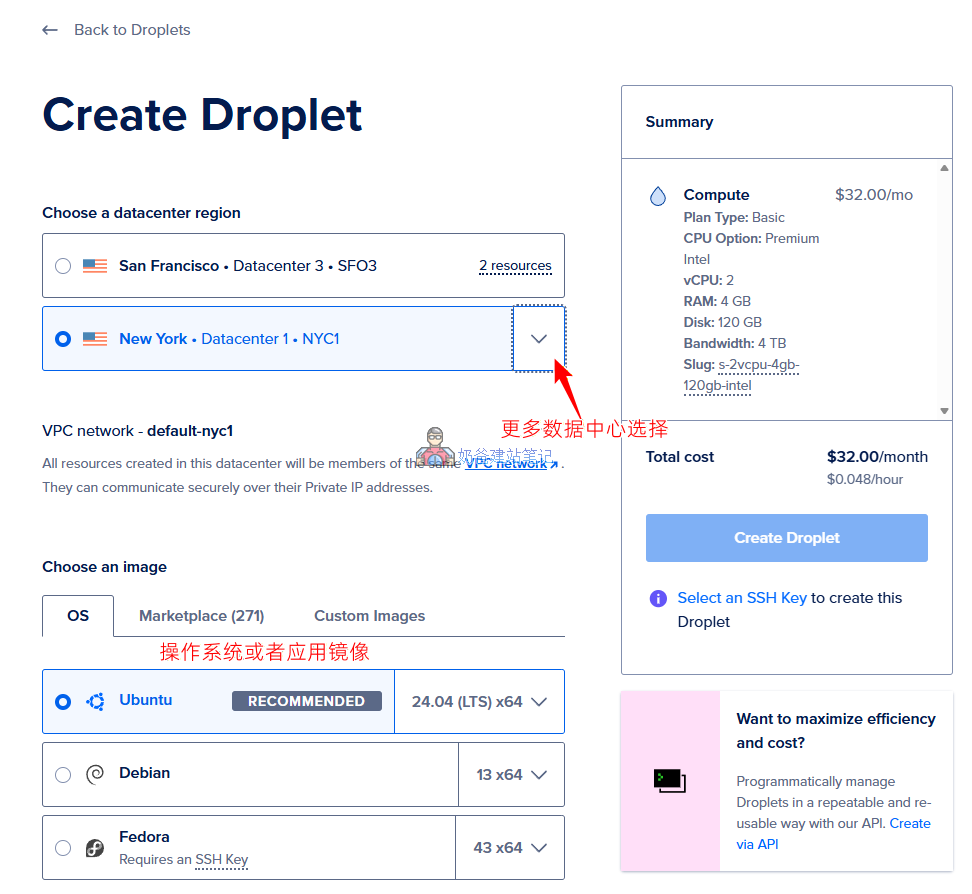
On the new interface, select the data center you need (Choose a datacenter region), then under Choose an image, select the operating system, or choose one-click installation (Marketplace)
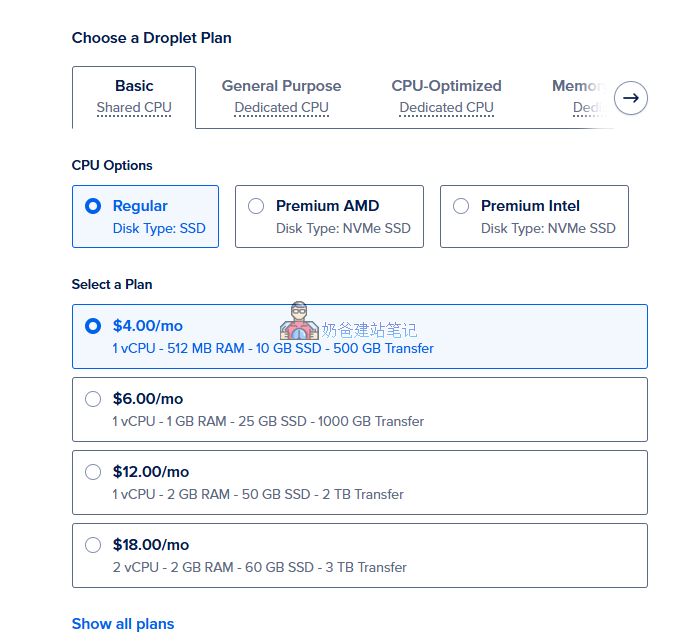
Next isChoose a Droplet Plan, select the configuration.
The plans here are divided into Basic, General Purpose, CPU-Optimized, Memory-Optimized, and Storage-Optimized
The Basic plan is the cheapest because it uses shared CPU, while the other plans use dedicated CPU.
Shared CPU means that programs on a server share the CPU's performance. Normal use is fine, but when you or other users need computing power, more CPU is temporarily allocated. If multiple users are competing for CPU at the same time, it can become very slow.
Dedicated CPU means you alone use the CPU's computing power, with no one competing with you.
For ordinary website users, the Basic plan is sufficient.Because most websites have little traffic and low resource usage, unless a website bug causes high CPU usage, you won't be affected.
For other options, such as Volumes Block Storage, Backups, Networking, Monitoring, and Additional Options, you can choose whether to add and enable them based on your actual needs.
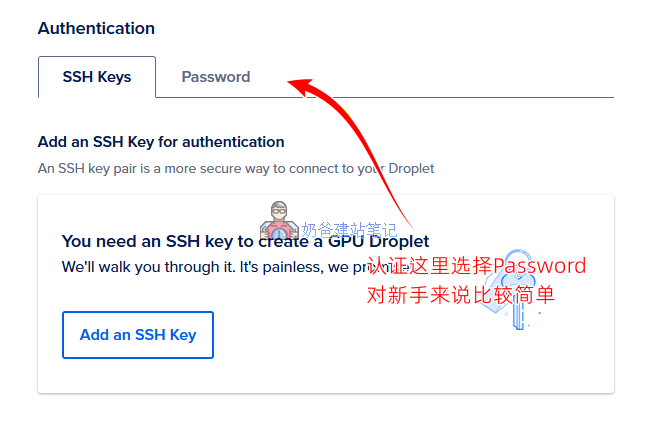
The only thing to note here is that Authentication is recommended to be set to Password; the default SSH Keys are not very user-friendly for beginners.
If you want to understand the difference between SSH Keys and Password, please refer to this article:Xshell Connection VPS Tutorial: Complete Guide to Windows Remote Login to Linux Server – Naibabiji
Deploy your websiteor application
There are two ways to deploy your website or application on DigitalOcean.
1. Directly use a ready-made application image, i.e., select Marketplace when creating the server
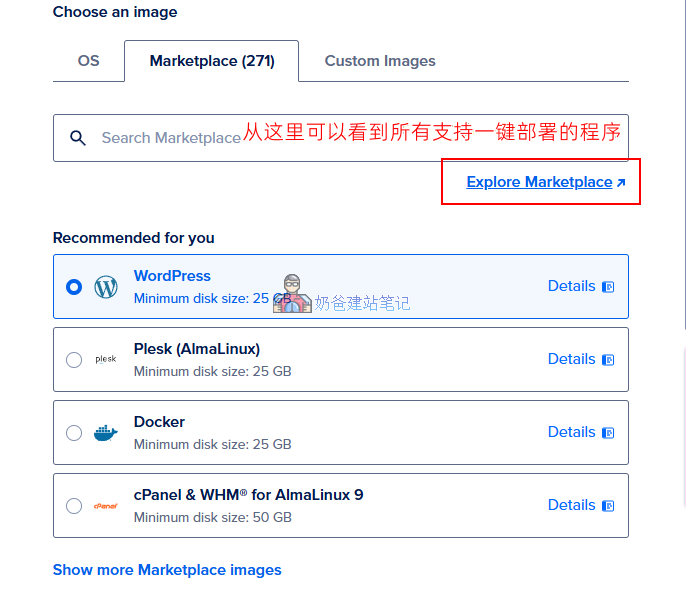
For example, choose WordPress one-click deployment.
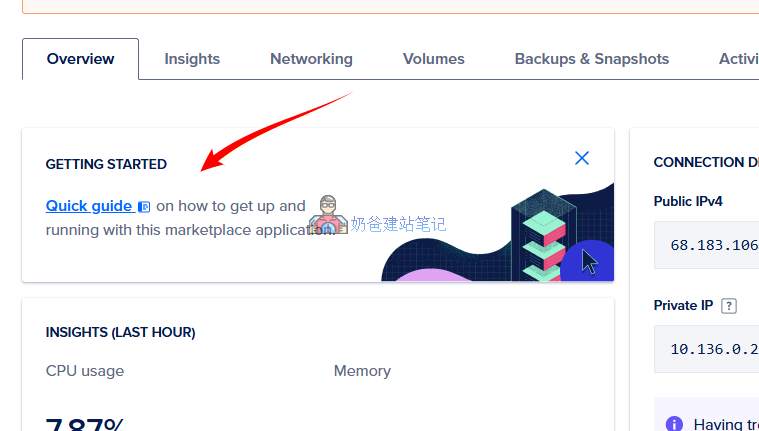
After creation, click Quick guide on the server details page to view the application's usage documentation, which explains how to manage and access your WordPress site, how to bind a domain name, etc.
2. Manually create, for example, through Baota Panel
The one-click installed application is just a single website by default. If you want to install multiple websites on one server, using Baota Panel is more user-friendly for beginners.
Naiba Web Development has already provided detailed tutorials on this topic, so please refer to the documentation below.
How to Modify Configuration or Delete a Server, etc.
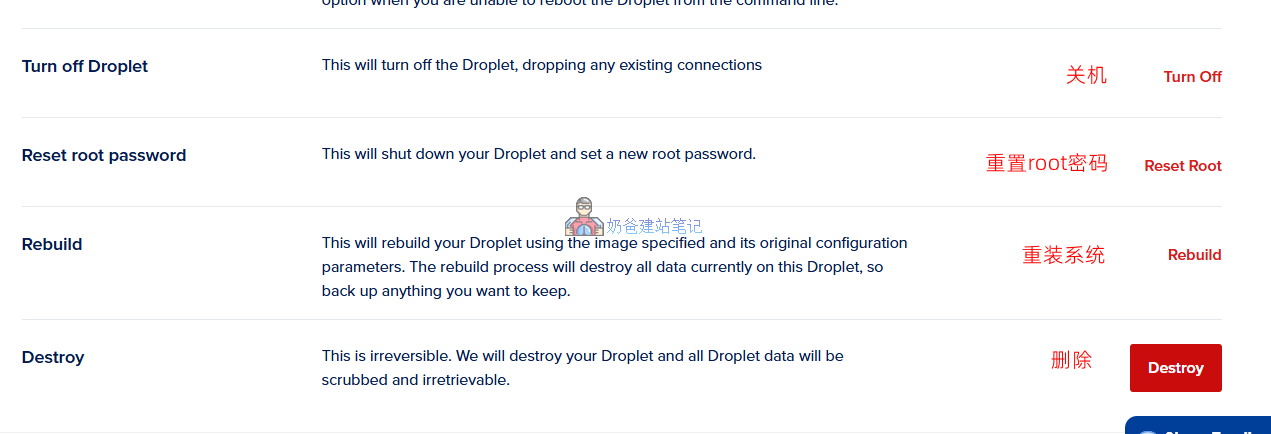
During use, when you need to upgrade server configuration, change the root password, or delete the server, you can do so by entering the Settings interface on the server details page.
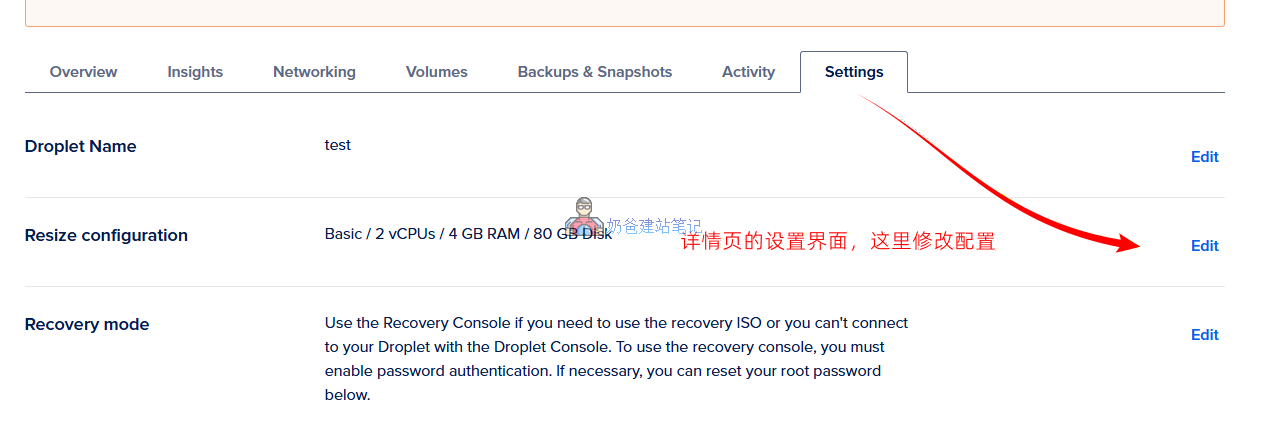
Resize configurationThis is the option to adjust configuration. Usually, you can only upgrade but not downgrade, because the hard disk capacity can only be increased, not decreased.
RebuildThis means reinstalling the system. If you selected Marketplace when creating, the reinstallation can only be done from Marketplace.
DestroyThis means deleting the server. After deletion, you will no longer be charged.