You've painstakingly followedWordPress Tutorialsto build your own independent website and installed a Theme, only to end up with a headache trying to modify the Theme's styles. Don't know CSS code, want to adjust website font color, navigation bar style, page spacing but don't know where to start? Worried that modifying code will break the original Theme and crash your site?
Today, Naiba shares a beginner-friendly Plugin with everyone –CSS Hero, no coding knowledge needed, just click to customize WordPress Theme in real-time, easily solving all problems like „how to change WordPress styles“ and „how to replace Theme colors“. Even beginners can quickly get started and create a unique, high-quality website.
Preparations
Plugin Introduction
CSS Hero is a visual CSS editor specifically designed for WordPress users. Its core advantages are „zero code, real-time preview, non-destructive editing“. No professional coding knowledge is required, and there„s no need to worry about damaging the original Theme files. Whether it“s a personal blog, corporate website, or e-commerce site, you can quickly customize styles with it. It perfectly adapts to all mainstream WordPress Themes like Astra, Divi, Avada, solving all the pain points beginners have when modifying Theme styles.
CSS Hero Installation and Activation
CSS Hero is a paid Plugin, so you need to purchase it before you can install it.
Official Price: $29/year/1 site; $59/year/5 sites; $199/year/999 sites.
After purchase, download the installation package and install the Plugin following the steps below.
- Step 1: Go to the WordPress Admin Dashboard, click „Plugins“ → „Add New“ on the left;
- Step 2: Select "Upload Plugin", then upload the installation package you just downloaded;
- Step 3: After installation is complete, click „Activate“. After activation, the plugin activation authorization button will automatically appear. Click it to authorize and activate;
First Look at the Interface
After the plugin is enabled and activated, you can see the CSS HERO entry in the Admin Bar. Click it to enter the editing interface.

The image below shows the CSS HERO editing interface. The left side is the CSS property panel, and the right side is the preview area for your website's frontend effects.
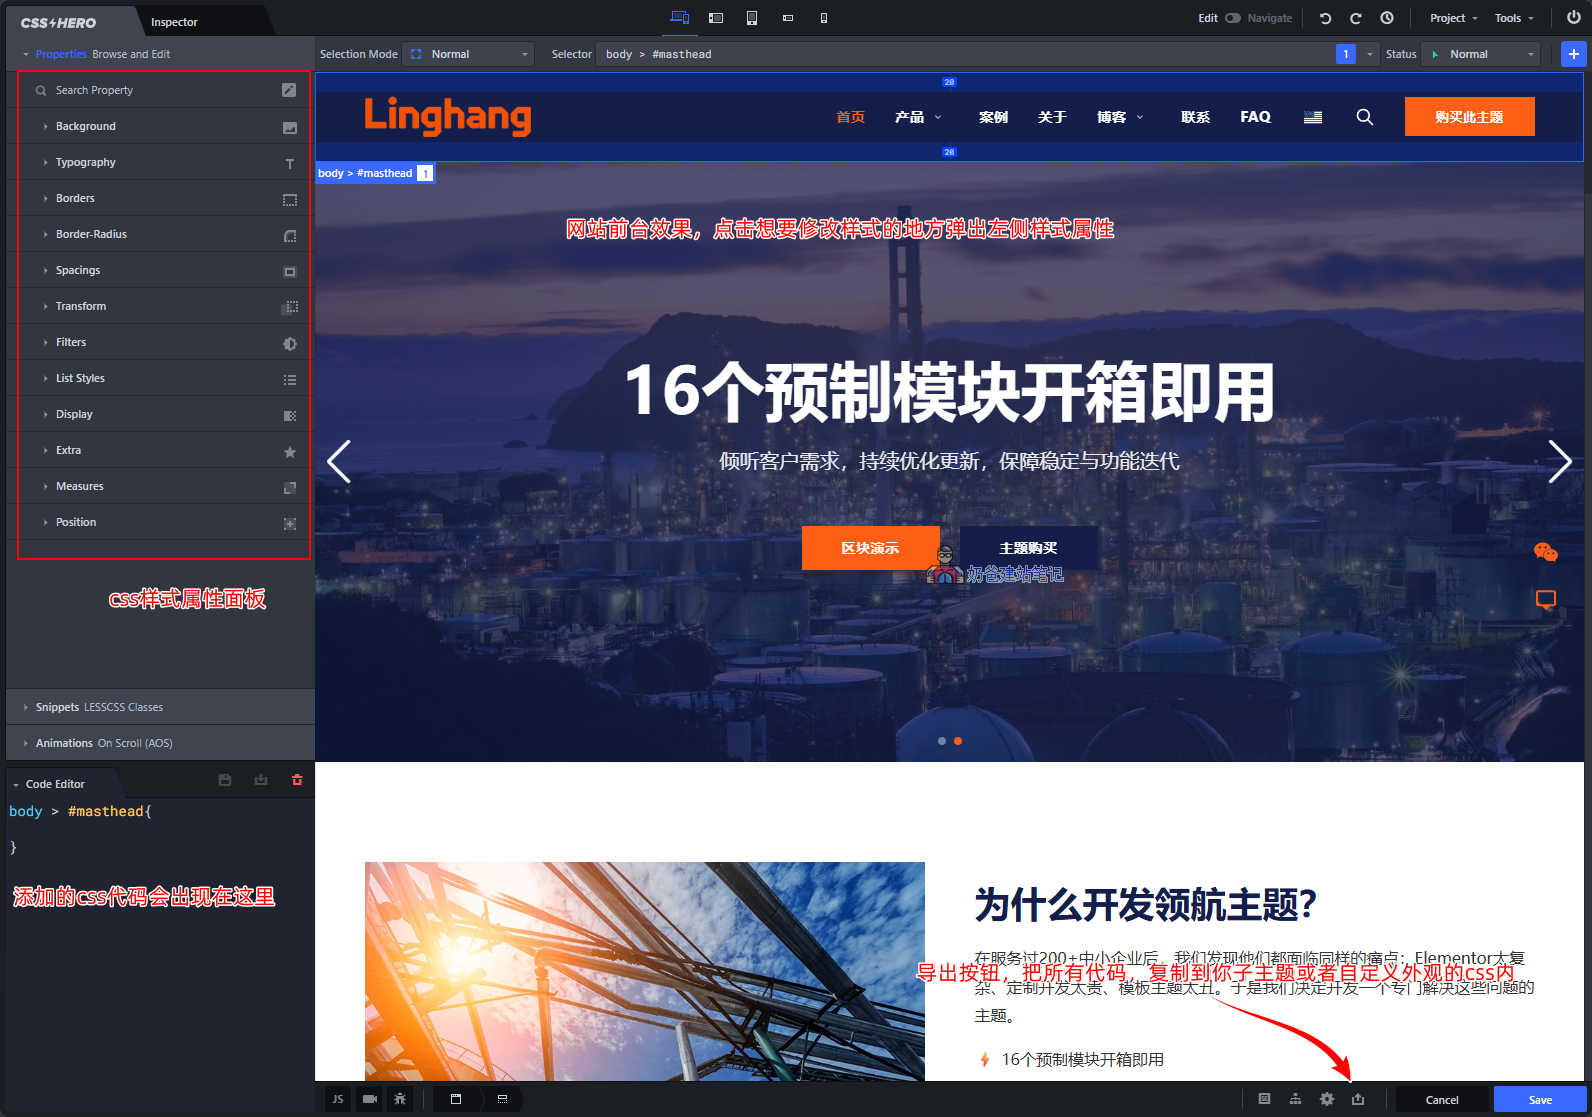
Click anywhere you want to modify the style, and then you can adjust the effect in the property panel on the left.
CSS HERO Chinese-English Reference
CSS HERO is only available in English and does not support localization. Therefore, Naiba will first provide a Chinese-English comparison of the CSS property panel here. Combined with the icons later, you will remember the function of each item after using it a few times.
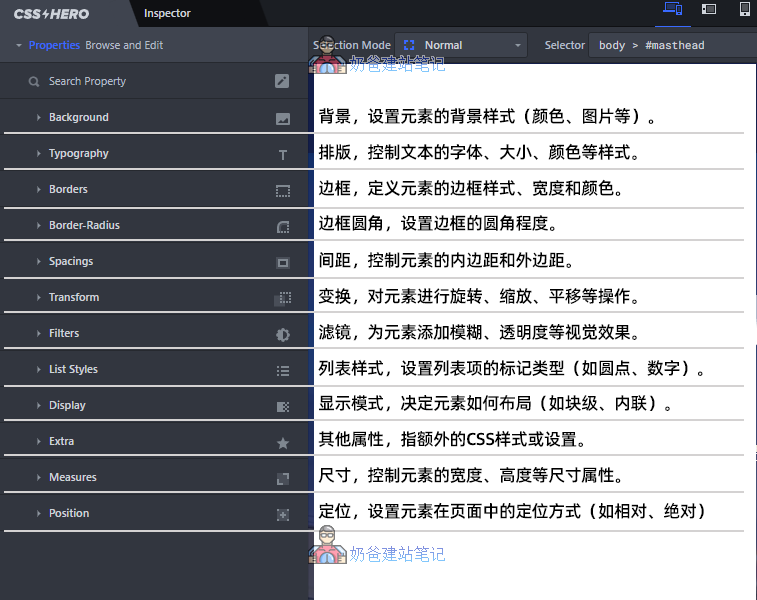
- Background – Sets the background style of an element (color, image, etc.).
- Typography – Controls the font, size, color, and other styles of text.
- Borders – Defines the border style, width, and color of an element.
- Border-Radius – Sets the roundness of element borders.
- Spacings – Controls the padding and margin of an element.
- Transform – Performs operations such as rotation, scaling, and translation on an element.
- Filters – Add visual effects like blur and transparency to elements.
- List Styles – Set the marker type for list items (e.g., dots, numbers).
- Display – Determines how an element is laid out (e.g., block, inline).
- Extra – Additional CSS styles or settings.
- Measures – Control element dimensions such as width and height.
- Position – Sets the positioning method for an element (e.g., relative, absolute).
Below is theAnimationsinterface's Chinese-English correspondence and explanation.
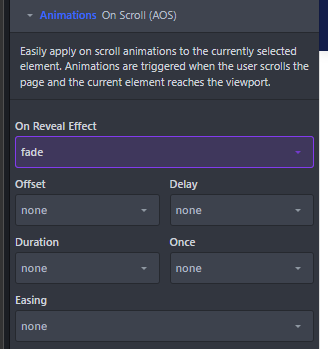
On Reveal Effect
- Function: A common interactive animation mode that triggers playback only when an element scrolls into the browser viewport. It is mainly used to enhance the scrolling experience of a page, presenting content dynamically as it comes into view.
Offset – Trigger offset
- Function: Defines the precise timing for triggering the „On Reveal Effect“. Usually a value between 0 and 1, representing the proportion of the element entering the viewport. For example,
offset: 0.3indicates that the animation starts when 30% of the element has entered the viewport.
Delay
- Function: Sets the waiting time before the animation starts playing. Used to stagger the start times of multiple animations, creating a sequenced entry effect.
Duration
- Purpose: Defines the total time the animation takes from start to finish. A short duration makes the animation fast and crisp; a long duration makes it slow and smooth.
Once – Execute once
- Purpose: A boolean value (true/false) that controls whether the animation plays only once.
true: The animation plays only the first time the element enters the viewport; subsequent scrolling does not trigger it.falseor Not Set: The animation may retrigger each time the element enters/leaves the viewport.
Easing – Easing function
- Purpose: Defines the speed change curve during the animation, a key parameter affecting the animation„s “feel„. It determines whether the animation is linear, starts fast and ends slow, starts slow and ends fast, etc., making it more intuitive to physics rather than rigid mechanical motion.
- Common Values:
ease(default, accelerates then decelerates),linear(linear),ease-in(slow to fast),ease-out(fast to slow),ease-in-out(slow-fast-slow).
- Common Values:
Core Practical Operations
Practice 1: Modify WordPress Font Color Without Code
Step 1: After entering the CSS HERO editing interface, select the text element whose color we want to modify.
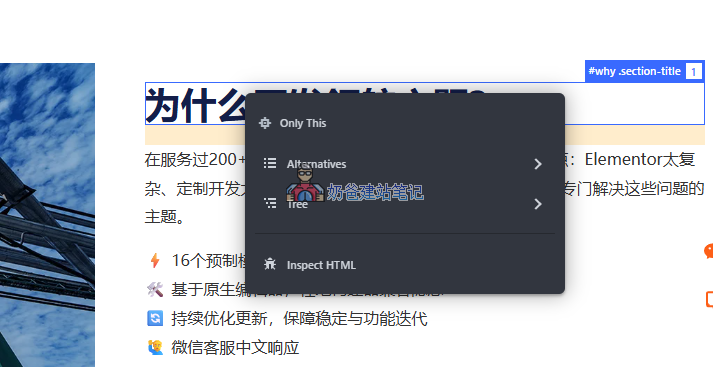
Note: Ifyou only want to change the font color in this one place, thenright-clickand selectOnly This。
Step 2: In the left style panel, select Typography, then choose Color to adjust the color. The right side allows for real-time preview.
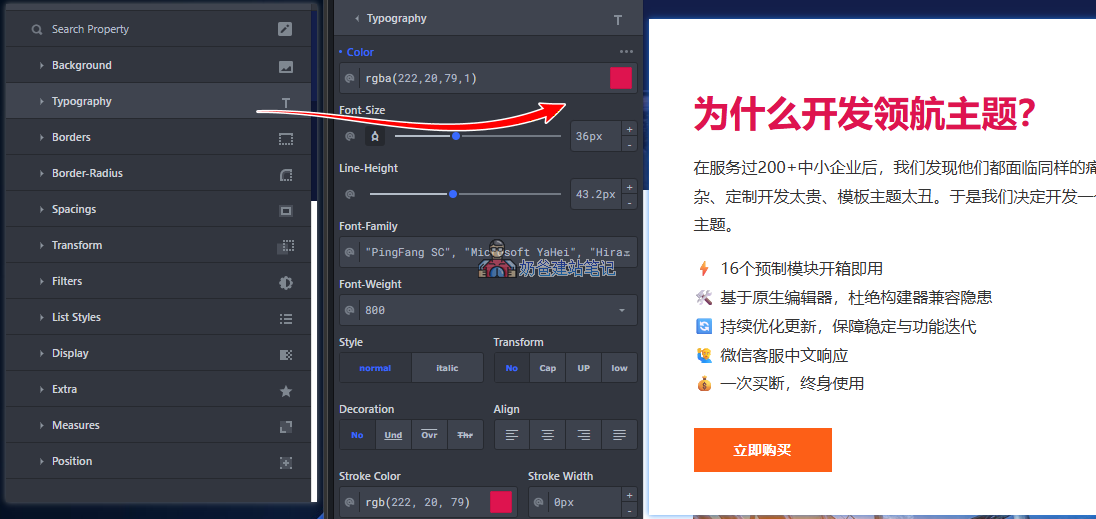
If satisfied with the changes, you can click the Save button in the bottom right corner to save. This makes it convenient to revert to this step later from the history icon in the top right corner if you make a mistake.
Other English equivalents in the Typography editing interface:
- Color
- Font-Size
- Line-Height
- Font-Family
- Font-Weight
- Style – Options: normal and italic
- Transform – Text transformation: Cap (capitalize first letter), UP (uppercase), low (lowercase)
- Stroke Color
- Stroke Width
- Letter-Spacing – Controls the space between characters (letters, numbers, individual Chinese characters).
- Word-Spacing – Controls the space between words (or space-separated phrases).
- Text-Shadow
In the section below,SnippetsThese are pre-made CSS snippets provided by the plugin author that you can directly apply. For example, select a Buttons element, then Set Params… to change your site's buttons to match the snippet's effect.
At the very bottom,Animationsare animation effects. After setting an element animation, it will appear when the browser scrolls to the corresponding element.
Practice 2: Modify WordPress Navigation Bar Style

Step 1: Enter the CSS Hero editing interface, click „Select Element“, and select the navigation bar (you can click on the navigation text or the navigation background).
Step 2: The style panel will pop up. You can adjust three core settings as needed:
① Navigation background color: Find „Background Color“, select a suitable color. For example, we changed the navigation background of theLinghang Themeto white.
② Navigation text style: Adjust the font, font size, letter-spacing, and the text color on hover (when the mouse hovers).
③ Navigation spacing: In the „Spacing Settings“, adjust the padding and margin between navigation items to optimize the layout.
Practice 3: Adjust WordPress Page Spacing
For example, if we want to adjust the blank space between two sections (such as between body paragraphs, images, or modules), we can follow the steps below to set it up.
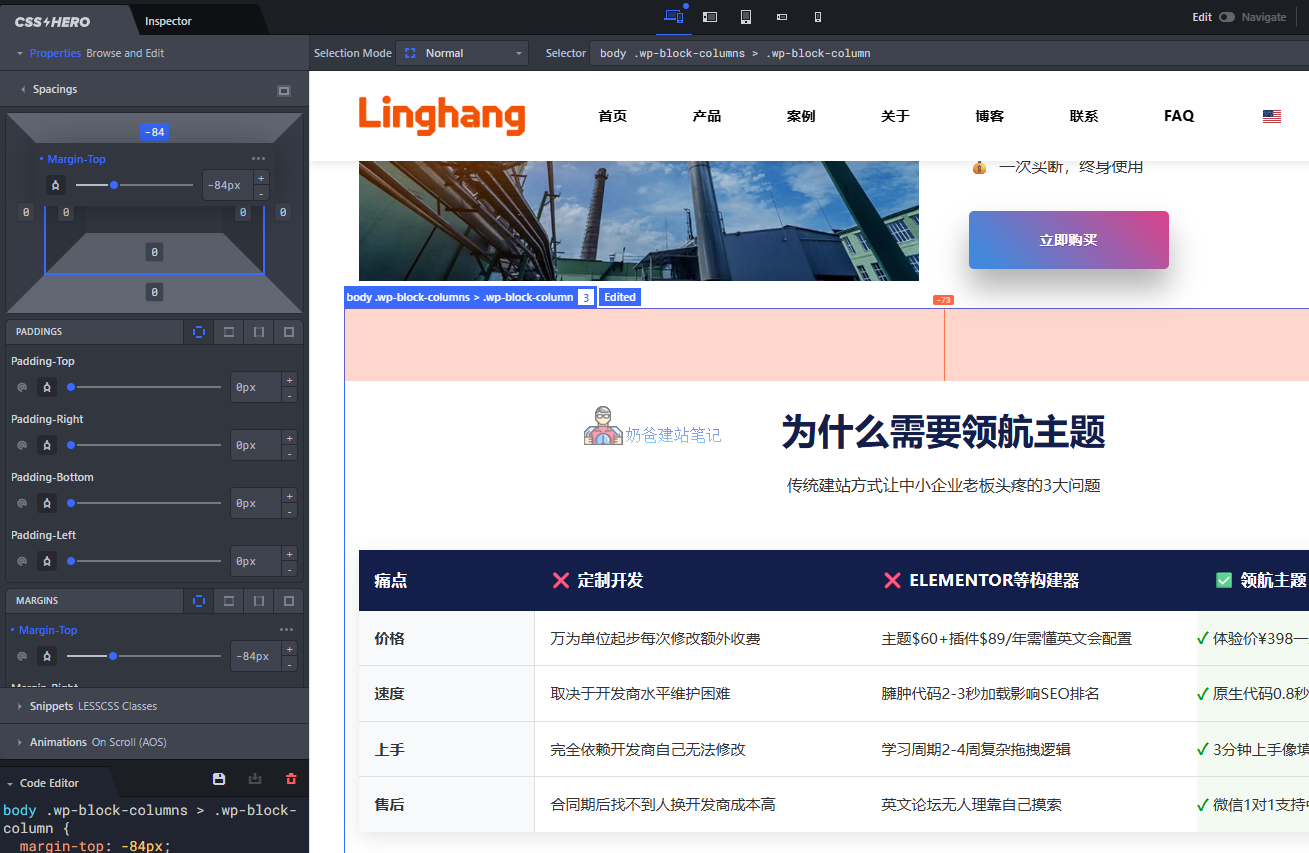
Step 1: Enter the CSS Hero editing interface, click „Select Element“, and select the area where you need to adjust the spacing (such as between body paragraphs, images, or modules).
Step 2: Find „Spacing Settings“ in the style panel.
Step 3: Drag the numerical slider or directly input a value to preview the spacing effect in real-time, avoiding it being too wide or too narrow.
Spacing Terminology Explanation:
Adjusting spacing is divided into inner spacing and outer spacing. In the following diagram, taking the blue box as the center:
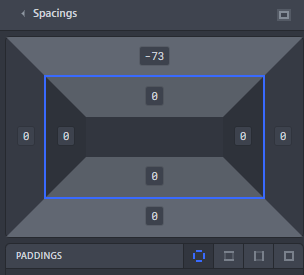
① Padding: The spacing inside the element (e.g., the distance between paragraph text and its border).
② Margin: The spacing between the element and other elements (e.g., the distance between two paragraphs).
Practice 4: Responsive Style Adjustments
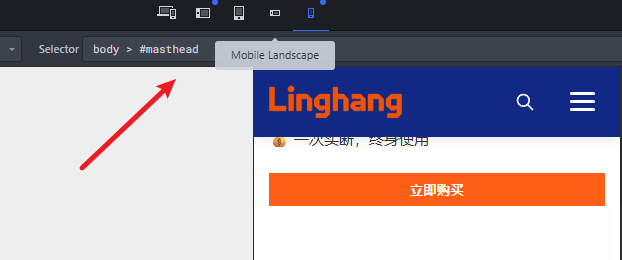
Step 1: Enter the CSS Hero editing interface, click the „Responsive View“ at the top.
Step 2: Switch view modes (Desktop, Tablet, Mobile). The styles for different devices will be displayed in real-time.
Step 3: For the mobile view, focus on adjusting three points: Font size (avoid being too small to read), Navigation bar style (adapt to the mobile screen, you can set a dropdown menu), and Spacing (avoid crowded elements).
Step 4: Switch between different views, check the style adaptation effect one by one to ensure proper display on all devices.
Practice 5: Apply Styles Modified with CSS HERO
After we adjust the styles in the CSS HERO editing interface and click the Save button, returning to the website frontend, we may find the changes have not taken effect. This is because we haven't yet added the modified style code into our Theme. There are multiple methods to complete the CSS HERO code loading.
Step 1: Click the export button in the lower right corner and copy the CSS code we have adjusted.
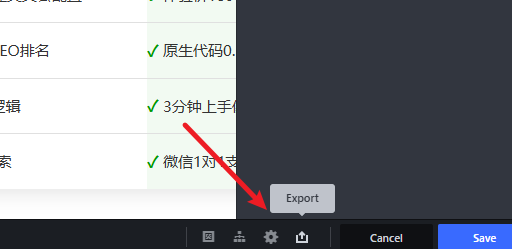
Step 2: Copy the CSS code generated by CSS HERO.
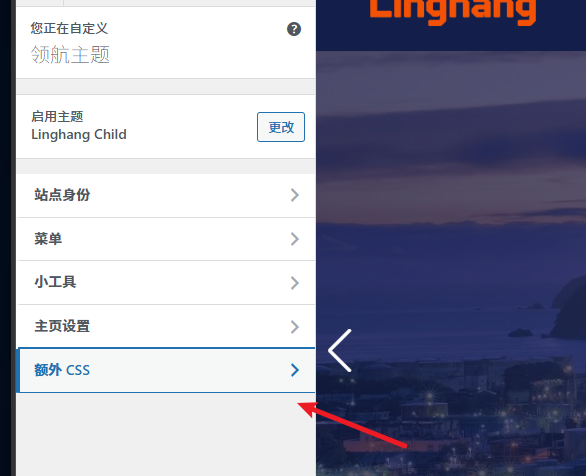
Step 3: Return to the website's Admin Dashboard,Appearancemenu -Customize, and paste the code you copied into theAdditional CSSsection.
Other Methods:
If you have installed a Child Theme, you can also directly paste these CSS codes into the Child Theme.
If you have installed some plugins for inserting code, you can also add them to the plugin. However, relatively speaking, the Additional CSS in the Customizer is the most convenient method for novice users.
Frequently Asked Questions
Is CSS Hero compatible with my WordPress Theme?
Fully compatible! CSS Hero is compatible with all mainstream WordPress Themes (including popular themes like Astra, Divi, Avada, etc.) and supports all commonly used Plugins, so there's no need to worry about compatibility issues.
Will using CSS Hero to modify styles damage the original Theme files?
No! CSS Hero uses a non-destructive editing mechanism. All modifications will not alter the core code of the original Theme. If the modified interface becomes disordered, simply delete the added CSS code to restore it.
Will the modified styles be lost after updating the WordPress Theme?
No, styles added via the Additional CSS section or a Child Theme will not be lost due to Theme updates.
Can a complete beginner learn it?
Absolutely! The CSS Hero interface is simple and intuitive, with fully visual operations requiring no coding knowledge. Following the practical steps in this tutorial, you can get started in 10 minutes and easily modify your website's styles.
Can CSS HERO be deleted after use?
Yes, after the CSS code generated by CSS HERO is added to your Theme, you can delete or deactivate CSS HERO. It will not occupy additional website resources or impact performance; it's green and pollution-free.
Summary
After reading this tutorial, I believe you have mastered the core usage of CSS Hero – without a single line of code, you can easily solve all Theme customization needs such as „How to change font color in WordPress,“ „How to adjust page spacing,“ and „Modify navigation bar styles.“
As a beginner-friendly WordPress style modification Plugin, CSS Hero is not only simple to operate and safe/non-destructive but also enables full-dimensional style control. Whether you are a complete novice, a self-media blogger, an enterprise operator, or a web development professional, you can use it to quickly create a personalized, high-quality website.
If you are still blocked by the coding barrier and worried about damaging your website by modifying styles, quickly install CSS Hero, follow the tutorial, easily handle WordPress Theme customization, and make your website stand out among many similar sites!