
Vultr is a top-tier cloud server provider founded in 2014, with over 30 data centers globally. Naiba has been using it since the early days of website building in 2015, and it has accompanied me for over 10 years to this day.
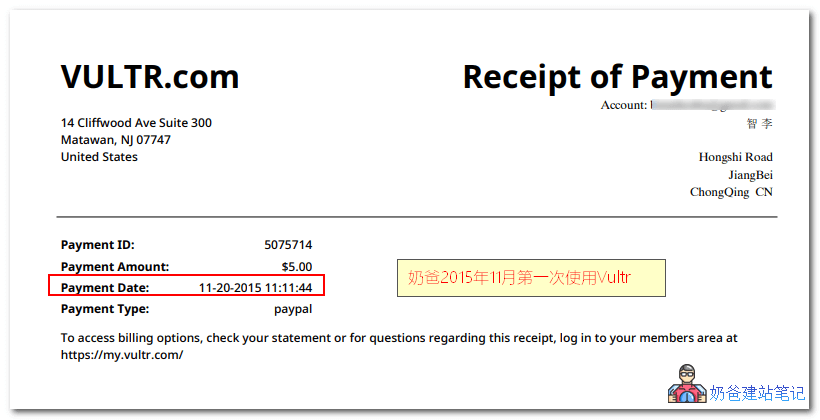
In this era where „annual plans for $10“ cheap VPSes are everywhere, many people might think Vultr„s price (starting at $5/month) is too expensive. But what Naiba wants to emphasize is—You get what you pay for. The risks of overselling, downtime, and providers disappearing with cheap vendors are fatal for those truly planning long-term projects.
The money saved on server budgets is often repaid many times over through website downtime repairs, SEO ranking drops, and user loss.
Choosing a reliable major provider like Vultr means you're not just buying computing resources, but alsothe peace of mind of not being disturbed and not needing to worry about operations. Stable infrastructure allows you to focus 100% of your energy on running your business, acquiring traffic, and content creation. This is why in 2026, I still recommend it forForeign Trade Independent Websites, Medium-to-Large Blogs, Serious Commercial Projectsthe preferred recommendation.
Vultr's Advantages
1. Ultimate Service Stability and Performance
Naiba's longest-running server purchased on Vultr has been online for nearly 4 years without a reboot (configured with 1 CPU core, 1GB RAM, running a WordPress + WooCommerce website). The eventual reboot was due to Vultr's official hardware maintenance, demonstrating the machine's stability.
For a website intended to be profitable (e.g., a corporate website), the most important point is稳. If the website is frequently inaccessible or the server is laggy, the losses will outweigh the gains.
Although there are many low-cost VPS options now (e.g., $10 per year), you must believe that you get what you pay for. VPS, like computers, compete on hardware. Vultr uses all new hardware, while cheap VPS almost always use outdated hardware configurations. (Refer to the later Vultr evaluation section.)
2. Global Data Center Coverage, Boosting Foreign Trade Expansion
Vultr currently has 30+ backbone data center nodes worldwide, spanning the Americas, Europe, Australia, and Asia. This is extremely beneficial forForeign Trade Independent Website。
- If your customers are in North America: choose New York or Silicon Valley.
- If your customers are in Europe: choose Frankfurt, Germany, or London. Having the serverclose to your customerscan greatly reduce website loading latency and directly increase the order conversion rate!
(Note: The speed of Vultr's regular routes for direct connections from mainland China is average. If you are building a Chinese website, unwilling to use domestic hosting after ICP filing, and have extremely stringent speed requirements, it is more recommended to purchase a machine withBandwagonHost CN2 GIA/AS9929 routes. It's expensive, but it loads instantly within China.)
3. Hourly Billing, Not a Penny Wasted
Vultr adopts aHourly Billingmodel. Similar to mobile phone top-ups, you are charged for the hours used. Charges stop immediately when you delete (Destroy) the machine. This is extremely friendly for beginners! For testing, practicing, running temporary scripts, or if the assigned IP is blocked, you can simply delete it and create a new machine, with a potential loss of less than $0.01.
Moreover, Vultrsupports Alipay payment, which significantly lowers the barrier for domestic webmasters without dual-currency credit cards.
Vultr Review: How to Choose a VPS for Legitimate Business
To help everyone understand the meaning of 'you get what you pay for' and the performance gap between a VPS costing a few dollars per year and one costing a few dollars per month, Naiba specifically compared his $6/year Dedirock machine with a $6/month Vultr machine for testing. (Low configurations were chosen for this test. For legitimate business operations, Naiba believes purchasing a VPS costing within $15 per month is reasonable and an affordable cost.)
---------------------基础信息查询--感谢所有开源项目----------------------
 CPU 型号          : QEMU Virtual CPU version 2.5+
 CPU 核心数        : 1
 CPU 频率          : 2200.000 MHz
 CPU 缓存          : L1: 32.00 KB / L2: 4.00 MB / L3: 16.00 MB
 AES-NI指令集      : ❌ Disabled
 VM-x/AMD-V支持    : ❌ Disabled
 内存              : 388.54 MiB / 1.44 GiB
 Swap              : 78.21 MiB / 2.00 GiB
 硬盘空间          : 6.49 GiB / 24.44 GiB
 启动盘路径        : /dev/vda1
 系统在线时间      : 104 days, 19 hour 59 min
 负载              : 0.61, 0.27, 0.10
 系统              : Debian GNU/Linux 12 (bookworm) (x86_64)
 架构              : x86_64 (64 Bit)
 内核              : 6.1.0-39-cloud-amd64
 TCP加速方式       : cubic
 虚拟化架构        : KVM
 NAT类型           : Full Cone
 IPV4 ASN          : AS36352 HostPapa
 IPV4 位置         : Los Angeles / California / US
------------------------CPU测试--通过sysbench测试-------------------------
 -> CPU 测试中 (Fast Mode, 1-Pass @ 5sec)
 1 线程测试(单核)得分: 		553 Scores
--------------------内存测试--感谢lemonbench开源----------------------------
 -> 内存测试 Test (Fast Mode, 1-Pass @ 5sec)
 单线程读测试:		9624.65 MB/s
 单线程写测试:		9497.32 MB/s
----------------------磁盘fio读写测试--感谢yabs开源-----------------------
Block Size | 4k            (IOPS) | 64k           (IOPS)
  ------   | ---            ----  | ----           ----
Read       | 18.83 MB/s    (4.7k) | 241.41 MB/s   (3.7k)
Write      | 18.84 MB/s    (4.7k) | 242.68 MB/s   (3.7k)
Total      | 37.67 MB/s    (9.4k) | 484.10 MB/s   (7.5k)
           |                      |
Block Size | 512k          (IOPS) | 1m            (IOPS)
  ------   | ---            ----  | ----           ----
Read       | 577.90 MB/s   (1.1k) | 748.36 MB/s    (730)
Write      | 608.60 MB/s   (1.1k) | 798.20 MB/s    (779)
Total      | 1.18 GB/s     (2.3k) | 1.54 GB/s     (1.5k)
---------------------自动更新测速节点列表--本脚本原创----------------------
位置		 上传速度	 下载速度	 延迟
Speedtest.net	 253.57Mbps	 822.97Mbps	 1.22ms
联通上海5G	 13.90Mbps	 38.44Mbps	 178.40ms
电信Suzhou5G	 1.18Mbps	 34.42Mbps	 139.87ms
移动Suzhou	 0.39Mbps	 0.09Mbps	 243.75ms
------------------------------------------------------------------------
 总共花费      : 4 分 15 秒
 时间          : Fri Mar 20 17:00:45 CST 2026
------------------------------------------------------------------------
---------------------基础信息查询--感谢所有开源项目----------------------
 CPU 型号          : Intel Core Processor (Skylake, IBRS)
 CPU 核心数        : 1
 CPU 频率          : 3791.996 MHz
 CPU 缓存          : L1: 32.00 KB / L2: 4.00 MB / L3: 16.00 MB
 AES-NI指令集      : ✔ Enabled
 VM-x/AMD-V支持    : ❌ Disabled
 内存              : 214.17 MiB / 954.93 MiB
 Swap              : 0 KiB / 3.03 GiB
 硬盘空间          : 6.14 GiB / 29.48 GiB
 启动盘路径        : /dev/vda2
 系统在线时间      : 0 days, 0 hour 4 min
 负载              : 0.22, 0.13, 0.06
 系统              : Debian GNU/Linux 12 (bookworm) (x86_64)
 架构              : x86_64 (64 Bit)
 内核              : 6.1.0-43-amd64
 TCP加速方式       : bbr
 虚拟化架构        : Microsoft Hyper-V
 NAT类型           : Port Restricted Cone
 IPV4 ASN          : AS20473 The Constant Company, LLC
 IPV4 位置         : Elk Grove Village / Illinois / US
------------------------CPU测试--通过sysbench测试-------------------------
 -> CPU 测试中 (Fast Mode, 1-Pass @ 5sec)
 1 线程测试(单核)得分: 		607 Scores
--------------------内存测试--感谢lemonbench开源----------------------------
 -> 内存测试 Test (Fast Mode, 1-Pass @ 5sec)
 单线程读测试:		11666.30 MB/s
 单线程写测试:		10061.02 MB/s
----------------------磁盘fio读写测试--感谢yabs开源-----------------------
Block Size | 4k            (IOPS) | 64k           (IOPS)
  ------   | ---            ----  | ----           ----
Read       | 131.03 MB/s  (32.7k) | 626.61 MB/s   (9.7k)
Write      | 131.38 MB/s  (32.8k) | 629.91 MB/s   (9.8k)
Total      | 262.42 MB/s  (65.6k) | 1.25 GB/s    (19.6k)
           |                      |
Block Size | 512k          (IOPS) | 1m            (IOPS)
  ------   | ---            ----  | ----           ----
Read       | 652.88 MB/s   (1.2k) | 684.04 MB/s    (668)
Write      | 687.57 MB/s   (1.3k) | 729.60 MB/s    (712)
Total      | 1.34 GB/s     (2.6k) | 1.41 GB/s     (1.3k)
---------------------自动更新测速节点列表--本脚本原创----------------------
位置		 上传速度	 下载速度	 延迟
Speedtest.net	 1110.89Mbps	 6717.59Mbps	 1.01ms
------------------------------------------------------------------------
 总共花费      : 3 分 28 秒
 时间          : Gum Cig 20  9:26:38 saaku UTC 2026
------------------------------------------------------------------------
You might not fully understand the一大堆 parameters above, so let's have Doubao help analyze the performance of these two machines.
Core Performance Real-World Test Gap
1. CPU: Vast Differences in Computing Power and Instruction Sets
- Dedirock: QEMU virtual CPU,AES-NI/VM-x fully disabled, single-core score 553, frequency 2.2GHz, weak computing power and no support for encryption acceleration.
- Vultr: Intel Skylake physical-level CPU,AES-NI Enabled, single-core benchmark score 607, frequency 3.79GHz, faster computation, compatible with encryption tasks.
2. Memory: Overstated capacity is less practical than bandwidth
- Dedirock: Advertised 1.5G, read/write speed 9624/9497 MB/s, high Swap usage, actual available memory is tight.
- Vultr: Advertised 1G, read/write speed 11666/10061 MB/s, higher memory bandwidth, smoother program response.
3. Disk: The most significant disparity, determining business smoothness
- Dedirock: 4K read/write only 18.83MB/s, IOPS 4.7k, extremely slow small file read/write, causing severe lag for website building / running services.
- Vultr: 4K read/write 131.03MB/s, IOPS 32.7k,performance is 7 times that of the annual fee machine, NVMe SSD high IOPS supports high concurrency.
4. Network: Domestic accessibility differs drastically between the two machines
- Dedirock: Los Angeles standard route, China Unicom download 38.44Mbps, China Telecom 34.42Mbps,China Mobile only 0.09Mbps, nearly disconnected, latency 139-243ms, TCP uses cubic with no acceleration.
- Vultr: Chicago premium bandwidth, local speed test at 10Gbps level, balanced access across three major ISPs, BBR acceleration enabled, lower latency, less packet loss.
5. Stability and Virtualization: Overselling vs. Pure Resources
- Dedirock: KVM virtualization butSeverely Oversold, high load after 100 days of uptime, high IP risk, and no formal after-sales support.
- Vultr: Hyper-V virtualization,No Overselling, extremely low load on new startup, clean IPs, supports hourly billing and ticket-based after-sales support.
Where Does the $6/Month Premium Go? The Premium is All Hard Value
- Hardware Not Downgraded: Physical-level CPU, hardware acceleration enabled, NVMe high IO storage, no false labeling or feature cuts.
- Dedicated Network: Premium bandwidth + triple-network optimization, BBR acceleration, accessible on China Mobile / China Telecom / China Unicom networks, no peak-hour throttling.
- No overselling guarantee: Eliminates „neighbor resource contention,“ maintains high load without downtime, suitable for 7×24 hour operations.
- Legitimate service: Established provider, ticket-based support, clean IPs, comprehensive refund policy, full compliance.
- Long-term stability: No malicious price hikes upon renewal, no risk of provider disappearance, safe for production environments.
Legitimate Business VPS Selection Guide
- Reject ultra-low-cost annual plans: Plans below $10/year are typically oversold, with severely downgraded hardware/network, guaranteed to crash your service.
- Verify core hardware: Must have AES-NI enabled, 4K disk IOPS ≥ 10000, memory read/write speed ≥ 10000MB/s.
- Test all three networks: Download speeds ≥ 10Mbps on China Unicom / China Telecom / China Mobile, latency < 180ms, supports BBR acceleration.
- Choose established, legitimate providers: Prioritize Vultr, DigitalOcean, etc., with support, SLA guarantees, and clean IPs.
- Match business scenarios: For toys/testing, choose cheap annual plans; for website building, API services, and cross-border business, opt for monthly-paid regular servers.
- Virtualization priority: Choose KVM/Hyper-V, avoid oversold architectures like OpenVZ.
Summary
A $6/year VPS is a „barely usable“ testing toy,completely unable to support legitimate business; every extra cent for a $6/month VPS is spent on performance, network, stability, and compliance.
For legitimate business, don't chase low prices. Choose monthly-paid regular servers to avoid pitfalls like downtime, IP blocking, and unresponsive support. (Naiba has even experienced losing data from two VPSs due to a vendor's data center fire—since then, legitimate business is never placed with small vendors.)
Vultr Purchase and Deployment Practical Guide
Below, we will guide you step-by-step on how to deploy a powerful WordPress website from scratch on Vultr.
Step 1: Register and Get Vultr New User Trial Credit
Click the button below to register and receive a $300 trial credit. (Only users who have not registered with Vultr before can get this $300; credit card or PayPal payment is required, and the trial credit is valid for 30 days.)

After registration, you need to verify your email, verify it in your email inbox. If you don't receive it, check your spam folder or try registering with a different email.
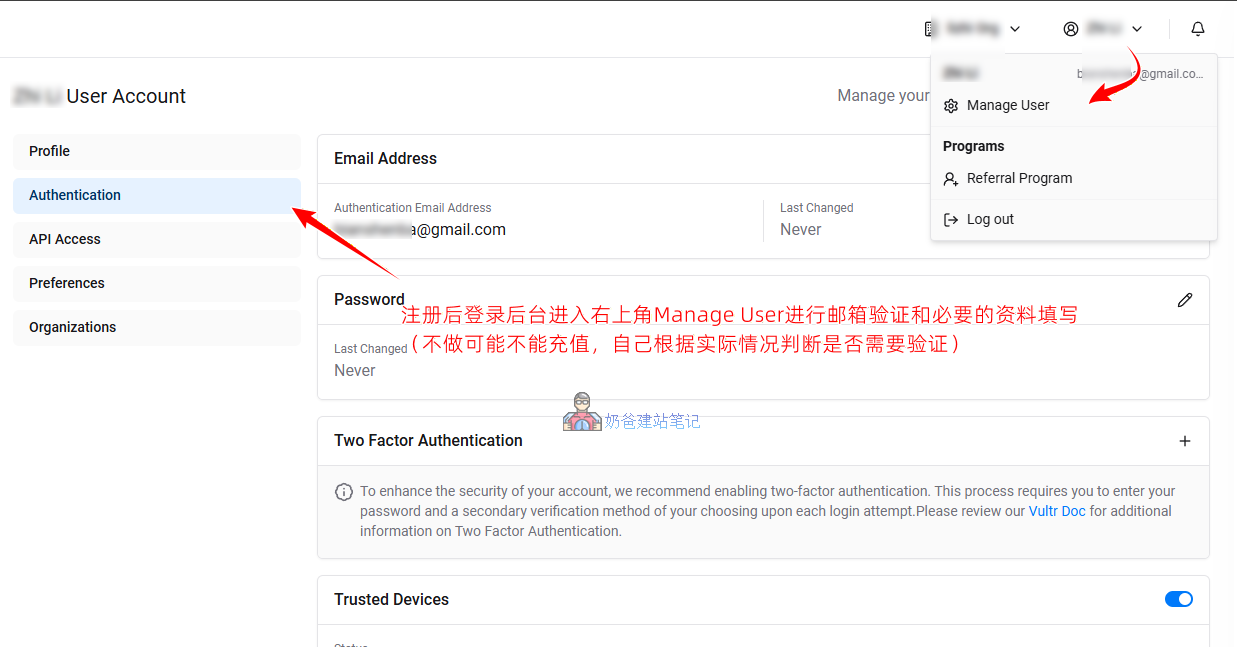
After verifying your email, then in theUser organization in the top right cornerIn the menu belowMake a Paymentselect a payment methodtop up $10(The trial credit will be granted after topping up.)
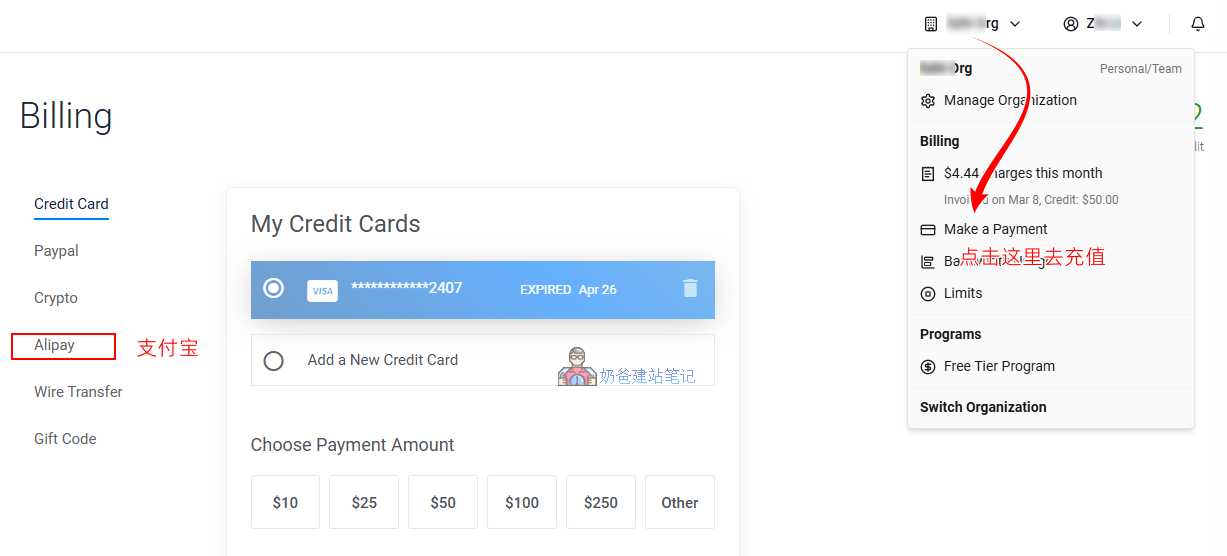
Domestic payment methods support Alipay. If you want to try the trial credit, you can only pay with a credit card or PayPal to receive it. The trial credit is valid for 30 days.
Step 2: Create (Deploy) Your Server
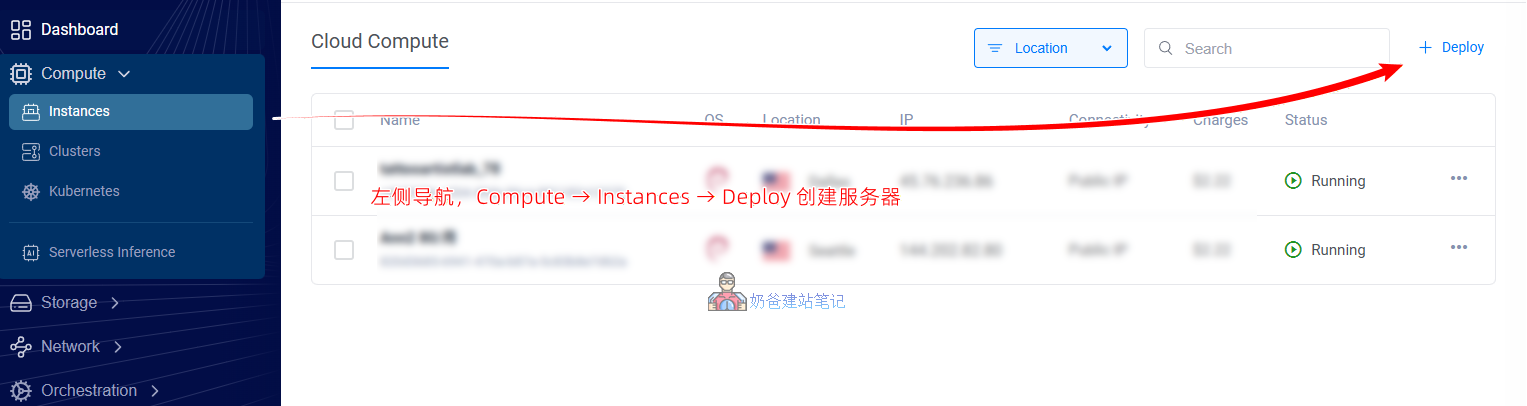
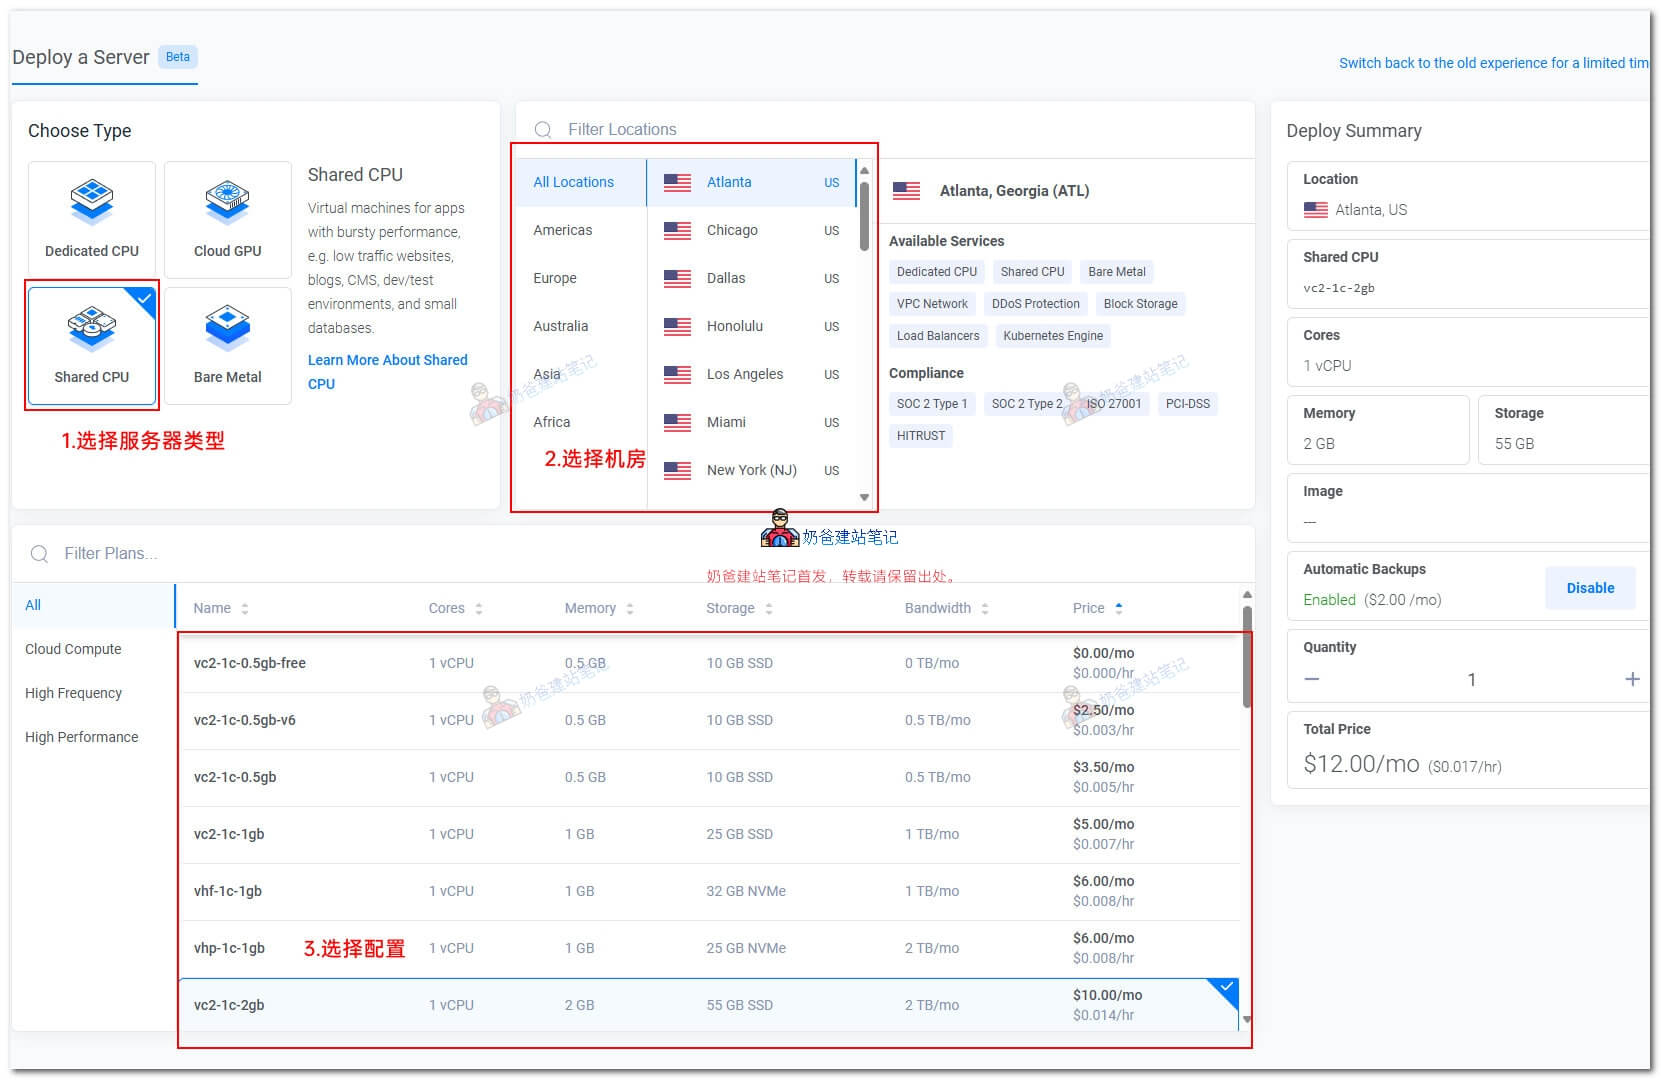
- Click on the leftComputeBelowInstances, then click on the right sideDeploy+to create a server.
- Select type (Type): ChooseShared CPU – High FrequencyThe models below offer better performance (for running WordPress, it is recommended to start with at least 1 CPU / 1GB or 2GB RAM).
- Select data center (Location): Choose the data center closest to your website users
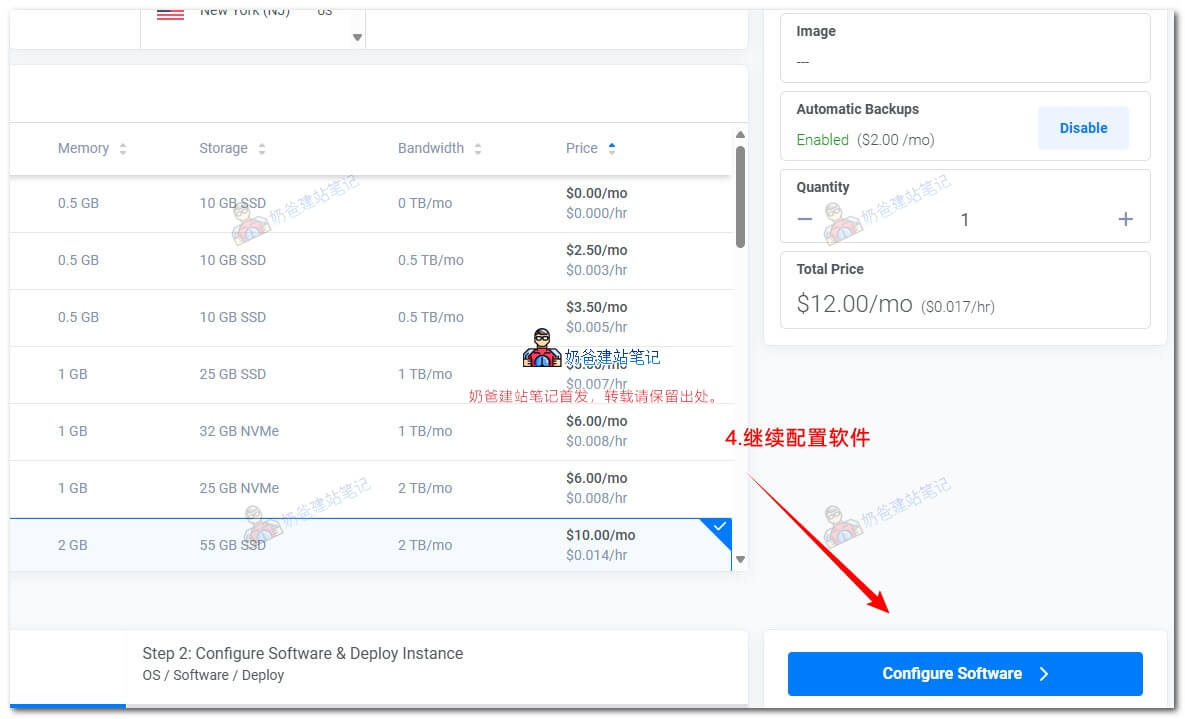
- Additional feature configuration:Automatic Backups(Automatic Backup) If the budget allows, it is strongly recommended to enable it (to save money, you can also use Baota Panel orPlugin automatic backup), clickConfigure SoftwareButton.
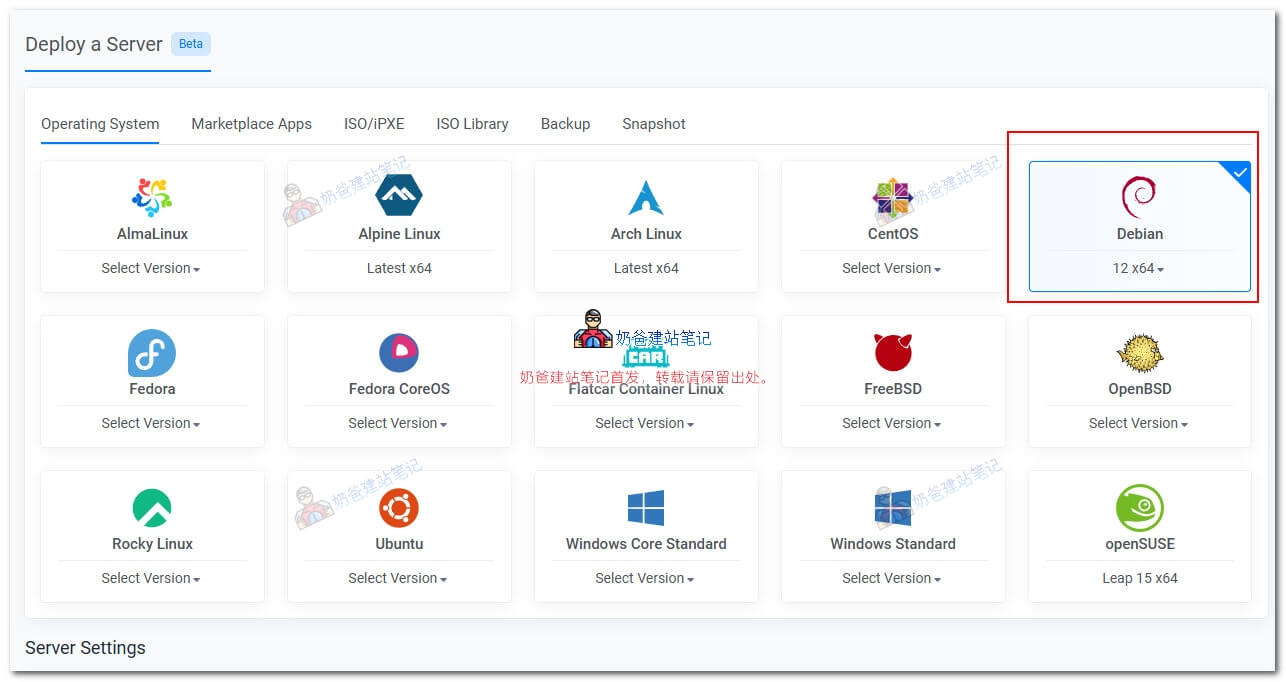
- Select operating system (Operating System): It is recommended to chooseDebian 12 x64(Currently extremely stable and well-supported by Baota Panel, not recommended to directly select OpenLiteSpeed WordPress from Marketplace Apps).
- Leave other information blank, click theDeploybutton to deploy.
Why is it not recommended to directly select OpenLiteSpeed WordPress from Marketplace Apps?
- Although deploying WordPress this way is fast, there are fewer corresponding help documents online, making it difficult to get tutorial assistance when problems arise.
- By installing Baota Panel, managing the server is more convenient, and online tutorial resources are also more abundant.
- By installing Baota Panel, you can install multiple websites on the same server.
Step 3: Connect to the Server (SSH)
After the server is created, we can start installing the website environment on the server. (Ad time: If you don't want to do the following steps yourself, Naiba charges 198 yuan to handle it properly for you. If needed, welcomeContact.)
First, install the management software on your computer:#WebsiteBuilding# Free VPS Management Software Xshell6/Xftp6 Chinese Version(Friends using Mac OS can directly use the system's built-in Terminal. I don't have a Mac, so I haven't written a tutorial for it.)
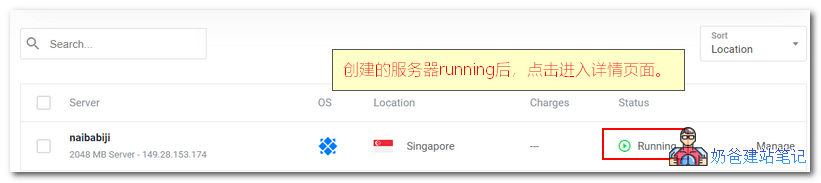
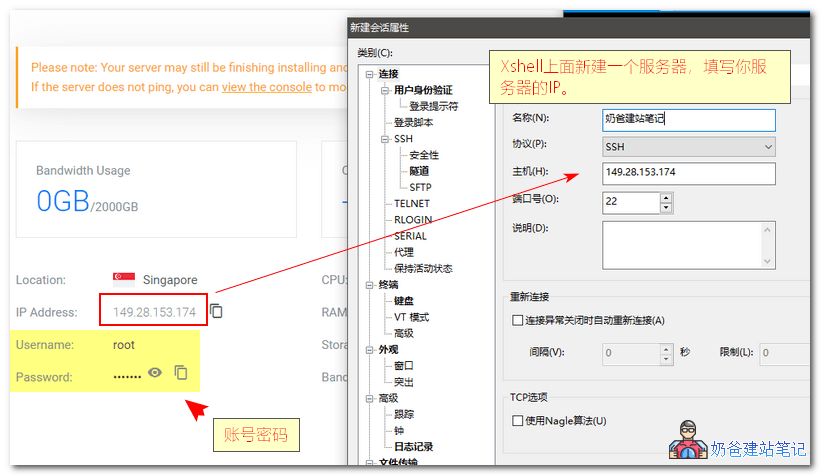
After clicking to enter the details page of the server you created, inXshell software, click to create, then fill in yourServer IPin the Host field.
ClickConnectAfter connecting, the following image appears, clickAccept and Save。
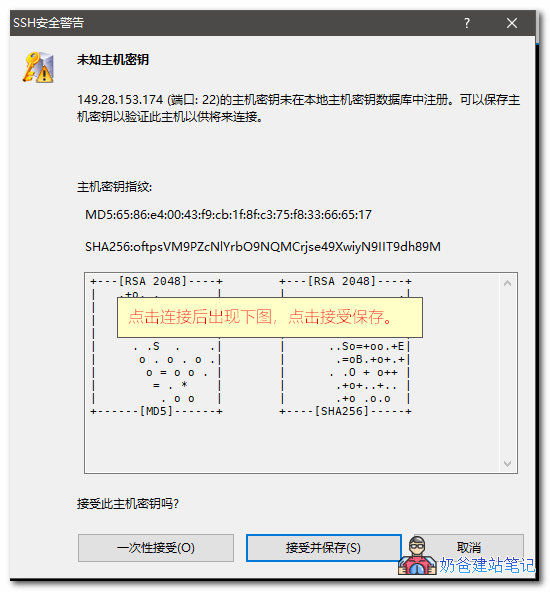
Note:If this prompt never appears for you, you can try pinging the server IP. If it doesn't ping, it's most likely blocked by the firewall.You can simply destroy and delete the server, then create a new one(Create first, then delete, to avoid getting the same IP). Sometimes you might need to create over a dozen without getting a working one, which is normal because many of Vultr's IPs are indeed blocked.
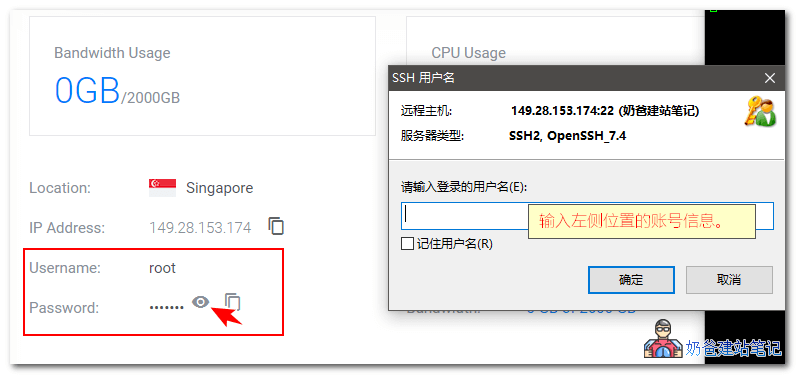
Then, enter the account information from the website page to connect to the VPS. As shown in the image below:
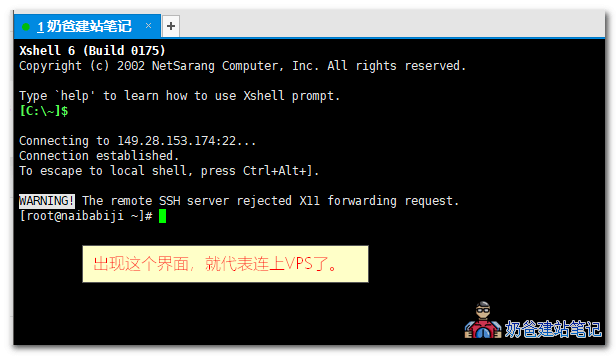
When an interface like the one above appears, it means you have successfully connected to the VPS. Next, we will install the website environment.
Step 4: Install Baota Panel (2026 Latest Environment Requirements)
Baota Panel is a tool to assist us in managing the server and websites. There are many related tutorials online. The specific installation method is as follows:
First, click the button below to register a Baota account for future use (Free registration button in the upper right corner)
After registering your Baota Panel account, return to the Xshell software interface, copy the command below, then right-click in Xshell and paste (if it doesn't execute, press Enter once).
Planning to install a WordPress website? Highly recommend using WP Panel instead of Baota Panel. It's simpler, optimized for WordPress website building, and makes server management easy for beginners. (Installation TutorialThat is, replace the Baota Panel installation command below with the WP Panel installation command.)
if [ -f /usr/bin/curl ];then curl -sSO https://download.bt.cn/install/install_panel.sh;else wget -O install_panel.sh https://download.bt.cn/install/install_panel.sh;fi;bash install_panel.sh ed8484bec
As shown in the figure below (if the text tutorial is unclear, you can refer to thevideo tutorial):
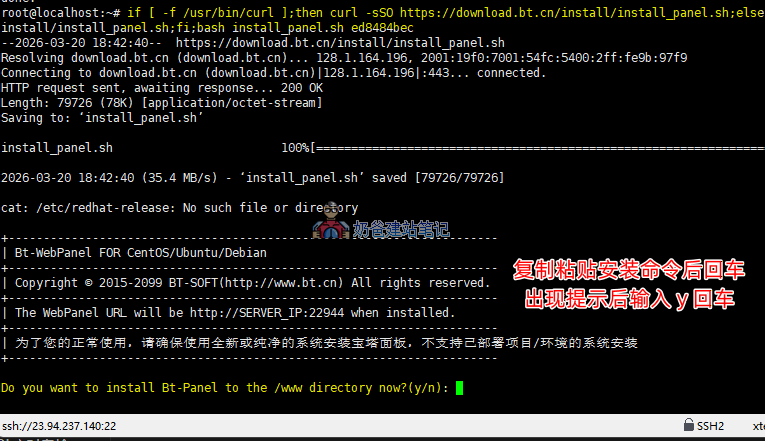
When the following prompt appears, type 'y' and press Enter.
Do you want to install Bt-Panel to the \/www directory now?(y\/n):(Type 'y' and press Enter)
Then continue waiting until the interface shown in the figure below appears.
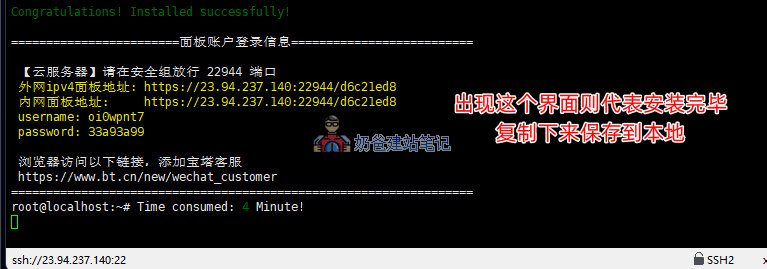
Copy the information above and save it locally, as you will need it frequently in the future.
Open the URL from the image above in your browser. If you encounter a „Your connection is not private" interface, click Advanced, proceed to the site, then enter the username and password to access the Baota Panel backend.
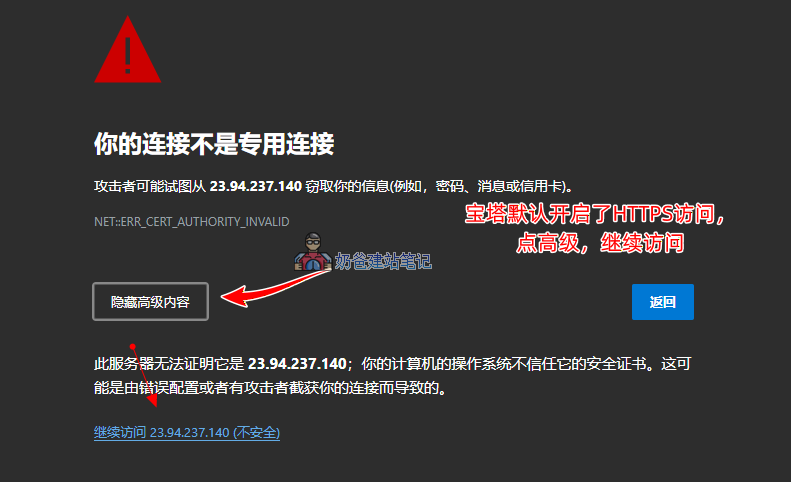
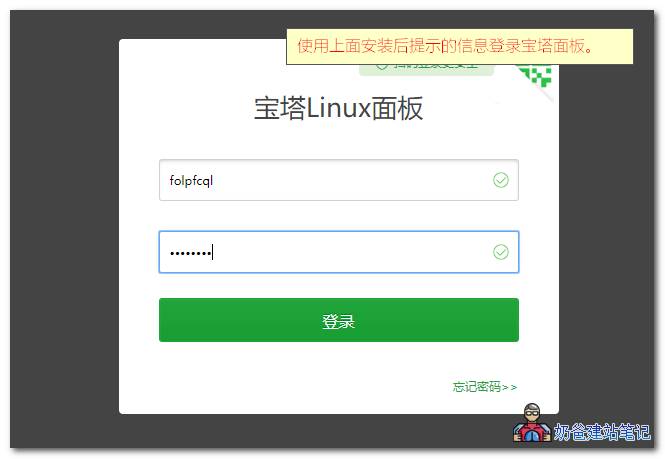
After agreeing to the terms, log in to the Baota Panel backend. Upon entering, you will be prompted to log in with your Baota Panel account; use the account you registered earlier.
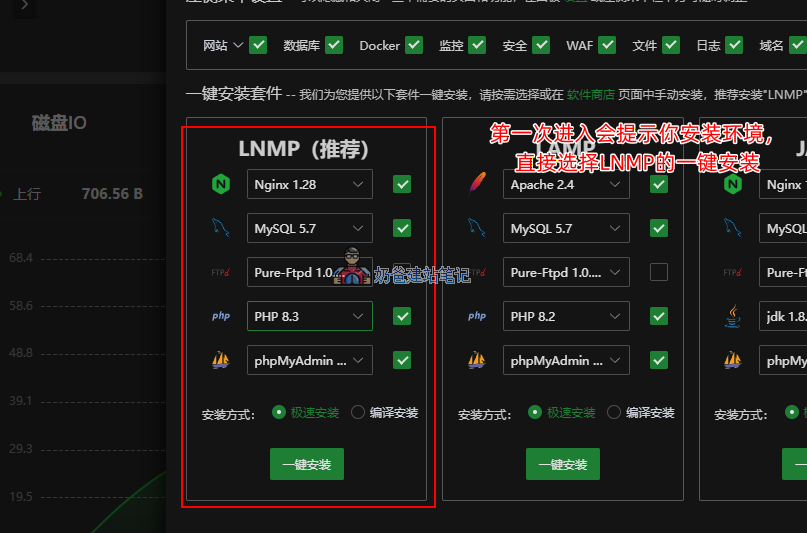
After successful login, a software suite installation selection like the image above will pop up.It is recommended to select PHP version 8.3, then proceed with one-click installation.
The installation process will take some time. You can do other tasks while waiting for it to complete.
Step 6: Install WordPress Website
①, Download WordPress installation package
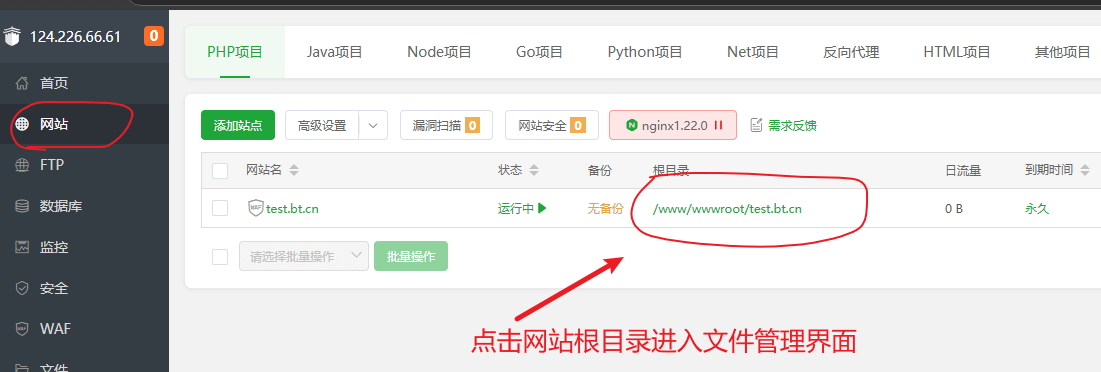
You can choose to upload locally or download directly on the server. Here we choose to use Baota Panel for remote download. First, enter the website root directory. The operation method is shown in the figure below:
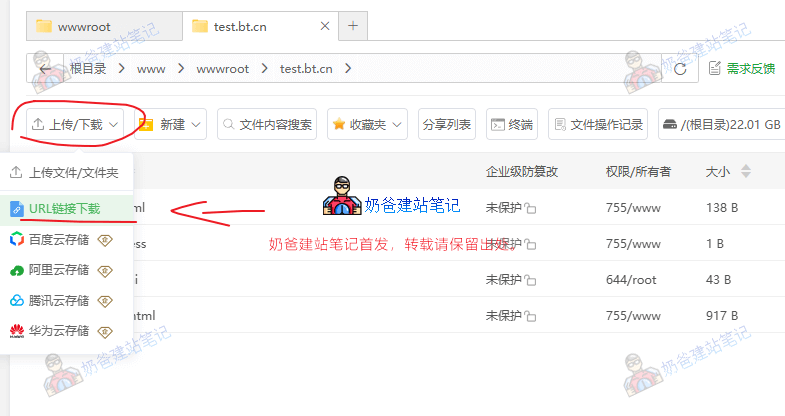
Then select to download from URL, as shown in the figure below:
Download address for the latest WordPress installation package: https://cn.wordpress.org/latest-zh_CN.zip
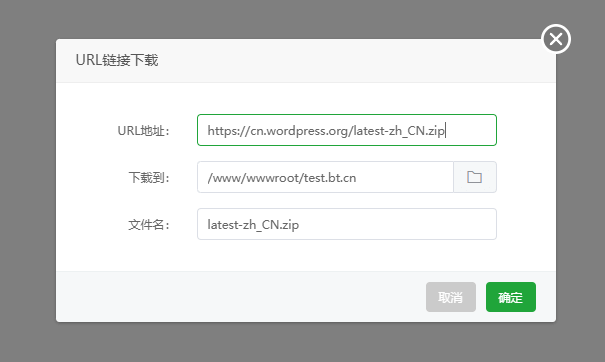
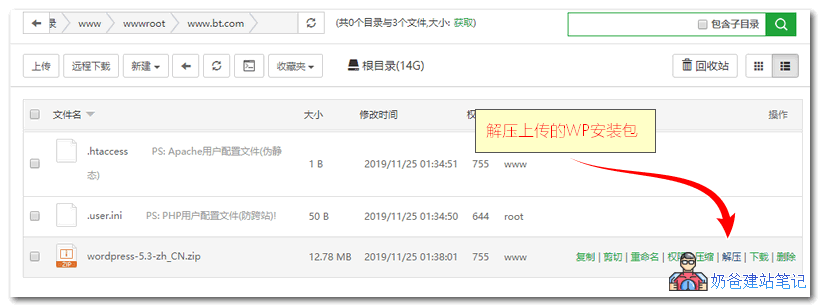
Copy the WordPress installation package URL above to download. After the download is complete, click the decompress button next to the compressed package, as shown in the figure below:
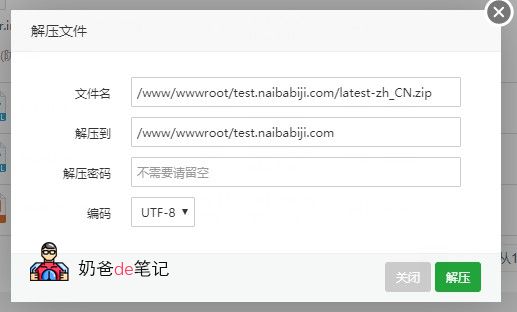
In the extraction window, directly click „Extract“.
It will be decompressed quickly, and aWordPressfolder will appear, as shown in the figure below:
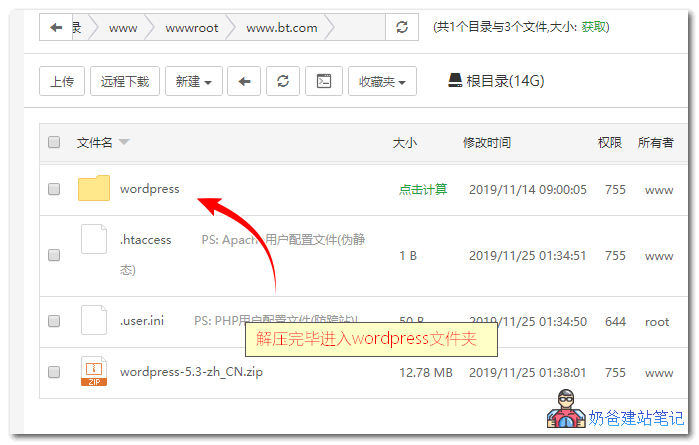
Click into the wordpress folder
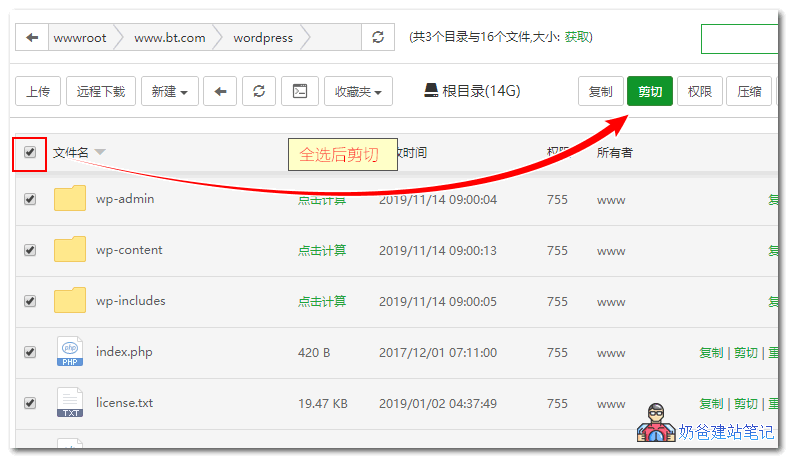
Check the box in front of the file name to select all files, then click the Cut button in the upper right corner.
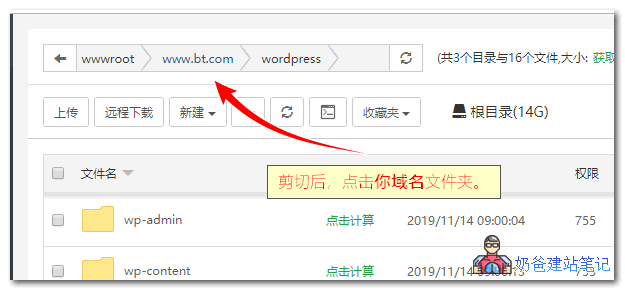
Then click on your domain name (at the red arrow in the figure below) to return to your domain name folder.
Select Paste All
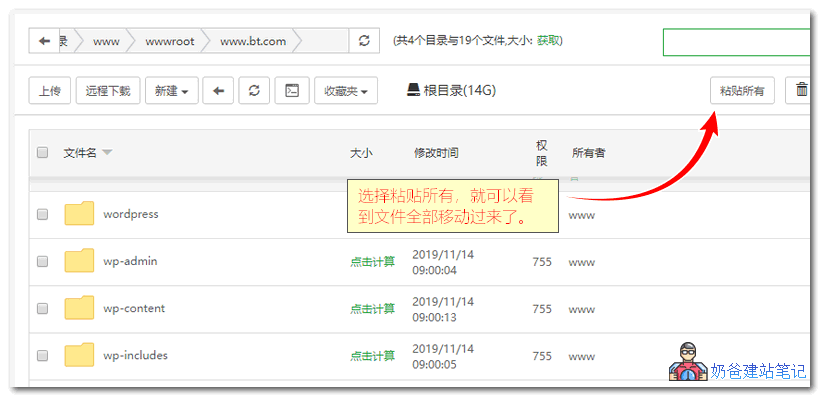
Finally, your Baota Panel file interface will look like the image below.
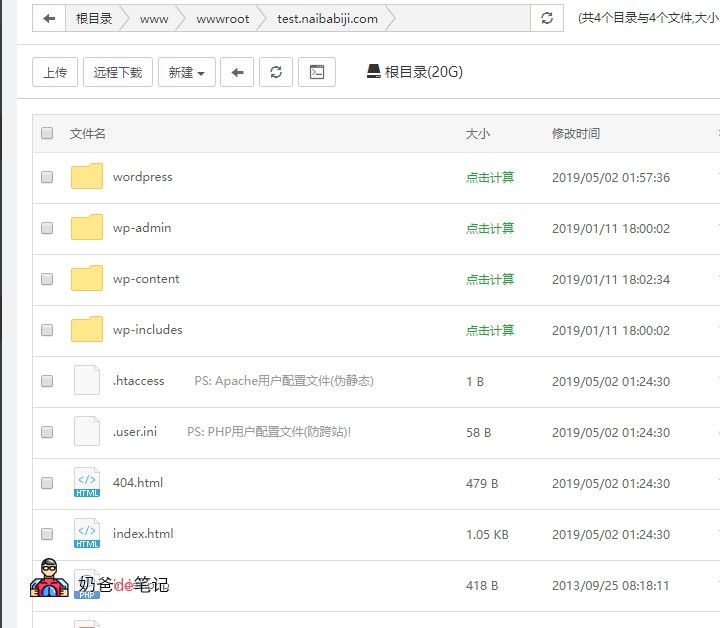
Next, we can start building the website.
②, Install the website from the browser
Now open your bound domain name, and the interface shown in the figure below will appear. Click „Let“s go„
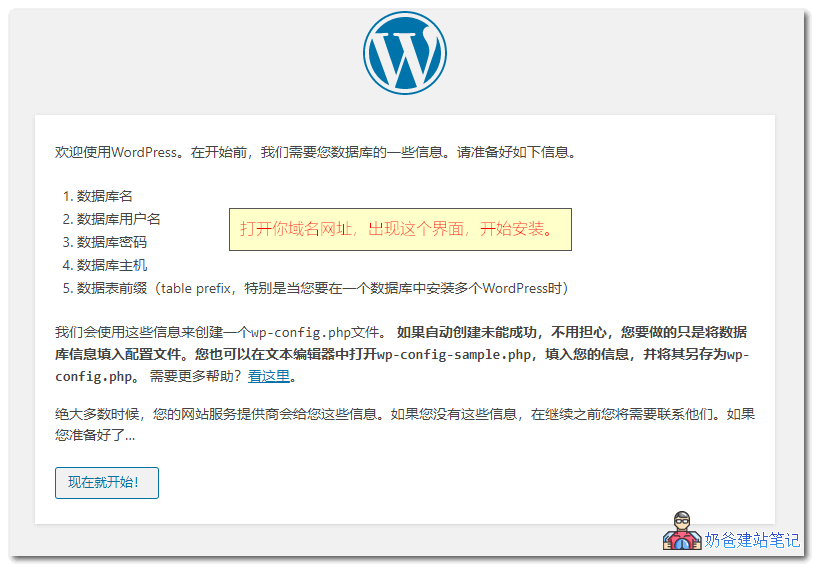
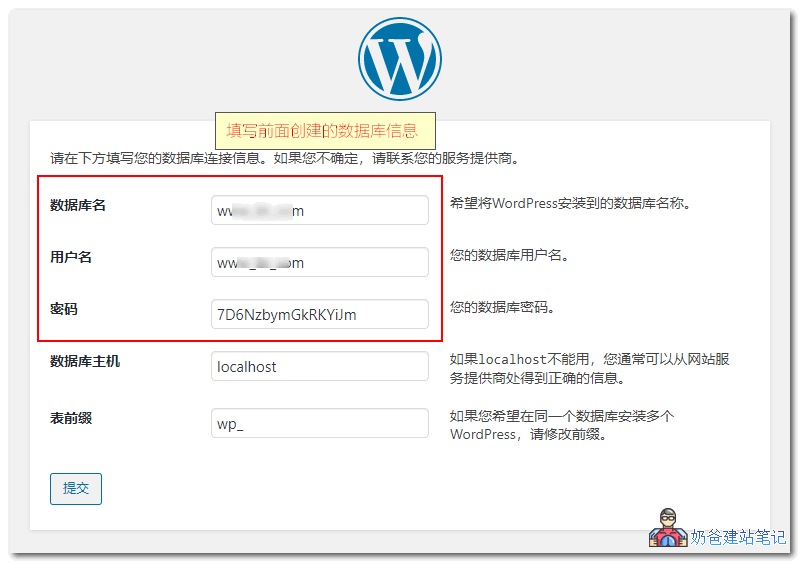
On the interface shown in the figure below, enter the corresponding database name, database username, and database password, then click Submit.
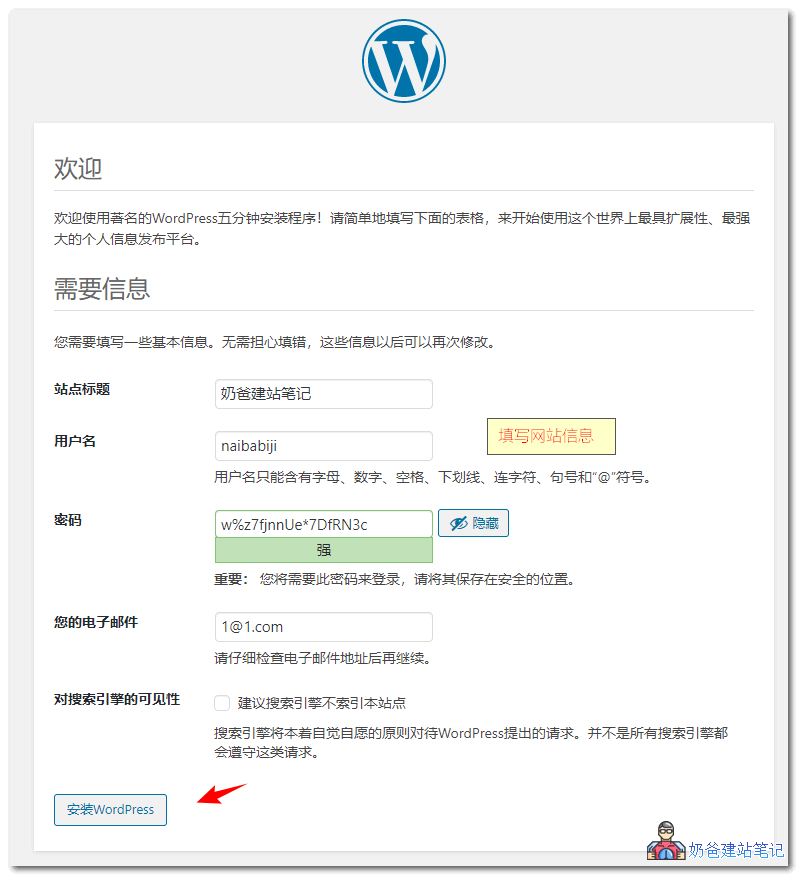
If the database is correct, the interface below will appear. Click "Install Now".

Soon, the interface below will appear, asking you to set the site title, username, password, and email information. After setting, click „Install WordPress“
Success, you can log in now.
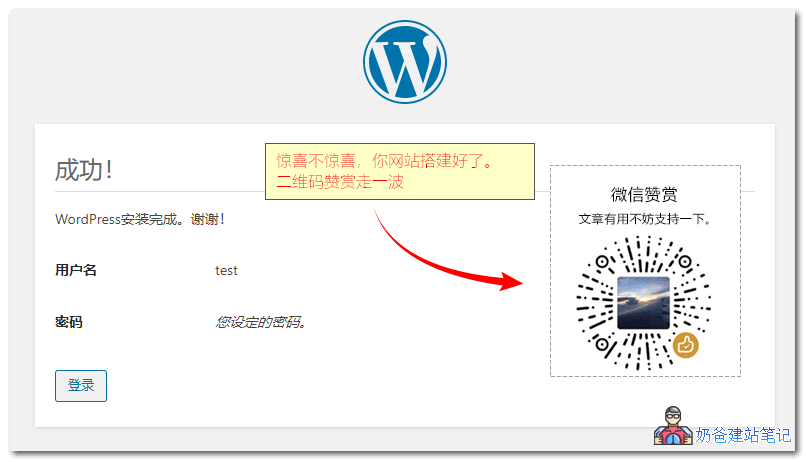
At this point, thetutorial on building a website using Vultris complete.
The remaining work is for you to modify the Theme template and detailed settings, and finally fill the website with content.
If there are still unclear points, you can contact Naiba via the QR code at the end of the article. You can also directly use Naiba'sForeign Trade Website Building Service。
Frequently Asked Questions (FAQ)
How Does Vultr Charge? How to Stop Billing If I Don't Want to Use It Anymore?
After topping up Vultr, the balance remains in your account. As long as you keep the server existing (whether it's running or in the stopped state), it will continue to be charged based on usage time. If you have finished testing, or if the project fails and you do not want to renew the rental, you must go to the panel and click Server Destroy to completely erase this machine. Only then will it stop deducting money from your balance! Shutting down is not effective!
Can I Use Vultr to Build a Proxy?
Technically, there is no problem at all; experienced users do it this way.Strong Warning: It is absolutely not recommended to host your legitimate WordPress business website and „VPN“ services onthe same Vultr server! Because VPNs are highly susceptible to having their IPs blocked, which would prevent access to the website on your server from within China.
Which Vultr Data Center Has the Fastest Speed for Access from China?
Generally speaking, Los Angeles offers faster speeds, but you should conduct actual tests based on your own network (China Telecom/Unicom or China Mobile). You can refer to:How to Test Which Vultr Datacenter is Fastest Among So Many – Naibabiji
How to Reinstall System and Upgrade Configuration on Vultr
For Vultr OS reinstallation and configuration upgrades, please see:https://blog.naibabiji.com/skill/vultr-reinstall.html
Aloha, I would like to know your pricing.
Aloha, I have no pricing. I would like to know what browser you are using to come to my Chinese website and leave this comment.
Vultr will ban accounts, right? I can't even receive password reset emails now.
My account hasn't been banned after all these years. If your account is banned, you should first consider whether you have violated their rules.
I finished the installation, but encountered a problem when installing a Theme. It says: Installation failed: Could not create directory. /wp-content/upgrade. How should I resolve this issue?
You probably didn't follow the tutorial strictly, right? This error usually indicates incorrect folder permissions.
I'll start over again. I did cut corners this time. When I did it the first time, I strictly followed the traffic guidelines and had no issues. This time there were major problems, so I reinstalled the OS on the VPS and am starting over. Thank you for your reply and such detailed information.
It seems SSL wasn't mentioned. My website is already being flagged as 'Not Secure' by the browser.
In the tutorial, on the interface for setting up rewrite rules, there is an SSL option. You can apply for a free one there.
How to set up wildcard broadcasting on a Vultr server?
You mean CDN? Just point your domain's DNS records to it.
Yes, okay, thanks for the answer.