Previously, we sharedBeginner-friendly VPS management software Xshell, here we will also introduce how to manage your VPS through Xshell 8. (Note: If you are using a Mac computer, you don't need to install Xshell, directly use the terminal and enter ssh root@your_IP to connect.)
I. Preparation (Must-Read Before Connecting)
Before starting to connect to VPS with Xshell, please confirm you have prepared the following information:
| Information Item | Description | How to Obtain |
|---|---|---|
| Server IP Address | Public IPv4 address of the VPS | Check in provider's control panel |
| SSH Port | Remote connection port | Default is22, some providers may modify it |
| Username | Login Username | Usuallyroot |
| Password | Login password | Set when purchasing VPS, or reset via control panel |
| Xshell Client | SSH connection tool | Download free version from official website |
If you don't have a VPS yet, refer toVPS Recommendations to purchase one first; you can get a cheap VPS for less than 100 yuan for a year.
II. Detailed Steps for Connecting to VPS with Xshell 8
1. Run Xshell.
After downloading and installing Xshell 8, run it. In the pop-up window, select „New“, fill in the corresponding content in the „Connection“ tab, as shown below:

You can fill in the name and description arbitrarily. Just ensure the protocol selected is SSH,the host field contains the server IP, and the port is the correct SSH port (the default port is 22).
2. Switch to the User Authentication tab.
The default method is Password, which logs in via username and password. It's recommended to only save the username here, not the password. Of course, if your security requirements aren't high or you don't mind, you can also save the password, so you don't have to enter it manually each time.
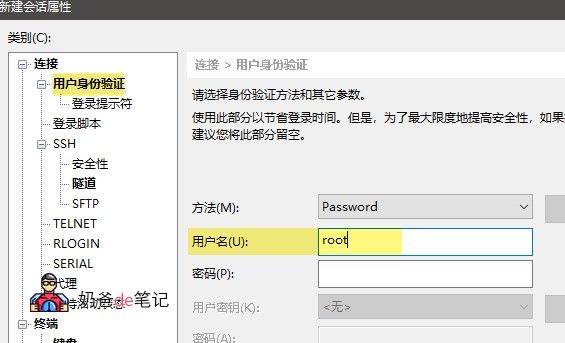
Tip: The default username for VPS purchased from some providers is not root. For example, the default username for Ubuntu systems is ubuntu.
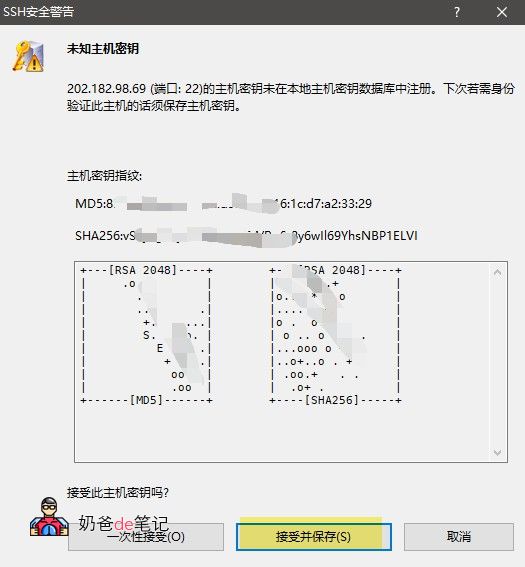
3. Click Connect and accept the host key
After filling in the details, click the Connect button. The first time you connect to the VPS, an SSH security warning about an unknown host key will appear. Click „Accept & Save“ to proceed, as shown below:
If this prompt does not appear, there are two possible situations:
- You entered the wrong server IP;
- Your website server is not blocked; it is inaccessible from within China.
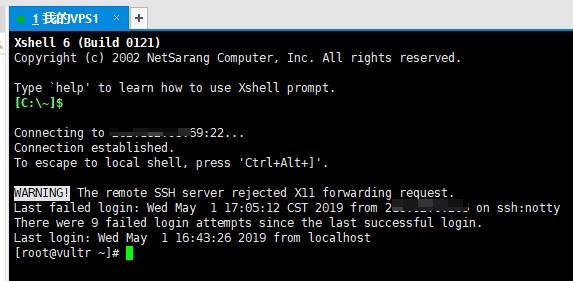
Step 4: Enter the password and log in successfully
If you did not save the password earlier, a password prompt will appear. Enter the password and confirm (the password will not be displayed while typing).
After successfully connecting to the VPS, you will see an image like the one below, showing[root@英文 ~]# 或 [ubuntu@英文 ~]$a similar prompt.
III. What You Can Do After Connecting to VPS
You have now successfully logged into the remote Linux server via Xshell and can execute various management commands in the command line:
- Update the system:
yum update -y(CentOS) orapt update && apt upgrade -y(Ubuntu) - Install the LNMP environment: Nginx, MySQL, PHP, and other website runtime environments
- install Baota Panel: Provides a visual interface for server management, suitable for beginners to quicklyBuilding a WordPress Website
- Configure the firewall: Use
firewalld或ufwto manage port openings
If you plan to build a website, it is strongly recommended to installBaota Panelfirst. You can then operate through the web interface without memorizing many Linux commands.
IV. Advanced Tutorial: Using SSH Key Login (More Secure)
The above tutorial teaches you how to log into the VPS using a password. Some VPS providers also require SSH key login. Key-based login is generally more secure, but it is more complex than password login for beginners. You can learn about it and then decide whether to use SSH key login.
What is key-based login?
It is similar to two people using a secret code. You generate a private key on your local computer and upload a public key to the server. When connecting, the two keys must match to allow you to log into the VPS.
| Comparison Item | Password login ✅ Recommended for beginners | Key-based login 🔒 Suitable for advanced users |
|---|---|---|
| Operation Difficulty | Simple, just enter username and password | More complex, requires generating/managing key files |
| Security | Average, passwords may be brute-forced | Higher, almost impossible to crack |
| Login experience | You have to enter the password manually every time | Password-free, one-click connection |
| What if I switch computers | No impact, you can log in from any computer | You need to copy the private key file to the new computer, otherwise you cannot connect |
| What if I lose the key | — | It's very troublesome, you need to reset it through the VPS console, or keep an alternative login method |
| Target audience | Beginners, those with only 1-2 VPS instances | Users who manage multiple servers long-term and have high security requirements |
For beginners, using password login is sufficient (provided your password is complex enough that brute force attacks are difficult to crack)
If you want to try key-based login, refer to the steps below:
- Generate a key pair in Xshell: Tools → User Key Manager → Generate (select RSA 4096)
- Upload the public key to the VPS: First log in to the VPS using password authentication, then paste the public key content into
~/.ssh/authorized_keysfile - Modify the Xshell session: Change the login method from Password to Public Key, and select your private key file
- Test the connection: After success, you can log in without a password
⚠️Important Reminder: If you decide to use key-based login,be sure to back up the private key file(recommend storing it in cloud storage or on a USB drive). If the private key is lost and there is no alternative login method, you may need to reset the entire SSH configuration through the VPS provider's console to log in again.
V. Common Xshell VPS Connection Issues (FAQ)
Xshell prompts "Connection failed" or "Could not connect to"?
This prompt usually indicates a network issue or incorrect port. The default SSH port is 22, but some providers, such as BandwagonHost, generate random ports by default for security. You need to enter the correct port to connect.
A network issue could mean your local network cannot reach the server, or the server is blocked by the Great Firewall of China. The best solution is to create a new server that is not blocked.
Prompts "Authentication failed, please try again" wrong password?
This indicates an incorrect username or password. First, check if your username is root and the password is the VPS password. Some people mistakenly enter the username and password for the website where they purchased the VPS, causing this error.
Additionally, if you installed the Ubuntu operating system, the default username should be ubuntu.
Garbled Chinese characters after successful connection?
In the tutorial, on the interface of step „2. Switch to the User Authentication tab“, switch to the Terminal tab, change the encoding to UTF-8, save it, and then reconnect to the VPS. It will work normally.
What is the difference between Xshell 8 Free Edition and Paid Edition?
The paid version comes with a commercial license and has no limit on the number of tabs. For personal website building and learning, the free version is fully functional.
Are the tutorials for Xshell 6/7/8 universal?
Yes, they are universal. At most, the software interface may change, but the operation methods are the same.
Below are Xshell articles you might need:
- #WebsiteBuilding# Free VPS management software Xshell/Xftp Chinese version download
- Multi-Datacenter Cross-Border Foreign Trade VPS Server Recommendation_Vultr_Complete Purchase and Usage Tutorial
- Beginner-Friendly Baota Panel Illustrated Installation Tutorial for Building Your Own Website
