
Converter for Media is a popular free plugin on the WordPress platform for converting images to WebP format. By default, when weuse Baota Panel for website buildingthe server software selected is usually nginx. In this case, manual configuration of nginx is required for Converter for Media to function properly. Beginners might find the official documentation difficult to understand, so this article by Naiba will guide you step-by-step on how to modify the nginx configuration file for your website in Baota Panel to ensure Converter for Media works correctly.
1. Open the website settings interface in Baota Panel
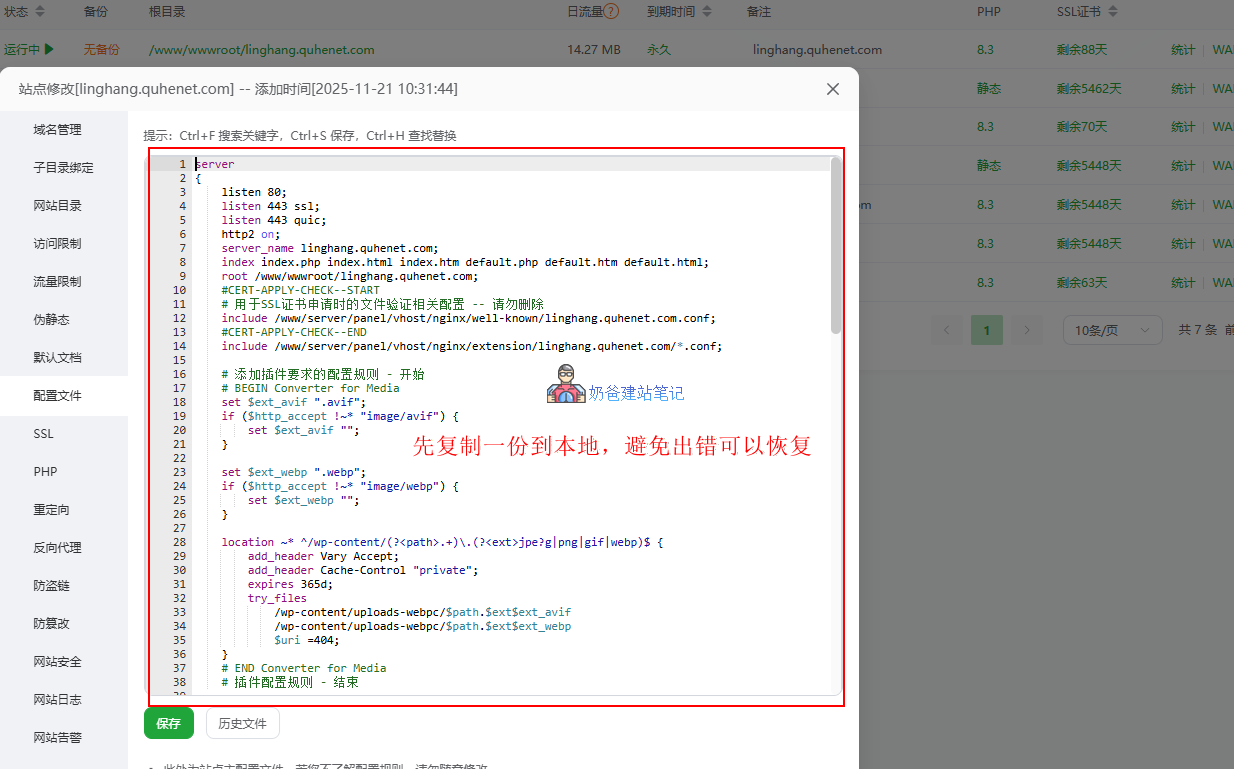
In the website list within Baota Panel, select the website you need to configure, switch to the configuration file interface, and first copy the default content locally for backup.
2. Modify the configuration file
Code to be added
# BEGIN Converter for Media
    set $ext_avif ".avif";
    if ($http_accept !~* "image/avif") {
        set $ext_avif "";
    }

    set $ext_webp ".webp";
    if ($http_accept !~* "image/webp") {
        set $ext_webp "";
    }

    location ~* ^/wp-content/(?<path>.+)\.(?<ext>jpe?g|png|gif|webp)$ {
        add_header Vary Accept;
        add_header Cache-Control "private";
        expires 365d;
        try_files
            /wp-content/uploads-webpc/$path.$ext$ext_avif
            /wp-content/uploads-webpc/$path.$ext$ext_webp
            $uri =404;
    }
    # END Converter for Media
Add to the correct location
The configuration file for Converter for Media needs to be added to the correct location to ensure proper functionality. The specific location requirements are as follows:
- 在
server { ... }Inside the block - Other
location { ... }Before the command - In all
includeBefore the command
You can refer to the screenshot information above and add it after approximately line 14.
Modify existing image processing rules
Find the following content in the original configuration file:
location ~ .*\.(gif|jpg|jpeg|png|bmp|swf)$
{
    expires      30d;
    error_log /dev/null;
    access_log /dev/null;
}
Modify to the following content:
location ~ .*\.(bmp|swf)$
{
    expires      30d;
    error_log /dev/null;
    access_log /dev/null;
}
Then click Save. If there are no errors, it proves the modification is correct.
3. Test if the plugin is working properly
After completing the configuration modifications above, as long as the Baota Panel shows no errors, the plugin should work normally. You can now return to the plugin settings interface to see if there are any configuration prompts left. If there are no more prompts and you can normally set the plugin's options or batch process previous images, then it proves the plugin is working properly.
4. How to check if images have been converted to WebP format
If you view the image address or save images from the website frontend, they are still in the previous format and have not changed to WebP. This situation is normal. The plugin author specificallypublished an articleexplaining the reason:This plugin does not change the image URLs, so when you view the website source code, you will always see the default image URLs. The plugin creates redirects to output files in WebP and AVIF formats, changes the MIME types of these images, but does not change the URLs.
The plugin workflow is as follows:
浏览器请求: GET https://edgeone.naibabiji.com/wp-content/uploads/photo.jpg
↓
插件检测浏览器支持WebP格式
↓
服务器内部重定向到: /wp-content/uploads-webpc/photo.jpg.webp
↓
浏览器收到WebP格式图片,但地址栏仍显示photo.jpg
Advantages of this design
- SEO Friendly: URL structure remains unchanged, does not affect SEO
- Compatibility: Older browsers that do not support the new formats can still receive the original format images
- Non-intrusive: No need to modify theme templates or page content
- Automation: Users are unaware, fully automatic background processing
How to verify:
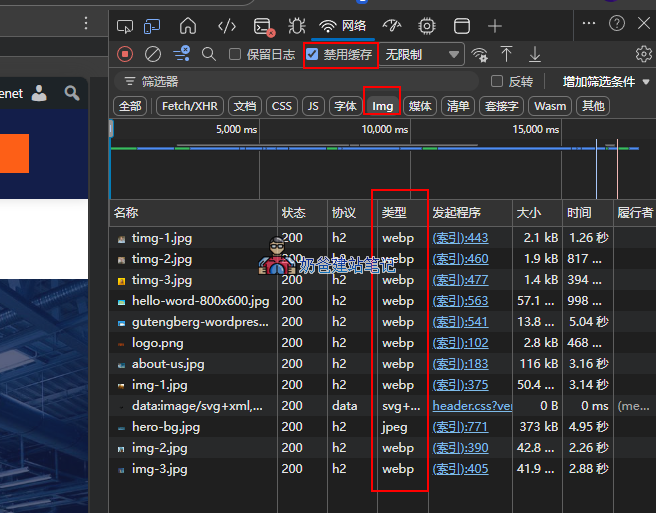
To confirm if the plugin is working properly, do not view the webpage source code, but instead:
- Browser Developer Tools (right-click mouse or shortcut key F12) → Network tab
- Refresh the page to view image requests
- Check the
Content-Typefield in the response headers - You should see
image/webp或image/avifinstead ofimage/jpeg
When you find that a certain image is still in the old format, it proves that the converted image is larger than the original, so the plugin discarded the processing of that image.
Images not converting successfully with Cloudflare CDN?
If you are using Cloudflare's free CDN, checking the source code will reveal that the original jpg or png images are still displayed, and webp format images are not output. This is because the plugin needs to use the browser'sAccept to determine whether to return WebP or AVIF. This feature is not supported by the free version of Cloudflare, and Converter for Media does not change the image URL by default, so Cloudflare recognizes it as yuantu.jpg
What we need to do is make the image support become yuantu.jpg.webp so that Cloudflare caches both jpg and webp images. Add the following code to your theme's functions file.
/**
 * WordPress + Cloudflare Free + Converter for Media
 * 仅在 WebP 文件真实存在时,将 jpg/png 图片包装为 picture。
 * 支持 uploads 目录 + 当前主题目录图片。
 */

function nbj_get_webp_info($src, $uploads) {
    $src_raw  = html_entity_decode($src);
    $src_path = parse_url(esc_url_raw($src_raw), PHP_URL_PATH);

    if (!$src_path || strpos($src_path, '..') !== false) {
        return false;
    }

    /**
     * 1. 处理媒体库 uploads 图片
     */
    $uploads_baseurl = $uploads['baseurl'];
    $uploads_basedir = $uploads['basedir'];

    $uploads_base_path = parse_url(esc_url_raw($uploads_baseurl), PHP_URL_PATH);

    if ($uploads_base_path && strpos($src_path, $uploads_base_path . '/') === 0) {
        $relative = ltrim(substr($src_path, strlen($uploads_base_path)), '/');

        if (!$relative) {
            return false;
        }

        $webp_url  = str_replace('https://edgeone.naibabiji.com/wp-content/uploads/', '/wp-content/uploads-webpc/uploads/', $src_raw) . '.webp';
        $webp_path = dirname($uploads_basedir) . '/uploads-webpc/uploads/' . $relative . '.webp';

        return [
            'url'  => $webp_url,
            'path' => $webp_path,
        ];
    }

    /**
     * 2. 处理当前主题目录图片
     * 规则:/wp-content/themes/your-theme/xxx.jpg
     * 对应:/wp-content/themes/your-theme/xxx.jpg.webp
     */
    $theme_baseurl = get_stylesheet_directory_uri();
    $theme_basedir = get_stylesheet_directory();

    $theme_base_path = parse_url(esc_url_raw($theme_baseurl), PHP_URL_PATH);

    if ($theme_base_path && strpos($src_path, $theme_base_path . '/') === 0) {
        $relative = ltrim(substr($src_path, strlen($theme_base_path)), '/');

        if (!$relative) {
            return false;
        }

        $webp_url  = $src_raw . '.webp';
        $webp_path = rtrim($theme_basedir, '/') . '/' . $relative . '.webp';

        return [
            'url'  => $webp_url,
            'path' => $webp_path,
        ];
    }

    return false;
}

function nbj_wrap_webp_picture($content) {
    if (is_admin() || is_feed() || (defined('REST_REQUEST') && REST_REQUEST)) {
        return $content;
    }

    if (stripos($content, '<img') === false) {
        return $content;
    }

    $uploads = wp_upload_dir();

    // 支持 jpg/png,以及 jpg/png 后面带 query string 的情况
    $pattern = '/<img\b[^>]*\bsrc=(["\'])([^"\']+\.(?:jpe?g|png)(?:\?[^"\']*)?)\1[^>]*>/i';

    return preg_replace_callback($pattern, function ($m) use ($uploads) {
        $img_tag = $m[0];
        $src     = html_entity_decode($m[2]);

        if (
            strpos($img_tag, 'data-nbj-webp') !== false ||
            strpos($src, 'uploads-webpc') !== false ||
            strpos($src, '.webp') !== false
        ) {
            return $img_tag;
        }

        $webp = nbj_get_webp_info($src, $uploads);

        if (!$webp || !is_file($webp['path'])) {
            return $img_tag;
        }

        $img_tag = preg_replace('/<img\b/i', '<img data-nbj-webp="1"', $img_tag, 1);

        return '<picture data-nbj-webp="1">'
            . '<source srcset="' . esc_url($webp['url']) . '" type="image/webp">'
            . $img_tag
            . '</picture>';
    }, $content);
}

add_filter('the_content', 'nbj_wrap_webp_picture', 999);
add_filter('widget_text_content', 'nbj_wrap_webp_picture', 999);

add_action('template_redirect', function () {
    if (
        !is_admin()
        && !is_feed()
        && !(defined('REST_REQUEST') && REST_REQUEST)
        && ob_get_level() === 0
    ) {
        ob_start('nbj_wrap_webp_picture');
    }
});