
What problems can this article help you solve?
- ✅ First time using Baota Panel and don't know how to install WordPress
- ✅ Want to quickly build your own website/blog
- ✅ The one-click deployed WordPress version is too old, want to install the latest version
- ✅ Website links don't work after installation, need to configure pseudo-static rules
- ✅ Encounter various errors during installation and don't know how to resolve them
Estimated Completion Time: 10-15 minutes
Difficulty Level: ⭐☆☆☆☆ (Beginner Friendly)
Preparation
Before starting, please ensure you have completed the following steps:
- Baota Panel is installed(If not installed yet, first seeBaota Panel Installation Tutorial)
- Domain purchased and DNS resolution completed(Domain points to your server IP, refer toDomain DNS Resolution Tutorial)
This article usesInstalling WordPress via Baota as an example, let me introduce the specific method. If you are using other website building programs, please refer to this tutorial and adapt accordingly.
Step 1: Deploy WordPress via Baota Panel
Method 1: Baota One-Click WordPress Deployment (Recommended for Beginners)
Baota Panel supports one-click deployment of several popular website building programs like WordPress, making the operation relatively simple for beginners.
1. Go to Baota Panel backend - Website - Add Website - One-click Deployment - Select WordPress - Fill in Domain - Confirm
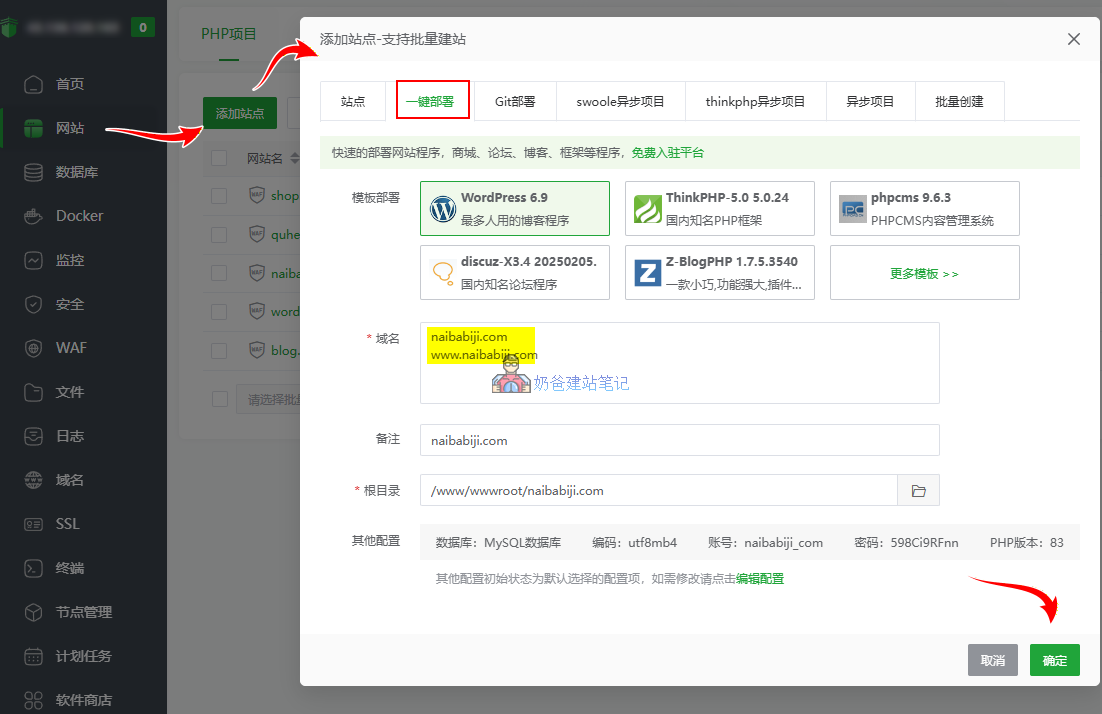
After clicking confirm, wait a moment. It will automatically add the website for you, download the WordPress installation files, and create a database.
After successful deployment, deployment information will pop up, including database details and the website URL. You can save it, or later view the account and password directly from the database.
Then wait for the website setup and proceed to install WordPress. See the following tutorial.
Method 2: Manually Install the Latest Version of WordPress
Although one-click deployment is convenient, domestic servers sometimes encounter network issues causing the installation package download to fail; or the one-click deployment might not use the latest installation package, requiring a manual update after installation. Therefore, learning to install WordPress manually is also essential.
Step One,Add a Website to Baota Panel
Manual WordPress installation doesn't handle everything for you like one-click deployment does. First, we need to create the website ourselves.
Baota Panel Backend – Website – Add Website
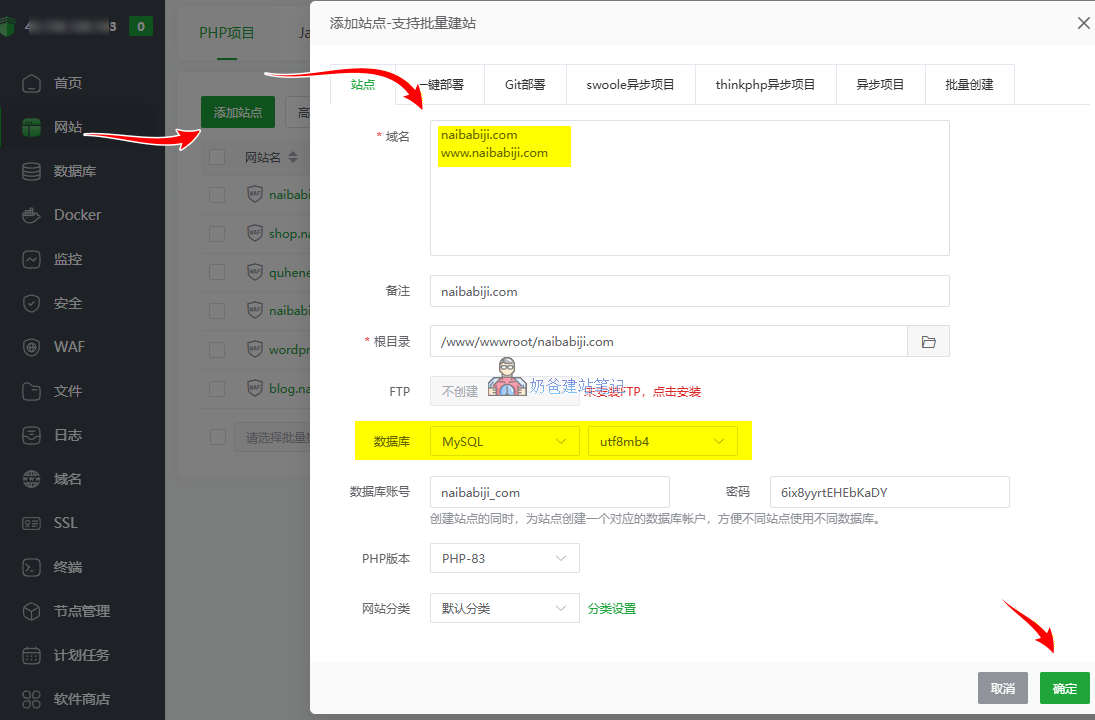
Fill in the domain name, select 'Create Database', leave other settings as default, then click the confirm button.
Step Two, Download/Upload the Latest WordPress Installation Package
There are two ways to upload the WordPress installation package: one is local upload, the other is direct server download.
If your domestic server fails at remote download, you can download the installation package from the link below and upload it to the website root directory.
WordPress New Version Installation Package Download Address:WordPress New Version Simplified Chinese Local Download
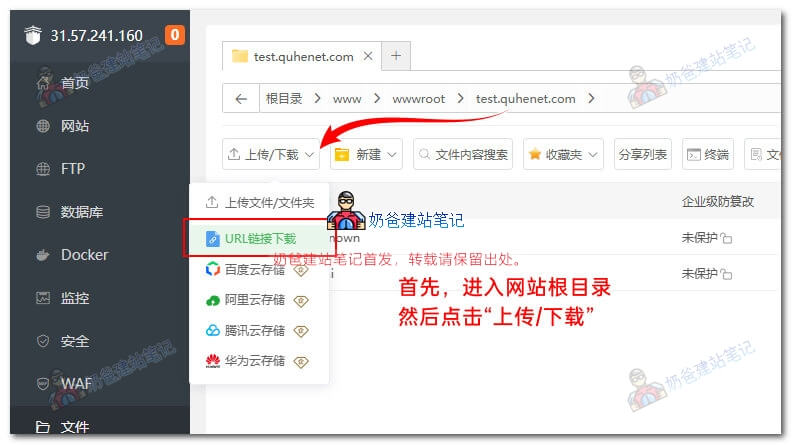
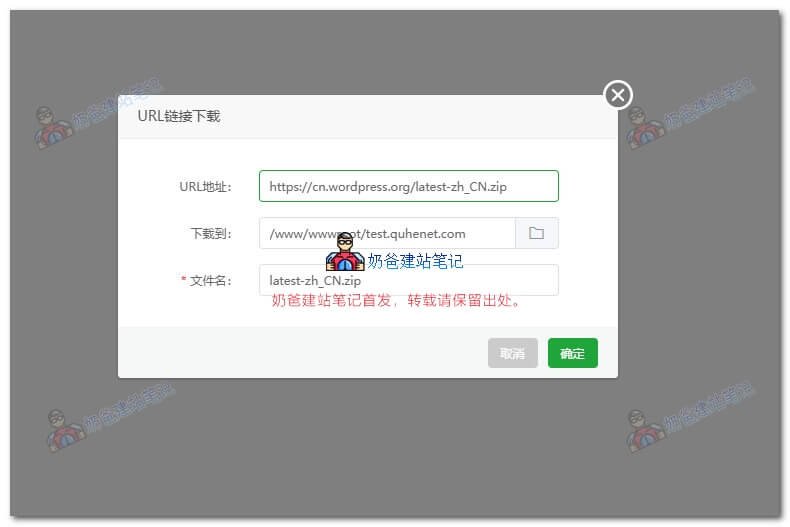
For server remote download, click in the Baota Panel:Website→ Website Root Directory Folder → URL Link Download, then fill in the URL below and click OK.
https://cn.wordpress.org/latest-zh_CN.zip
After uploading or downloading the WordPress installation package, move your mouse to the package's row and click the 'Extract' button. As shown below:
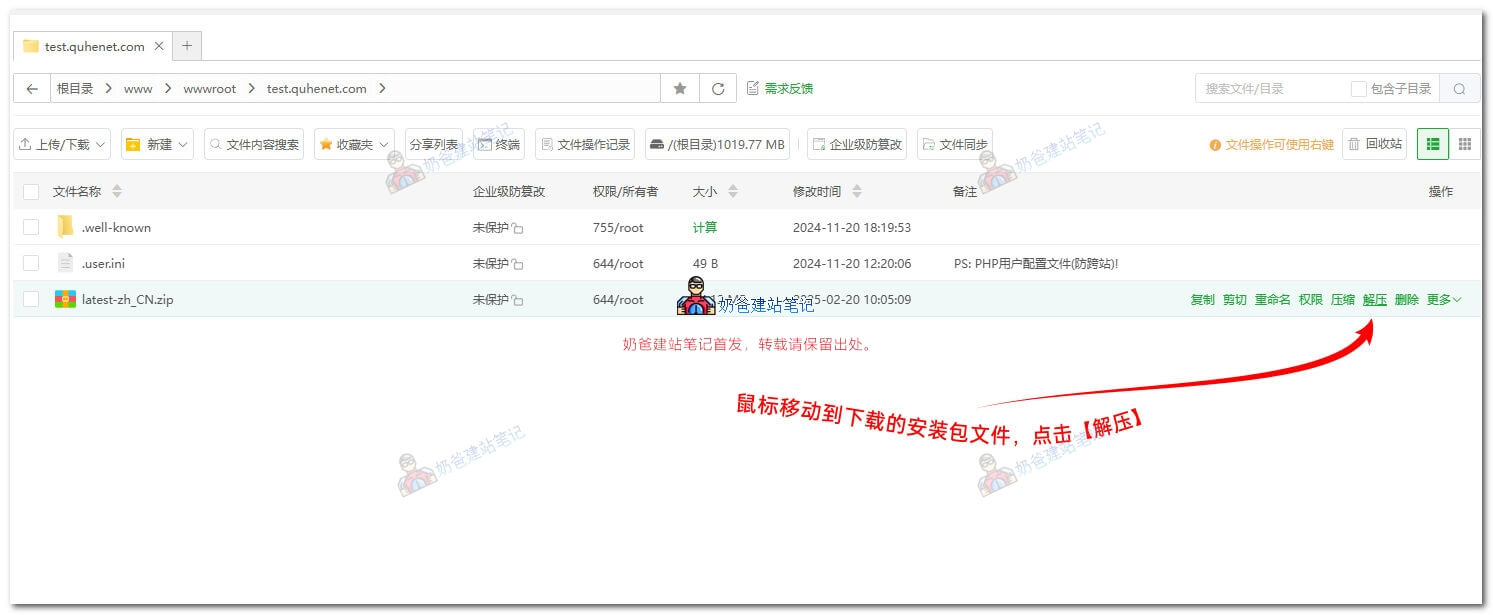
In the extraction window, directly click „Extract“.
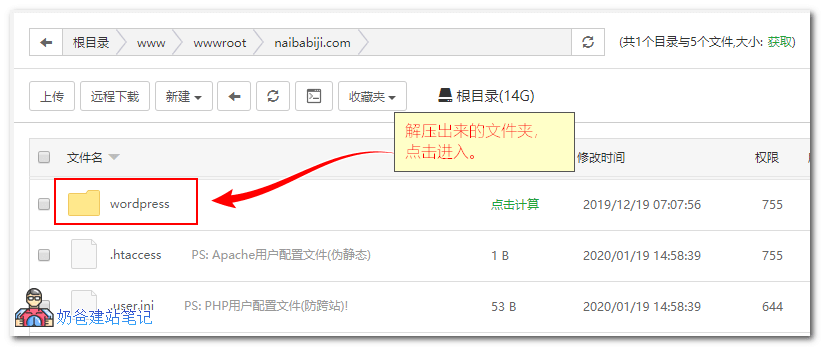
Extraction will complete quickly, resulting in a folder named 'WordPress'. Click to enter this folder.
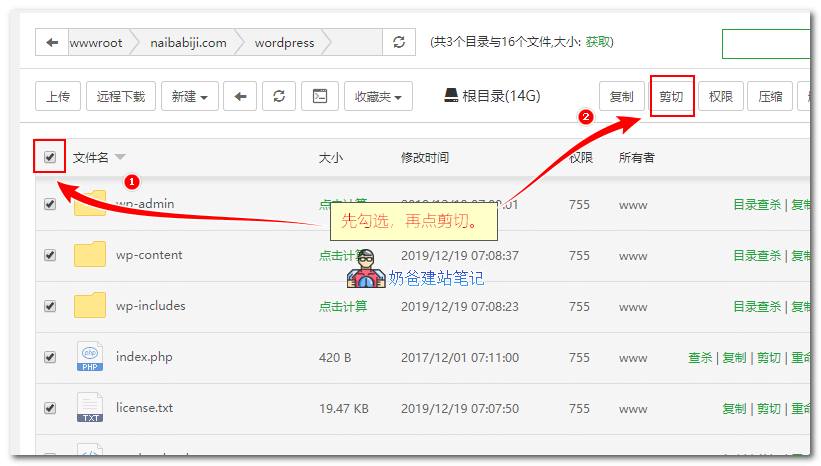
After entering the WordPress folder, click the checkbox in front of the file names to select all folders and files.
Then click the 'Cut' button in the top right corner. The steps are shown in the image below:
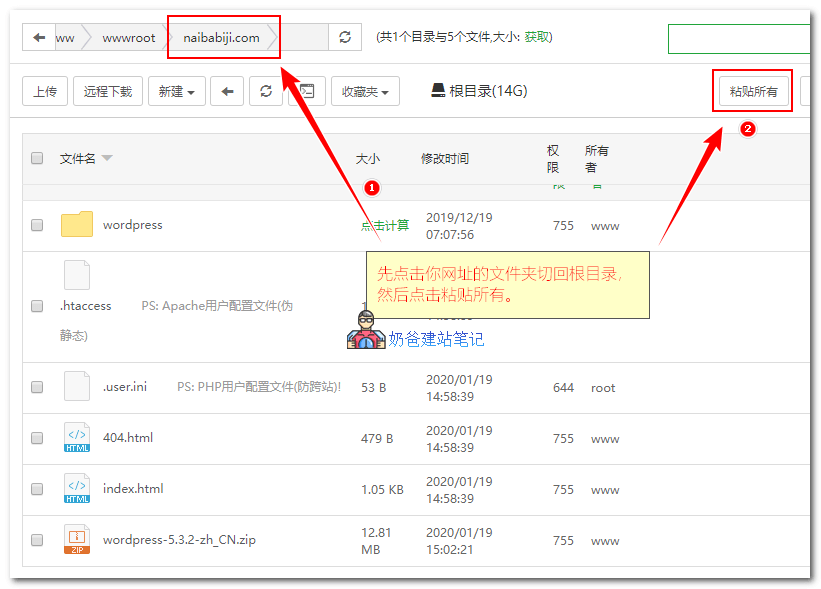
Next, click your website's folder to return to the root directory, then click the 'Paste All' button in the top right corner, as shown below:
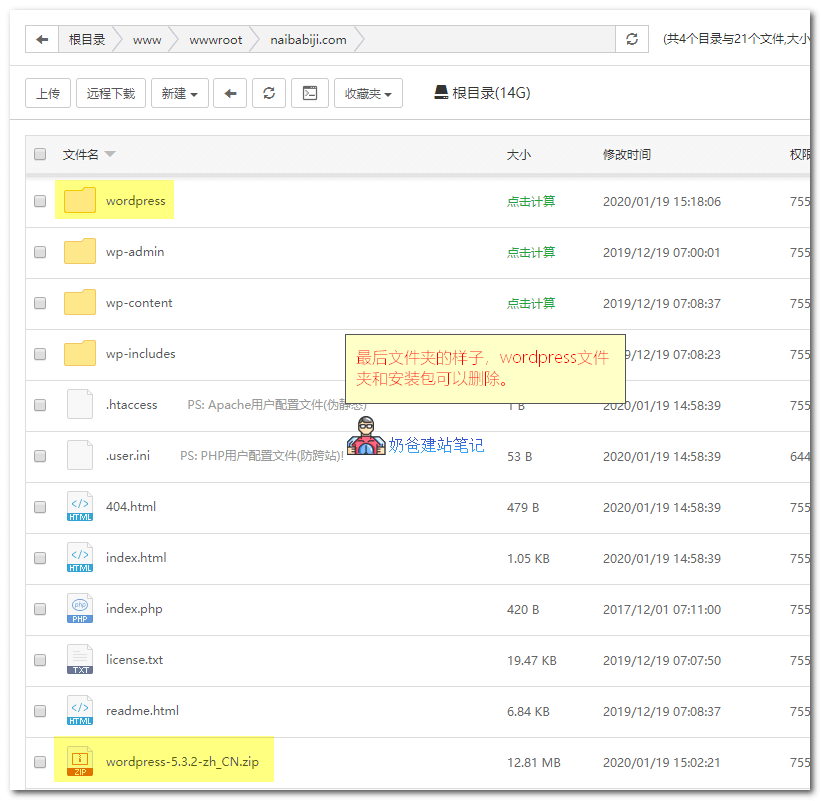
Finally, your Baota Panel file interface will look like the image below.
The WordPress folder and the installation package file can be deleted. 404.html and index.html can also be deleted. It's fine if you don't delete them.
Next, we can start building the website.
After opening this access address, you will see the interface for building a WordPress program website in the second step below. Just follow the instructions.
Step 2: Configure WordPress Pseudo-Static Rules and SSL Certificate
In the previous step, we have uploaded the WordPress installation files to the website root directory. Next, we can use a browser to open the URL and install WordPress. However, to avoid future hassles, Naiba suggests configuring the pseudo-static rules and SSL security certificate in the second step first.
Note: The security certificate can only be successfully applied if the domain name has already been resolved to the server.
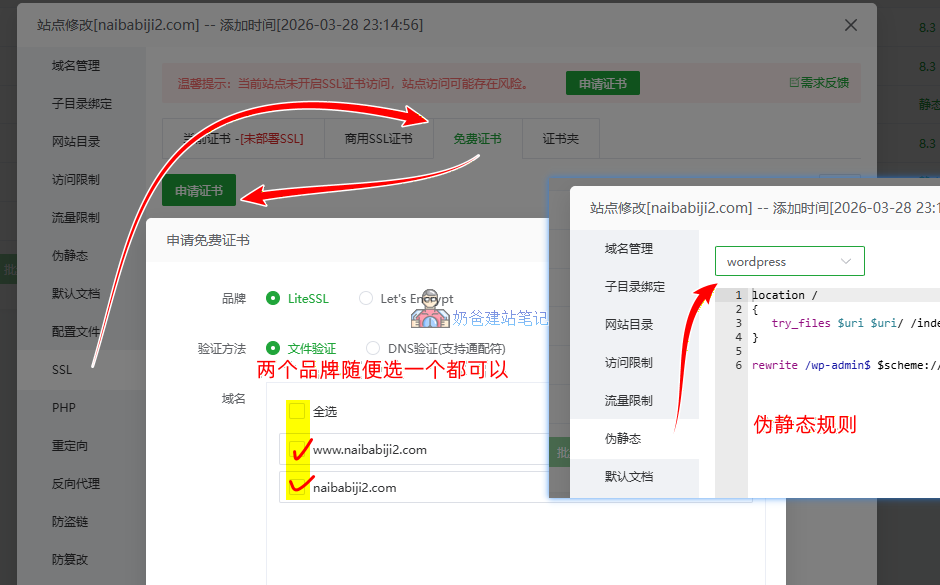
Setup method:
ClickWebsite ListThe followingSettingsbutton, a pop-up interface appears:
- Pseudo-static, select WordPress, save;
- SSL, free certificate, choose either LiteSSL or Let's Encrypt, select all domains, and click the Apply button.
After the SSL security certificate is successfully applied, you can enableForce HTTPS。
Step 3: Run the Installation Wizard to Install the WordPress Website
Now open your bound domain name, and the interface shown in the figure below will appear. Click „Let“s go„
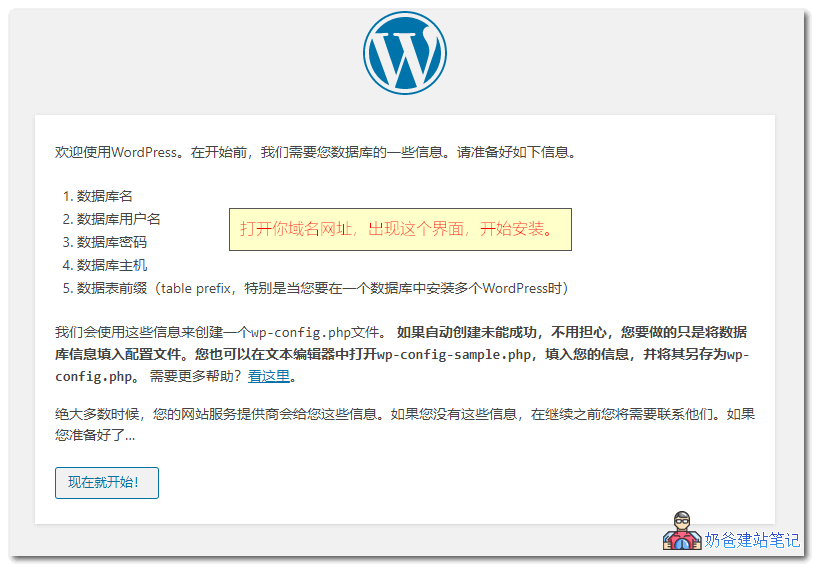
In the interface below, enter the corresponding database name, database username, and database password (if you forgot the database, you can check it on the database page in the Baota Panel backend), then click Submit.
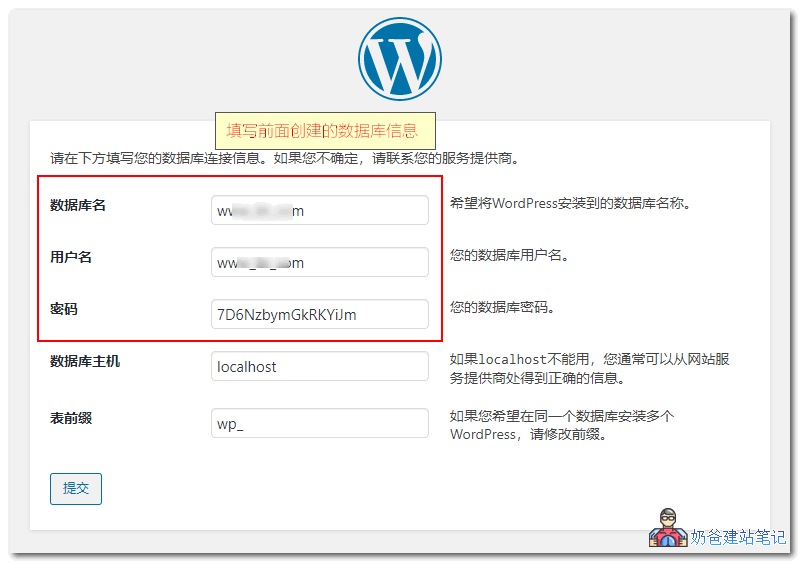
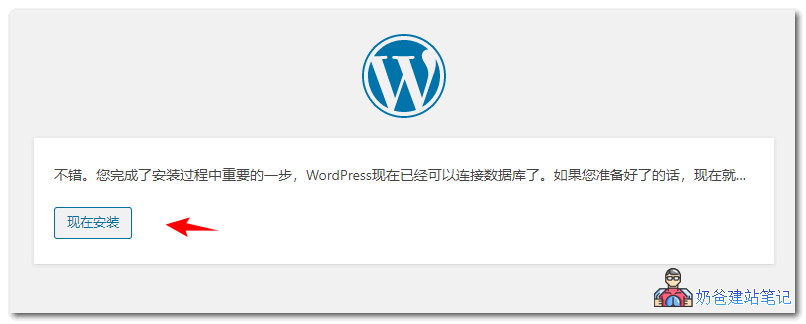
If the database is correct, the interface below will appear. Click "Install Now".
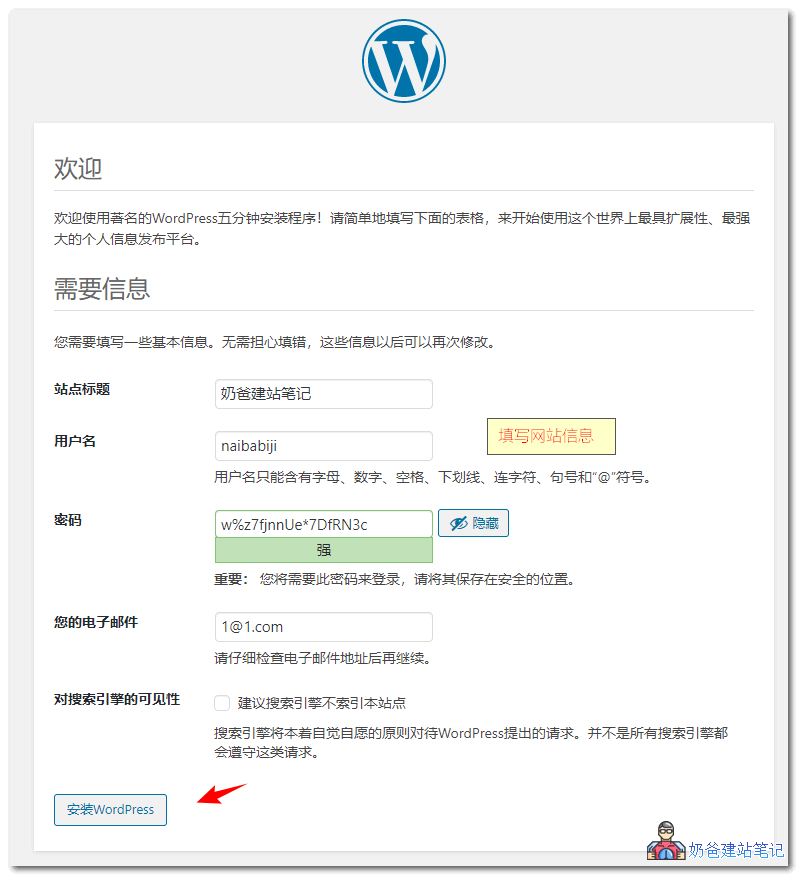
Soon, the interface below will appear, asking you to set the site title, username, password, and email information. After setting, click „Install WordPress“
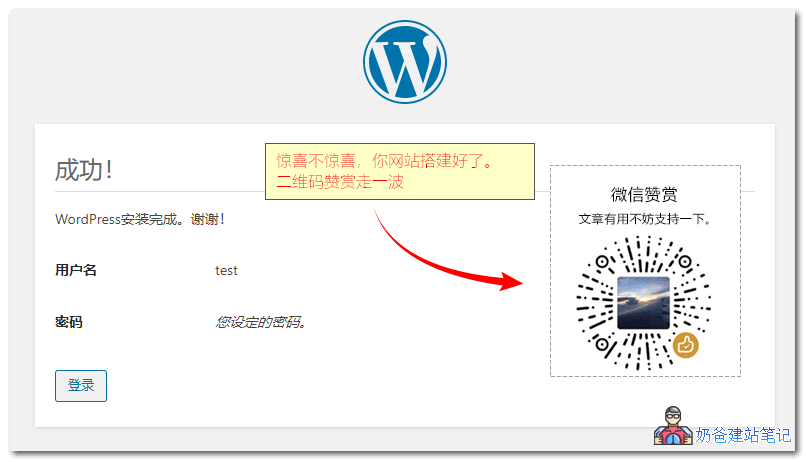
Success, you can log in now.
FAQ - Common Questions
What if the WordPress version deployed with one-click is not the latest?
Log in to the WordPress Admin Dashboard. If there is an update, it will prompt you. Click to update. Or use the manual installation method from Method Two.
What to do if the installation prompts "Need FTP information to connect to server"?
This is caused by incorrect folder permission settings. FromBaota Panelenter yourwebsite root directory,Select Allfiles and folders, on the right, under theMoremenu, selectPermissions, a pop-up interface appears to set755和www, click OK to fix the issue.
What to do if the website is very slow after installation?
A newly installed WordPress website being slow is usually not related to the website itself. It's either your internet speed to access the server is slow, or your server configuration is poor. You can refer toVPS Recommendationsan article on how to choose a better server.
How to use WordPress after installation? What are the setup items?
For how to use WordPress after installation, such as system settings, installing Themes and Plugins, please refer toWordPress Tutorialsthe content of the article.
Hello, previously my website pages were accessed via IP. Later, after DNS resolution, only the homepage is accessed via the domain, while other pages are still accessed via IP. I directly modified the URL and site domain in the WordPress Admin Dashboard, and now the Admin Dashboard is inaccessible (data was backed up using a WordPress Plugin). How can I make all pages accessible via the domain plus the page name?
Go to the database and replace the IP with the domain. For searching, you can Google "wordpress更换域名" (WordPress change domain).
In the one-click deployment step, your domain is test.xxxx.com instead of the previous xxx.com. Do I also need to set up DNS resolution for test.xxxx.com? But aren't all the files already under the root directory of xxxx.com?
I followed the steps one by one, but the one-click deployment always reminds me that the xxxx.com domain already exists. However, I have already deleted all the data.
Please clarify, thank you.
That domain is just a demo domain in my tutorial. Fill in your own accurate domain. If it prompts that it already exists, then go to the website list to delete it and start over. If there are still issues, it is recommended not to use one-click deployment.
I am using my own domain. If I delete it from the website list, won't the previously installed WordPress package also be deleted?
What I mean is, for example, my domain is 123.com. According to the tutorial, I downloaded the WP installation package under the root directory of this 123.com. Why is test.123.com still needed when deploying the website?
I'm stuck here. Thanks for clarifying.
If you are using one-click deployment, then you need to first delete the contents in the website, because one-click deployment will automatically add the domain and the installation package. The domain I used in the tutorial is a test domain; you don't need to add it that way.