Previously shared#WebsiteBuilding# Beginner-friendly Baota Panel setup tutorialToday, sharing another website environment installation script, the LNMP one-click package.
Naiba has used this LNMP one-click package to build website environments since starting with VPS; it's incredibly stable and uses fewer resources compared to Baota Panel. Opinions on which is more convenient or secure vary.
What is the LNMP One-Click Package?
There are reports online that the LNMP one-click installation package has been sold to another company, and there are claims of official tampering. It is not recommended to continue using it; you can considerinstall Baota Panelormanually installing the LNMP environment yourself。
Risk Warning Regarding the LNMP Supply Chain Tampering Incident (qq.com)
LNMP One-Click Installation Tutorial with Images
LNMP One-Click Installation Steps:
SSH into your VPS, then copy and paste the following code string.
wget http://soft.vpser.net/lnmp/lnmp1.5.tar.gz -cO lnmp1.5.tar.gz && tar zxf lnmp1.5.tar.gz && cd lnmp1.5 && ./install.sh lnmp
The meaning of this command is to download the LNMP installation package, extract it, and then proceed with the installation.
If prompted with 'wget: command not found', CentOS systems should use `yum install wget -y` or Debian/Ubuntu systems should use `apt-get install wget -y` to install wget.
After running the above command, the following interface will appear.
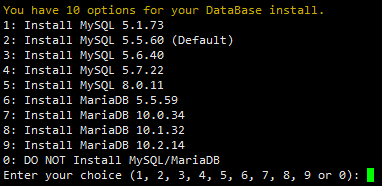
Here, you are asked to choose the version of MySQL or MariaDB to install. If your machine has 1GB of RAM or more, you can choose to install MySQL 5.6, which is option 3, then press Enter. If you have less than 1GB of RAM, installing the default 5.5 is fine (however, later onWordPressMySQL 5.5 might become unsupported, so it's recommended to purchase a machine with 1GB of RAM and directly install 5.6).
Next, the following image will appear, asking you to set a database password.

Set the MySQL root password (for security, pressing Enter without input will set it to lnmp.org#randomnumber). If you make a mistake and need to delete, you can hold Ctrl and press Backspace (in some cases, just Backspace works). After entering, press Enter to proceed to the next step, as shown in the image below:

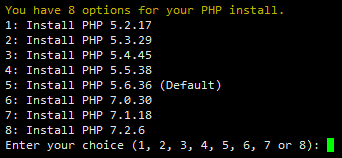
For the InnoDB engine of the database, simply press Enter to install (typing 'y' and pressing Enter yields the same result). Then the following image appears, asking you to choose the PHP version.
If you have a newly purchased server and plan to set up WordPress, it is recommended to choose 7.2.6. If you are not using WordPress, please first confirm if your application supports PHP 7 or above.
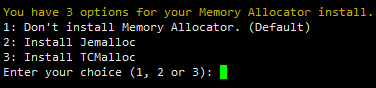
The image above asks if you want to install Jemalloc or TCmalloc. Enter the corresponding number and press Enter, or simply press Enter for the default (no installation). Just press Enter.
Then it's a waiting game. Depending on the machine's performance and network speed, it could take from 30 minutes to several hours.
Finally, when the image below appears, it means the installation was successful.

If your screen does not look like the one above and has red error messages, then the installation has failed. There's no need to investigate the problem; simply go to your VPS management backend, reinstall the operating system, and start over.
Post-Installation Steps for LNMP
After LNMP is installed, the next steps are adding domain binding and creating a website.. For the method, refer to the article below: