
Previously, we introducedThe Complete Guide to WordPress Website Backup, today we will introduceWordPress Website RestorationComplete Guide. The value of website backup lies in being able to quickly restore website data when problems occur. Many website owners set up backups but never test the restoration process, leaving them at a loss when they actually need to restore data. This article will detail website restoration methods for various scenarios, ensuring your backups truly serve their purpose.
Why Website Restoration is as Important as Backup
Backup and restoration are two sides of the same coin, both indispensable:
Having backup without restoration = data cannot be recoveredIf backup files cannot be successfully restored, they are just files taking up space. Regularly testing the restoration process to ensure backup availability is the real security guarantee.
Different scenarios require different restoration methodsAccidental deletion of a single file, deletion of the entire site, server crash, changing hosting providers—each situation requires a different recovery strategy. Mastering multiple restoration methods allows you to handle various emergencies calmly.
Quick recovery reduces business lossesEvery minute a website is down can mean traffic loss and lost orders. Familiarity with the recovery process enables you to get your website back online in the shortest time possible.
Forms a complete cycle with the backup articleBackup solves the problem of "how to save data", while restoration solves the problem of "how to recover data". The combination of the two forms a complete website data protection solution.
📌 Recommended Reading: It is recommended to first understandThe Complete Guide to WordPress Website Backup, this article focuses on explaining restoration operations.
Preparations Before Website Restoration
Confirm the Recovery Scenario
Different problems require different recovery strategies. First, clarify the situation you are facing:
| Scenario | Recovery Method | Difficulty |
|---|---|---|
| Website files corrupted | Partial recovery | ⭐⭐ |
| Accidentally deleted the entire site | Full recovery | ⭐⭐⭐ |
| Server replacement | Migration recovery | ⭐⭐⭐ |
| Database lost | Database recovery | ⭐⭐⭐⭐ |
| Website hacked/infected | Clean recovery | ⭐⭐⭐⭐⭐ |
Prepare the Recovery Environment
Before starting the recovery, ensure the target environment is ready:
- Check server space: Ensure there is enough space to store the recovered files
- Create a new database: Prepare database name, username, password
- Prepare domain name resolution: If changing servers, set up the domain pointing in advance
- Backup the current state: If the current environment still has some data, back it up first just in case
Some friends purchase server space that is relatively small. If the website data is large, plus the backup data decompression, the existing website data + backup files + temporary files during backup decompression will greatly exceed the server limits, leading to recovery failure.
Creating a new database is the best option when a website is hacked or infected, to avoid directly overwriting the existing database. Keep it temporarily for unforeseen needs (in case there are still issues with the recovery that require database investigation).
Pre-Recovery Checklist
- [ ] Confirm backup file integrity (Is the file size normal? Can it be decompressed?)
- [ ] Record the original website configuration information (database name, username, table prefix, etc.)
- [ ] Prepare database account password (can be distinguished from the previous database)
- [ ] Test PHP version compatibility in the new environment (recommended to be the same as or higher than the original environment)
Solution 1: Website Restoration with Baota Panel
Baota Panelis the server website management panel that Naiba has always recommended for beginners, and it is also very simple to operate.
Where are the Baota Panel backup files located?
Baota Panel supports two backup methods: local backup and remote backup.
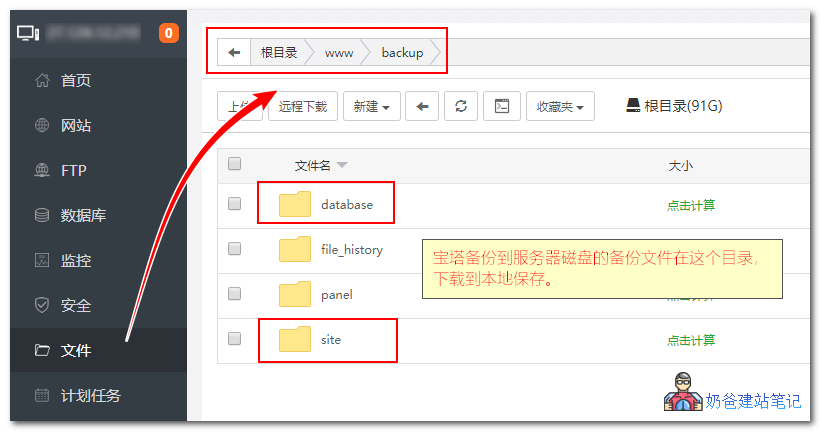
Local backup location
/www/backup/
sitefolder: Website file backupdatabaseFolder: Database Backup
Remote BackupIf automatic backup to FTP is set up, you need to log in to the FTP server to download the backup files.
Backup File Naming Rules
web_网站名_日期.tar.gz: Website File Backupdb_数据库名_日期.sql.gz: Database Backup
Note, if you have not previouslymanually set up website and database backups in the Baota Panel, then you may not have backup files, and thus cannot restore the website data.
How to Restore After Accidentally Deleting a Site in Baota Panel
Emergency Notice: If you have just deleted a site,do not immediately create a site with the same name, to avoid data being overwritten!
Step 1: Log in to the Baota Panel, open the file function, navigate to the /www/wwwroot directory, and check if the folder of your previous website still exists.
If you see the website folder is still there, it means the website files are still present and can be directly restored. If not, check if the backup folder or file recycle bin contains the website data. If neither does, then restoration is not possible.
Step 2: Check if the database still exists.
In the Baota Panel backend, go to Databases and see if the database for the mistakenly deleted website is still there. If not, try to find a database backup in the Baota backup folder. If one exists, it can be restored; if not, restoration is not possible.
Step 3: Create a New Website
Click Websites → Create New Website → Fill in your domain → Do not create a database
After creation, the normal website folder should be the one found in Step 1. If not, manually cut all contents from the folder found in Step 1 and paste them into the new website folder.
Since the database from before is not deleted, wp-config.php by default contains the previous database information. No manual modification is needed; simply visit the website domain to open the site. The mistakenly deleted website is then successfully restored.
Standard Recovery Process for Baota Panel
If you have previously backed up your website and database using the Baota Panel, the restoration method is very simple.
I. Restore Website Data
In the Baota Panel backend, go to the website backup data folder /www/backup/site, find the latest backup file, right-click, and extract it.
Then select all extracted files and folders, cut them, switch to the website folder /www/wwwroot/your-website-folder in the file manager, paste, and choose to overwrite all files. (Alternatively, you can delete the previous ones first and then paste.)
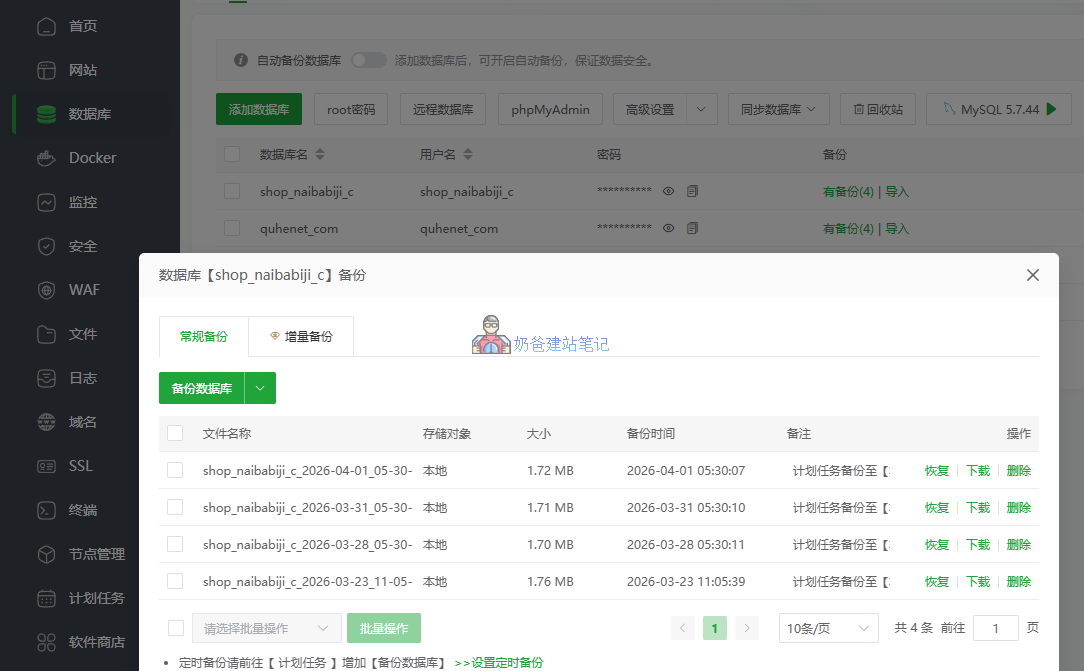
II. Restore Database
Restoring the database is simpler than restoring website data. Go to the database interface in the Baota backend, find the database you want to restore, click Backup Data, and select Restore.
This way, the website files and database are restored. If everything is normal, you can open your website by visiting your domain in a browser.
Using Baota Migration API for Recovery When Changing Servers
If you need to change servers and want to restore the website data from the old server to a new server, and the new server also has the Baota Panel installed, you can use the one-click migration feature of the Baota Panel to restore the website.
1. On the old server, go to the App Store, search for „One-Click Migration“, install it, and open it.
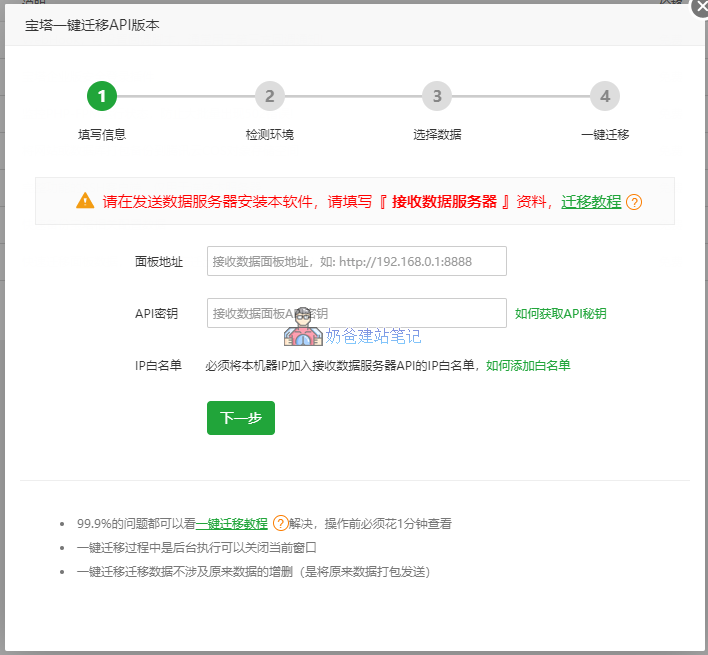
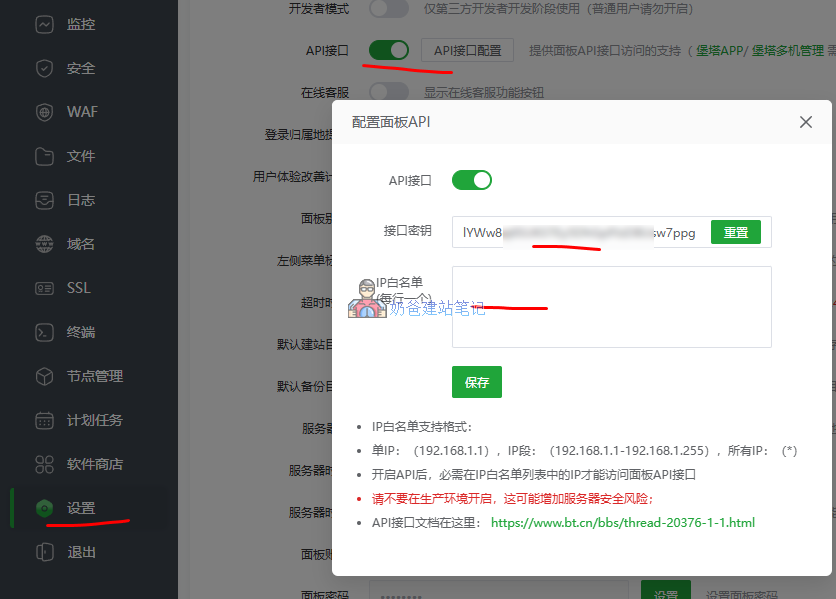
2. On the new server, go to Settings → API Interface → Enter the old server's IP address
3. On the old server's one-click migration interface, fill in the new server's API data, then follow the prompts to complete the data migration.
Note: Do not manually create a website on the new server before migration. If you have already created a website and database, delete them first before migrating.
Solution 2: Website Restoration with cPanel / Shared Hosting
If you are using specialized WordPress hosting like SiteGround or Hostinger, you can find the backup restore button in their backend website backup interface. It's very simple; just click the mouse to restore directly.
If your hosting uses a cPanel, you need to have manually downloaded the backup data locally beforehand. Then you can restore it via the backup function in cPanel, as it requires you to manually upload the data to be restored; it is not saved on the server by default.
This is also why it is recommended to purchaseSiteGround、Hostingerthis type of managed hosting—it considers beginners more and is simpler to operate.
SiteGround Restoration
SiteGround provides two backup methods: automatic and manual:
Automatic Backup Restore
- Log in to the SiteGround backend
- Go to „Speed“ → „Backups“
- Select the date to restore
- Choose the restore scope (full restore or partial restore)
- Confirm the restore
Manual Backup Restore
- Upload the backup file to public_html via FTP
- Import the database using phpMyAdmin
- Update the wp-config.php configuration
Hostinger Recovery
Hostinger provides daily automatic backups:
- Log in to hPanel
- Go to "Websites" → Select a website
- Click "Backups"
- Select the backup date
- Choose the file or database to restore
- Click the restore button
Option 3: WordPress Plugin Restoration (Universal for WP Sites)
If your previous backup was created using a WordPress backup Plugin, then the quickest way is to use the Plugin for one-click restore directly in the WordPress Admin Dashboard. You don't need to worry about server backups, Baota Panel backups, or cPanel backups, because as long as the WordPress website was backed up using a Plugin, it can be restored from the Plugin.
UpdraftPlus Recovery Tutorial
UpdraftPlus is the most popular backup Plugin for WordPress, and its restore operation is simple and intuitive:
Preparation
- Install WordPress on the new website (if it's a fresh restore)
- Install and activate the UpdraftPlus Plugin
- Prepare the backup files (typically including: database, plugins, themes, uploads, others)
Restoration Steps
- Go to WordPress Admin Dashboard → UpdraftPlus → Backup/Restore
- If the backup files are already uploaded to the server, they will be displayed directly in the list
- If the backup is stored locally or remotely, click "Upload backup file"
- Select the backup to restore and click the "Restore" button
- Select the content to restore (usually select all):
- [x] Database
- [x] Plugins
- [x] Themes
- [x] Uploads
- [x] Others (wp-config.php, etc.)
- Click "Restore" to start the restoration process
- Wait for the restoration to complete and follow the prompts
Post-Restoration Actions
- Log back into WordPress (you may need to use the original site's username and password)
- Check the Permalink settings (Settings → Permalinks → Save)
- Check if all functions are working properly
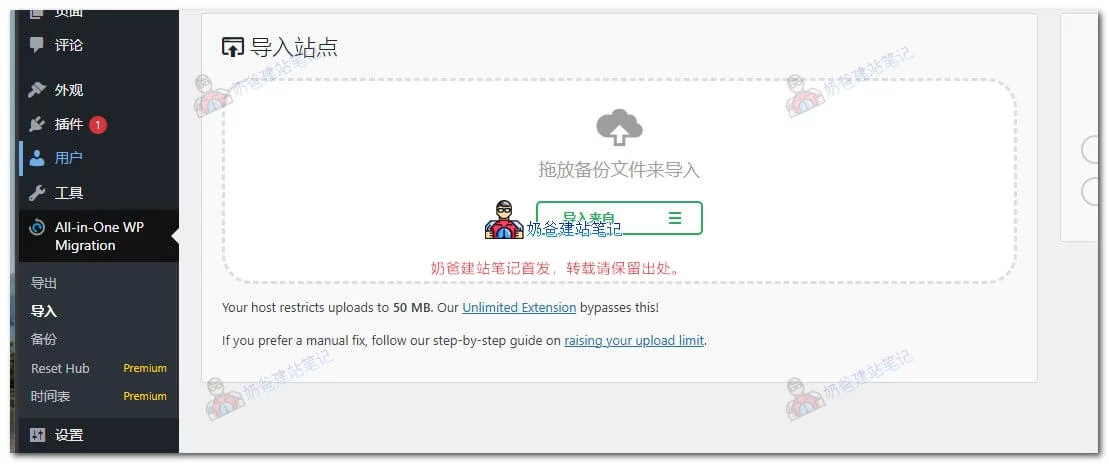
All-in-One WP Migration Recovery
All-in-One WP Migration is known for its simple import and export features:
Restoration Steps
- Install WordPress on the new website
- Install the All-in-One WP Migration plugin
- Go to Plugins → Import
- Select the import method:
- Import from file (select .wpress backup file)
- Import from URL
- Import from other storage
- Wait for the import to complete (large files may take a long time)
- Follow the prompts to complete the restoration
Handling Import Size Limits
If the backup file exceeds the upload limit:
- Install All-in-One WP Migration File Extension (paid)
- Or modify php.ini to increase upload limits:
upload_max_filesize = 512M
post_max_size = 512M
If modifying the code is ineffective, you can use the All-in-One WP Migration File Extension, which Naiba hasa usable cracked version for 9.9available.
Other plugin backup and restore methods are similar.
Manual Website Restoration Method (No Plugin/No Panel)
This method was essential for veteran webmasters years ago before panels like Baota Panel became popular. For today's beginners, the operation is not user-friendly enough, so just understanding it is sufficient.
First, similarly, you need to have the backup files and backup database locally.
First, upload the backup website data to the server via FTP software, then use server commands to decompress it and configure file and folder permissions.
Then upload the backup database file via phpMyAdmin.
Finally, modify the database information in wp-config.php in the website's root directory.
Finally, the website is successfully restored.
Special Scenario Recovery Solutions
Only Database, No Files
This situation usually occurs when Theme/Plugin files are corrupted, but the database is intact:
- Reinstall WordPress
- Download the latest version of WordPress
- Upload core files
- Import the database
- Use phpMyAdmin to import the original database (or directly restore it via the Baota Panel backend database)
- Reinstall Themes and Plugins
- Log in to the Admin Dashboard, reinstall the previously used Theme
- Install and configure Plugins one by one
- Upload the images folder
- Restore the wp-content/uploads folder from any available backup
- Or use data recovery tools to try to retrieve it
Only Files, No Database
This situation is less common and more difficult to recover from. Apart from materials like uploaded website images being meaningful, it's equivalent to having backed up nothing. The most important aspects of a website, like page design and Posts, are stored in the database.
Therefore, if you encounter a situation where you only have file backups and no database backup, the simplest solution is to rebuild the website. However, all images can be found from the backup files, so you don't need to recreate them.
Recovery After Changing Domain
Changing the domain name requires additional URL handling:
Method 1: Use the Better Search Replace Plugin
- Install the Better Search Replace Plugin
- Go to Tools → Better Search Replace
- Search: olddomain.com
- Replace with: newdomain.com
- Select all data tables
- First run a "dry run" check
- After confirming no issues, run "Replace"
Method 2: Manual SQL Replacement
UPDATE wp_options SET option_value = replace(option_value, 'https://旧域名.com', 'https://新域名.com') WHERE option_name = 'home' OR option_name = 'siteurl';

UPDATE wp_posts SET post_content = replace(post_content, 'https://旧域名.com', 'https://新域名.com');

UPDATE wp_postmeta SET meta_value = replace(meta_value, 'https://旧域名.com', 'https://新域名.com');
301 Redirect Settings
Add a 301 redirect from the old domain website to the new domain to preserve SEO ranking.
Frequently Asked Questions (FAQ)
Q: Can a site be recovered after deletion in Baota Panel?
Depends on the operation during deletion:
If "Delete files" was not checked during deletion: data will remain in the /www/wwwroot/ directory, and you can directly recreate the site and bind it.
If "Delete files" was checked: you need to rely on previous backups to restore; without a backup, restoration is impossible.
Q: What to do if the website displays a blank page after recovery?
This is usually caused by a PHP error. If you know how to enable WordPress debug mode, you can enable it to help diagnose the issue. If not, deactivate all plugins, install and activate a default theme. If the frontend displays normally with the default theme, then switch back to your theme and enable plugins one by one. Sometimes, you also need to clear server and CDN caches to troubleshoot.
Q: What to do if images are not displaying after recovery?
You can use the browser's inspect element feature to check if the image paths are correct, then verify if the corresponding folders on the server contain those images. If the images are missing, it's a path error; restore to the correct path. If the images exist but don't display, it might be incorrect file permissions; set them to the correct permissions.
Q: What to do if I cannot log into the admin dashboard after recovery?
If you forgot the administrator password after restoring from a backup, you can refer toWhat to Do If You Forget Your WordPress Password? 4 Methods to Quickly Recover Admin Password (2026 Latest) – NaibabijiIf the admin dashboard simply won't load, then check for PHP issues; refer to the troubleshooting method for the second issue (blank website).
Q: How to recover a website without a backup?
It's very difficult to recover data without backup files. First, ask your hosting provider if they have server backups. If not, you can only rely on web snapshots (though these seem to be unavailable now). If that fails, you'll have to abandon recovery and start rebuilding the website.
Q: What to do if the website becomes very slow after recovery?
This is usually caused by inconsistencies in the PHP version or PHP extensions between the new and old environments. First, switch to the same PHP version and extensions as the old server. Deactivate all plugins and test. If the speed returns to normal, then enable plugins one by one to identify which one is causing the slowdown. Check if the cache plugin settings are accurate and if there are any different optimization settings between the new and old servers.