
wp-config.php is the configuration file for WordPress. Naibabiji shares 15 advanced uses of wp-config.php here. Let's see if there are any techniques you need.
Understanding wp-config.php
wp-config.phpis the configuration file for WordPress. It does not exist by default and is automatically created during website installation. The one inside the WordPress installation package you downloadedwp-config-sample.phpRename towp-config.phpYou can manually create this file and then insert the following 15 code snippets to achieve some advanced features.
Note: It is recommended to use a dedicated code editor to modifywp-config.phpsuch as Sublime Text, Notepad++, etc.
15 Advanced Uses of wp-config.php
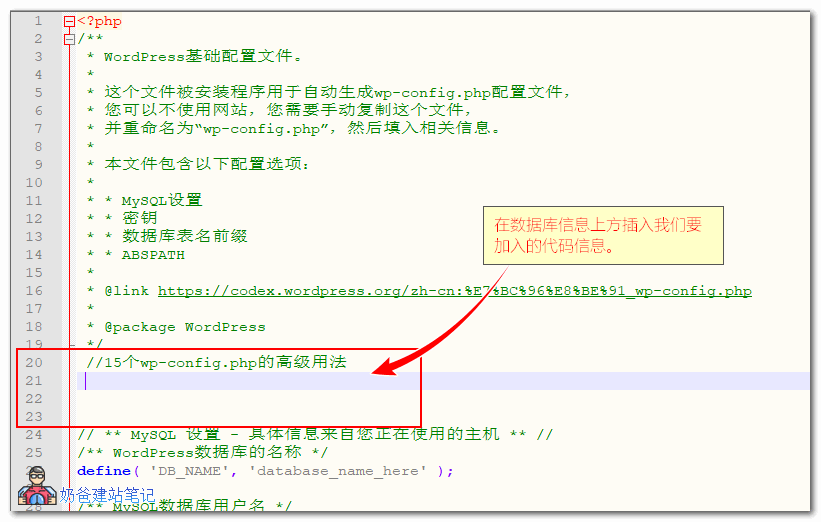
When writing the code, we insert it above the database settings.
Enable WordPress Debug Mode
WordPress debug mode is used by developers to troubleshoot error messages on the site. It is disabled by default. When our site has problems and we cannot determine the cause, we can enable WordPress debug mode.
The default wp-config.php comes with this parameter. We just need to change the value to true and save it.
/** 开启WordPress调试模式 */
define( 'WP_DEBUG', true );
If you need to debug CSS or JavaScript scripts on the front-end, you can also add the following code to enable it.
/** 开启CSS和JS调试模式 */
define( 'SCRIPT_DEBUG', true );
Change Database Prefix
By default,WordPress installationThe default prefix wp_ will be used. If you are installing multiple WP sites in one database, it is recommended to change to different database prefixes.
It is not recommended to change the database prefix for an already installed site. Also, during a fresh WordPress installation, you can choose the database prefix on the installation screen.
/** 自定义数据库前缀 */
$table_prefix = 'a81kJt_';
Change WordPress Website URL
When you change your website's domain name and cannot access the WP admin dashboard, besides modifying the website URL from the database, you can also use thewp-config.phpfile to change the URL address.
/** 设置wordpress网站地址 */
define('WP_SITEURL', 'https://blog.naibabiji.com');
define('WP_HOME', 'https://blog.naibabiji.com');
Automatically Clean Trash
If you have the habit of deleting posts to the trash, you can use the following code to implement scheduled automatic emptying of the trash to save website resources.
/** 自动清理回收站 */
define( 'EMPTY_TRASH_DAYS', 7 );
The number 7 above is the number of days, which you can modify yourself. If set to 0, the trash function will be disabled, and when you want to delete a post, it will be permanently deleted directly.
Enable WordPress Multisite Feature
Naibabiji has written a separate article on the WP Multisite feature. For an in-depth understanding, refer to the URL below:
/** WP开启多站点模式 */
define( 'WP_ALLOW_MULTISITE', true );
Redirect Non-existent Subdomains and Folders
This code is used when Multisite mode is enabled. When a user accesses a non-existent subdomain or subfolder, it will automatically redirect to the page you set, such as the homepage.
/** 多站点不存在子域和文件夹跳转 */
define( 'NOBLOGREDIRECT', 'https://blog.naibabiji.com' );
Manage Post Revisions
By default, WordPress keeps post revisions so that you can compare old and new versions when writing articles or recover from mistakes.
But most people don't need this feature, and it takes up database space. Naibabiji Website Building Notes has also shared separately beforeHow to Disable or Reduce the Number of Revision Saves。
/** 完全禁用修订版本 */
define( 'WP_POST_REVISIONS', false );
/** 保留5份修订版本 */
define( 'WP_POST_REVISIONS', 5 );
Use WordPress's built-in database repair and optimization features
I believe 99% of WordPress users don't know that WP actually comes with an automatic database repair and optimization feature, because most people directly use database optimization plugins, such as the following:
- Optimize Your WordPress Database with WP-Optimize
- 7 WordPress Database Plugins for _Cleaning_Optimizing_Resetting_Repairing_Searching
And if you don't want to use plugins, you can also try using WP's built-in database repair and optimization feature.
/** 打开WP内置的数据库修复优化 */
define( 'WP_ALLOW_REPAIR', true );
Add the above code towp-config.phpAfterwards, via你网址/wp-admin/maint/repair.phpThis URL can be used for database repair and optimization.
Note that this URL is accessible to anyone, so it's best to delete the code after optimizing the database.
Disable automatic updates
WordPress automatic update feature has pros and cons. For webmasters who don't like automatic updates, you can use the following code to disable automatic updates. Especially for friends with domestic servers, it is recommended to disable it to avoid site crashes due to failed automatic updates.
For detailed automatic update configuration files, refer tothe official documentation., the most commonly used ones are listed here.
/** 禁用WP自动更新功能 */
define( 'AUTOMATIC_UPDATER_DISABLED', true );
If you want to disable updates for plugins and themes, you can refer to the following article:
- WordPress Disable Update Notifications for Specific Plugins
- Completely disable WordPress Plugin and Theme updates, installation, and editing functions
Increase PHP memory limit
This feature is useful for many shared hosting users, but it may not always work. If the service provider restricts memory usage on the server, this code won't be effective either, so it's stillmore convenient to build a website using a VPS.
/** 设置WordPress网站内存限制 */
define( 'WP_MEMORY_LIMIT', '96M' );
/** 设置WordPress管理后台内存限制 */
define( 'WP_MAX_MEMORY_LIMIT', '128M' );
Force SSL login
This feature is actually unnecessary when we enable forced SSL redirection after installing an SSL certificate for the website. However, if you haven't enabled forced SSL redirection, you can use the following method to force SSL login for the website.
/** 强制WordPress通过ssl登录 */
define( 'FORCE_SSL_ADMIN', true );
Disable plugin and theme editing/updates
If your website is to be handed over to clients or novice users, it is recommended to prohibit them from editing and updating themes and plugins to avoid crashing the website.
/** 禁止主题和插件的编辑功能 */
define( 'DISALLOW_FILE_EDIT', true );

/** 禁止主题和插件的编辑以及更新 */
define( 'DISALLOW_FILE_MODS', true );
Of course, this code only prohibits editing and updating via the backend links. If FTP updates are to be used, this code is still powerless.
Delete extra files generated during image editing
This feature should not be used by many users. What does it do?
By default, when you upload an image to the WordPress media library, you can choose to edit the image, such as cropping. This will create an additional image. If you have thumbnails enabled, multiple images will be created.
When you click the edit image function again, WP will generate multiple images again.
If you use the following code, it will only generate the edited image file once. Multiple edits will overwrite the previous one.
/** 删除图像编辑多余文件 */
define( 'IMAGE_EDIT_OVERWRITE', true );
Disable unfiltered HTML code
If your website allows user registration and article publishing, it is recommended to enable the following feature to prevent users with publishing permissions from posting unfiltered HTML code.
/** 开启未过滤HTML */
define( 'DISALLOW_UNFILTERED_HTML', true );
The above are 15 advanced uses of wp-config.php. Do you need any of these features? Go ahead and give them a try.