Since Naiba started using VPS, he has been using the LNMP one-click package to build websites. In those days when server performance was generally low, LNMP was indeed very useful. However, now most VPSs start with 1G or 2G memory. Unless your server configuration is very low, or you are learning, Naiba recommends you useBaota PanelorWP Panelto manage the server, which will be more worry-free.
What is LNMP?
LNMP refers to the website building environment composed of Linux, Nginx, MySQL, and PHP:
- L: Linux, server operating system;
- N: Nginx, Web server;
- M: MySQL / MariaDB, database;
- P: PHP, PHP program runtime environment.
For WordPress website building, we need the LNMP environment. Of course, replacing N with A is also possible (Nginx replaced by Apache, each has its own advantages, depending on personal preference).
What is the LNMP One-Click Package?
Usually, when domestic webmasters mention the „LNMP one-click package“, they usually refer to a Shell script written by „Jun Ge“ that automates the deployment of the LNMP environment, helping us quickly install these environments on the server to set up the website runtime environment.
If you manually configure these environments following online tutorials, you need to enter many commands, and the entire configuration may take several hours. With the one-click package, you only need to copy one command at the beginning, and then make some choices, and the rest will be done automatically. Although it also takes some time, you can completely ignore it afterwards and just check the installation result at the end.
As of 2026, the LNMP project is still being updated. The latest official version currently provided on the official website isLNMP 2.3, which supports newer software versions including PHP 8.4, PHP 8.5, MySQL 8.4 LTS, and MariaDB 11.4/11.8 LTS.
What happened with the LNMP supply chain poisoning incident?
In September 2023, Anheng Information CERT monitored a supply chain poisoning attack on LNMP. They found that the installation package downloaded from the lnmp.org official website had been implanted with malicious programs.
Related articles:Risk Warning Regarding the LNMP Supply Chain Tampering Incident (qq.com)
Although „the installation package provided on the LNMP official website once suffered supply chain poisoning“ and „LNMP officials actively poisoned it“ are two different things, once bitten, twice shy. Naiba now rarely recommends everyone to use the LNMP one-click package to manage servers.
After server configurations improved, Naiba basically adopted the Baota Panel to manage servers. For some servers with low configurations, he wrote a one-click script to configure and install WordPress.
Now most servers have switched to Naiba's own WP Panel, which is completely open source. All installation packages are obtained from official sources, and many security and performance optimizations have been made for WordPress usage scenarios. If you are interested, you might want to try it. Official website address:WP Panel – WordPress Server Management Panel - Lightweight Alternative to Baota Panel and 1Panel
Is LNMP itself safe?
LNMP itself is safe; the security issues were only with the LNMP one-click package.
Linux, Nginx, MySQL/MariaDB, and PHP are all independent software projects.
The so-called LNMP is just combining them to run a website.
For example, you can install them separately on a Debian or Ubuntu server:
Nginx
MariaDB
PHP-FPM
What you end up with is still a complete LNMP website runtime environment.
LNMP One-Click Installation Tutorial with Images
If you still want to try the LNMP one-click installation package, you can follow the steps below. (To be honest, this project is likely to collapse after being sold. The latest version on the official website is 2.3, but the help interface still shows the installation script commands for 2.2. Moreover, when Naiba updated this article, the official website's security certificate had already expired for two days. For such an unmaintained script, if you want to update the program version later, you have to figure out the method yourself.)
LNMP One-Click Installation Steps:
SSH into your VPS, then copy and paste the following code string.
wget https://soft.lnmp.com/lnmp/lnmp2.2.tar.gz -O lnmp2.2.tar.gz && tar zxf lnmp2.2.tar.gz && cd lnmp2.2 && ./install.sh lnmpThe meaning of this command is to download the LNMP installation package, extract it, and then proceed with the installation.
If prompted with 'wget: command not found', CentOS systems should use `yum install wget -y` or Debian/Ubuntu systems should use `apt-get install wget -y` to install wget.
After running the above command, the following interface will appear.
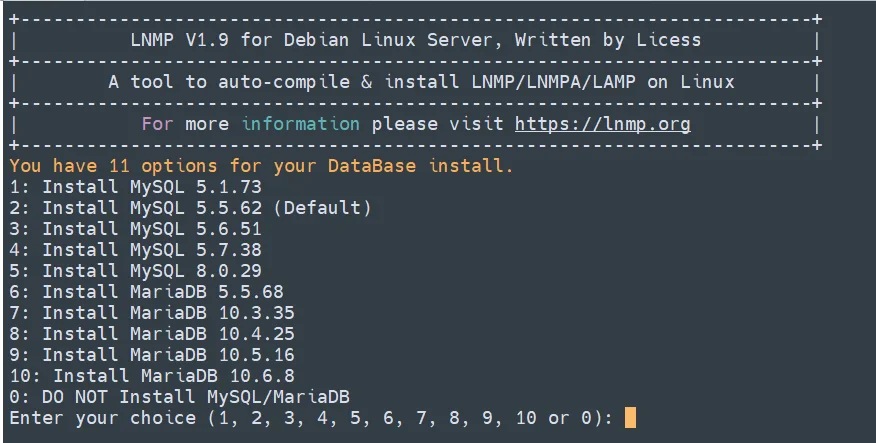
This is where you choose the version of MySQL or MariaDB to install. WordPress currently recommends PHP 8.3, MySQL 8.0, or MariaDB 10.11. If your memory is less than 1G, installing a higher version of the database may fail.
Next, the following image will appear, asking you to set a database password.

Set the MySQL root password (for security, pressing Enter without input will set it to lnmp.org#randomnumber). If you make a mistake and need to delete, you can hold Ctrl and press Backspace (in some cases, just Backspace works). After entering, press Enter to proceed to the next step, as shown in the image below:

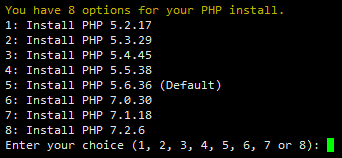
For the InnoDB engine of the database, simply press Enter to install (typing 'y' and pressing Enter yields the same result). Then the following image appears, asking you to choose the PHP version.
If you have just purchased a new server to build WordPress, it is recommended to choose a version above 8.0. If you are not using WordPress, please first confirm whether it supports PHP 7 or above.
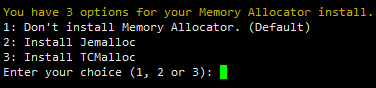
The image above asks if you want to install Jemalloc or TCmalloc. Enter the corresponding number and press Enter, or simply press Enter for the default (no installation). Just press Enter.
Then it's a waiting game. Depending on the machine's performance and network speed, it could take from 30 minutes to several hours.
Finally, when the image below appears, it means the installation was successful.
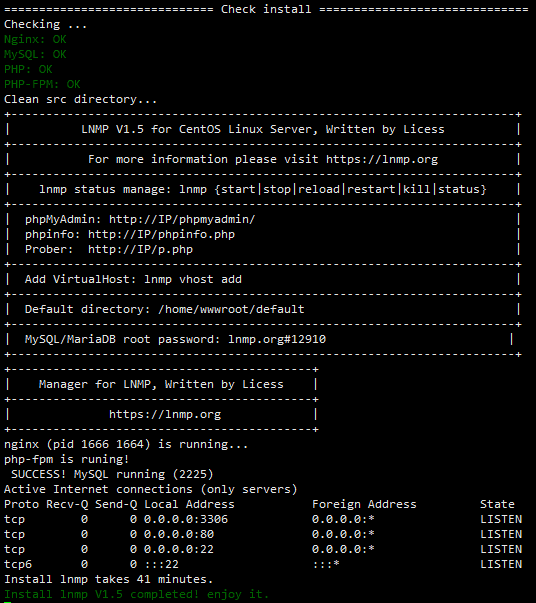
If your screen does not look like the one above and has red error messages, then the installation has failed. There's no need to investigate the problem; simply go to your VPS management backend, reinstall the operating system, and start over.
Post-Installation Steps for LNMP
After LNMP is installed, the next steps are adding domain binding and creating a website.. For the method, refer to the article below: