
WordPress optimizationThere is an obvious way to optimize the loading speed of a website, which is to use CDN acceleration. Upyun is a CDN acceleration service provider. WordPress website owners can get 10GB of cloud storage and 15GB/month of CDN traffic each month, with HTTPS acceleration support.
This article teaches you how to start from registration and useUsing Upyun to Accelerate WordPress。
Tutorial on Using Upyun CDN Cloud Storage to Accelerate WordPress Websites
The tutorial in this article usesUpyuncloud storage's built-inCDNfunction to host image files on Upyun, achievingdynamic and static separation acceleration. You can also put the entire website on Upyun's CDN service, but novice users are advised to start with this tutorial and then apply CDN to the whole site after becoming familiar.
Register an Upyun Account
First, we need to register an Upyun account. After registration and real-name verification, you will receive a 61 yuan voucher.
What can you buy with the 61 yuan newcomer voucher from Upyun?? The 61 yuan one-month voucher from Upyun's real-name authentication is used to offset your fees for using Upyun services that month. This means you can use this 61 yuan voucher to pay for any service provided by Upyun.
Obtaining Upyun Free Traffic
Does Upyun still offer free traffic? The answer is yes.
By default, Upyun only provides the 61 yuan voucher for real-name authentication and no longer offers fixed monthly free traffic. To get fixed monthly free traffic, you need to apply for the Upyun Alliance (Link Address), which grants 10GB of free cloud storage space and 15GB of CDN acceleration traffic per month.
Upyun Cloud Storage Setup Tutorial
Although we intend to use Upyun's CDN acceleration, Upyun provides cloud storage space by default, and cloud storage automatically includes CDN acceleration. Therefore, it is recommended to directly useUpyun Cloud Storage to accelerate your WordPress website。
①、Create Cloud Storage Service
Enter the Upyun console, find Cloud Storage, and then create a service.
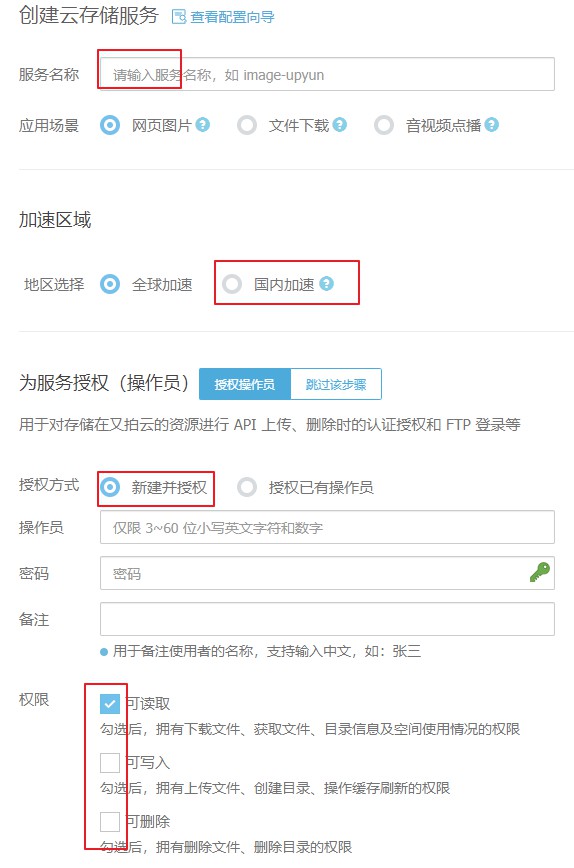
Choose a name for yourself, for acceleration traffic, Naiba only accelerates within China. Generally, there are no visitors from abroad, and international acceleration costs are higher.
Create a new operator, grant read, write, and delete permissionsAll permissions。
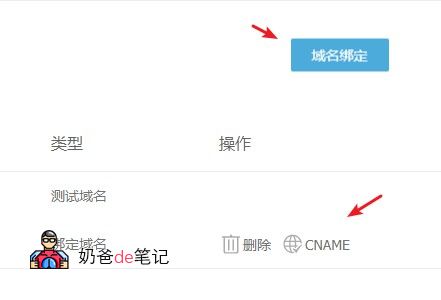
②、Bind Domain
After creating the service, go back to the service management interface, under Domain Management, click the Domain Binding button, then enter a CDN domain name you want, for example, Naiba's is img.wordpressjc.com
Then go to the website where you purchased the domain, find the DNS resolution panel, and add aCNAME的records, the record value can be seen in the location indicated by the arrow in the image below
Don't know how to resolve? Read this article:#WebsiteBuilding# Tutorial on Adding Domain Name Resolution
③、API Key and HTTPS Configuration
Switch to [Content Management], set API Key to ON.
Switch to [HTTPS] interface (skip this step if HTTPS is not needed). In the HTTPS configuration, select Manage. If you don't have an SSL certificate, click the button to apply for one. Both TrustAsia and Let's Encrypt are fine, free.
Hotlinking protection can be turned off for now; enable it later when traffic increases (hotlinking protection images can promote you then).
WordPress Upyun Plugin Setup Tutorial
Previous online tutorials for Upyun used the pluginHacklog Remote Attachment UpyunThis plugin, but it hasn't been updated for a long time. After upgrading to WordPress 5.3, uploading images often fails with empty files.
Fortunately, another blogger made a new Upyun plugin,WPUPYUN, so the following tutorial is divided into two parts: the old version and the new version.
Old Version Plugin Tutorial
After finishing the settings on the Upyun website, now you need to go back to WordPress.
First, install the Upyun WordPress plugin. PluginDownload hereDon't know how to install the plugin?
After installation, find the Hacklog Upyun Remote Attachment option in the Settings menu.
Pay attention to the following fields
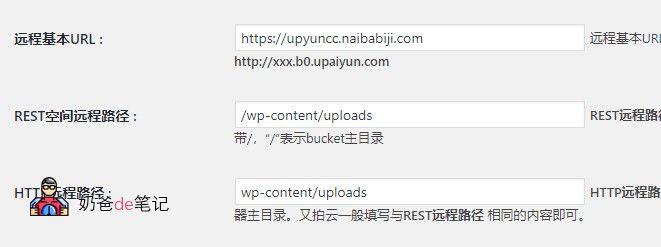
Naiba uploaded the attachments from the uploads folder on the website to Upyun cloud storage himself. The directory structure on both sides is kept consistent for easy domain change in the future. You can use FTP to upload your files yourself.For Upyun FTP usage tutorial, refer to the official website's。
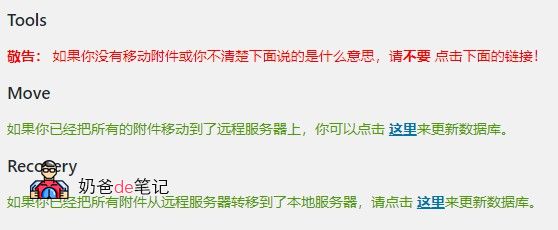
After setting, save. There will be a test prompt on the plugin top; if successful, it will tell you.
If you have uploaded all images to Upyun's cloud storage, you can click the button below to replace the database URL.
After setup, posting articles will default to uploading images to Upyun, and Upyun will automatically enable CDN acceleration.
New version Upyun plugin tutorial
First, click the button below to download (or search WPUPYUN in the backend to install) the new versionUpyun WordPress plugin。
After downloading, install and activate the plugin. (WordPress Plugin Installation Tutorial_Complete Guide to Popular Essential Plugins)
Enter the settings interface as shown below.
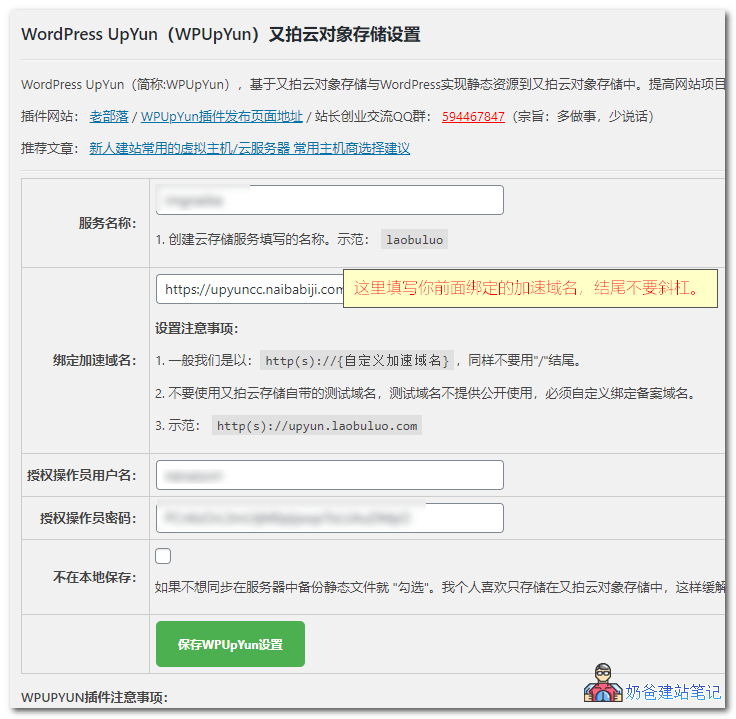
- Service name: fill in the service name created earlier for cloud storage service.
- Acceleration domain: fill in your bound acceleration domain.
- Operator username and password: fill in the account information created in Upyun backend.
- Do not save locally: choose based on your actual situation, it is recommended to keep a local copy.
After setting, go to the Media Library and add an image. If set correctly, the image URL will become the URL accelerated by Upyun. Test if the image is accessible.
If the image displays normally,WordPress Upyun accelerationoperation is complete.
Common Issues After Accelerating WordPress with Upyun
Below are common issues collected from netizens after using Upyun to accelerate WordPress. If your question is not resolved, you can join group 774633089 for discussion.
Images Not Displaying After Publishing Articles When Switched to Upyun
In some cases, you may find that after images are transferred to Upyun, they do not display on the website frontend but show in the backend. This issue is caused by WordPress responsive image code and can be resolved by disabling it. Method as follows:
Disable WordPress's Default Feature of Generating Responsive Images
Previous Images Not Displaying After Installing the Upyun Plugin
After installing the Upyun plugin, you may find that all previously uploaded images on your website show 404 errors and do not display. This is because the plugin defaults to replacing your website's image links with Upyun accelerated domain URLs. You need to upload all your website's previous images to Upyun cloud storage.
How to Switch from the Old Version Plugin to the New Version Plugin
If you previously used Hacklog Remote Attachment Upyun and added the /wp-content/uploads path in the settings interface as in this tutorial, then you need to perform the following operations.
- Use FTP to move all files under the /wp-content/uploads folder in Upyun cloud storage space to the root directory of cloud storage.
- UseWordPress Batch Find and Replace Plugin and Code for Modifying Article Contentmethod inside, modify the image links in articles to the new ones.
Naiba Tip:
① You can contact customer service first to see if they can help move the directory directly in the backend. Doing it yourself via FTP is still troublesome.
② If you don't delete (or move) the files under /wp-content/uploads, you can also not modify the image links in old articles. New articles will use the new path URL, while old articles still use the old path URL, but it will take up some extra cloud storage space.
③ If you want to replace, for the plugin, directlyhttps://original-website/wp-content/uploads/withhttps://upyun-storage-custom-url/is sufficient.
The database replacement command is as follows:
UPDATE wp_posts SET post_content = REPLACE( post_content, 'https://原来网址/wp-content/uploads/', 'https://又拍云存储自定义网址/' ) ;