使用WordPress搭建网站后,设置伪静态规则完毕除了首页能访问,其他页面都是404错误,就是由于没有配置好服务器的伪静态规则导致的。本文介绍百度云虚拟主机WordPress404错误的解决办法。
如果你是使用的VPS,然后安装到宝塔面板或者LNMP一键包,在你添加网站的时候就可以很方便的设置伪静态规则。但是如果你使用的是百度云虚拟主机BCH的话,设置伪静态的方法就要稍微麻烦一点。下面是百度云虚拟主机BCH配置WordPress伪静态的方法,其他程序方法类似。
前期准备
百度云虚拟主机BCH设置伪静态有两种方法,一是通过app.conf文件,二是通过bcloud_nginx_gen.conf文件。
奶爸的推荐是使用第二种,不过这里两种方法都介绍下。
app.conf
请复制下面的代码,然后保存为app.conf文件
handlers:
    - url : /
    script : /index.php
    script : /index.html

    - rewrite_not_exist: (.*)
    script: /index.php/$1

    - errordoc : 404 /error/404.html

    - expire : .jpg modify 10 years
    - expire : .swf modify 10 years
    - expire : .png modify 10 years
    - expire : .gif modify 10 years
    - expire : .JPG modify 10 years
    - expire : .ico modify 10 years
说明一下的是,上面的规则自定义了404页面,是/error/404.html,如果你想使用WordPress默认的404页面,则删除这一行。
下面的文件expire是文件过期时间,默认设置的是10年,可以改成30 days
参考资料:百度云帮助文档
bcloud_nginx_user.conf
请将下面的代码复制后保存为bcloud_nginx_user.conf
location / {

        try_files $uri $uri/ /index.php?$args;

}

# Add trailing slash to */wp-admin requests.

rewrite /wp-admin$ $scheme://$host$uri/ permanent;
具体方法
准备好app.conf或者bcloud_nginx_user.conf文件后,就可以开始来配置伪静态规则了。方法如下:
1、使用FTP软件把app.conf或者bcloud_nginx_user.conf文件上传到网站根目录(只上传任意一个,不要都传。)
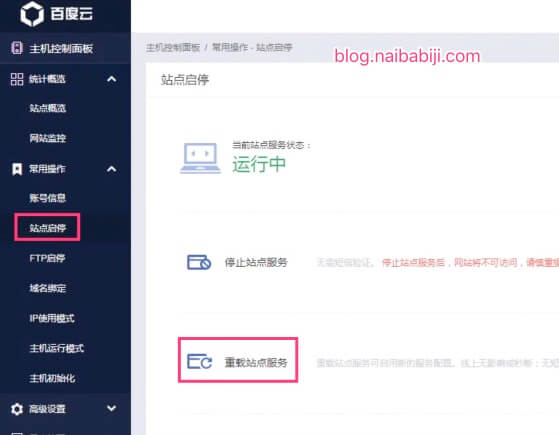
2、百度云虚拟主机BCH控制面板,找到站点启停,然后点击重载站点服务后面的按钮。
 3、进入WordPress站点设置里面设置伪静态,前台查看效果。
到这里,百度云虚拟主机BCH的伪静态就配置完毕了。
视频资料参考:BCH伪静态规则配置


