
Hello everyone, I am Brother Lei Feng. Today, I will talk aboutWordPress Adding Watermarks to Imagesplugin introduction and methods. Adding watermarks to images actually doesn't require much technical skill. On one hand, it's to prevent image theft, and on the other hand, it enhances website visibility.
WordPress upload image watermark plugin recommendation
If manually adding watermarks to images each time is troublesome, using a plugin can help you add watermarks automatically. There are many plugins for automatic watermarking on the WordPress platform. Here, I recommend two plugins that have proven effective.
Plugin Recommendation 1: DX-Watermark
DX-Watermark is a very oldimage watermarkplugin. Although the author hasn't updated it for 6 years, everything works normally.Supports adding text watermarks and image watermarks。
Features supported by DX-Watermark:
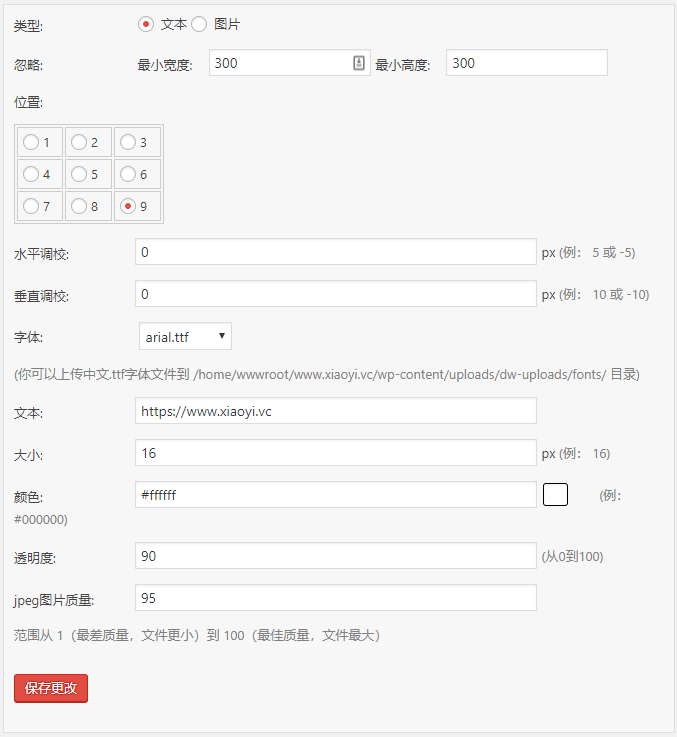
- Type: Can choose between text or image watermark types, default is text.
- Ignore: When the image size is smaller than the set value, no watermark is added.
- Position: Set the watermark to one of 9 positions, default is bottom right.
- Horizontal adjustment, Vertical adjustment: Adjust the horizontal and vertical offset of the watermark. Negative values indicate left or upward offset.
- Font: Due to the large size of font files, the plugin only includes a few built-in fonts. Users can upload .ttf font files to the wp-content/uploads/dw-uploads/fonts/ directory.
- Text: Enter the text to display as the watermark.
- Size: Enter the size for the text watermark display.
- Color: Choose the color of the text watermark from the color palette.
- Transparency: 0 means fully transparent, 100 means opaque.
- The plugin backend provides a preview function, allowing users to preview the effect before saving.
Plugin Recommendation 2: image-watermark
The highlight feature of image-watermark is that it canadd watermarks to images you have previously uploaded. Functionally, it also supports setting the watermark position and controlling transparency.
Features supported by image-watermark:
- Select watermark position;
- Adjustable transparency;
- Watermarks can be applied to both new and old uploaded images;
- Disable right-click copying of images.
Localized version address of image-watermark:https://www.lanzous.com/i6jzuni
There are several similar plugins, all largely similar; the two mentioned above are quite good and free, as reported by users.
Plugin Recommendation 3: WPWaterMark
WPWaterMark is a plugin developed by Chinese blogger Lao Jiang for adding watermarks to WordPress, fully in Chinese.
- Based on the WordPress platform and provided free to users, it enhances image watermarking functionality to prevent theft of articles and images, at least retaining the watermark to strengthen anti-theft capabilities.
- Offers three effects: nine-grid, random nine-grid, and full-coverage watermark, making it one of the few plugins with such features currently available.
- The lightweight watermark plugin supports setting text and image watermarks, with common functions like rotation angle and transparency adjustments.
WordPress upload image watermark plugin-free method:
If you think installingWordPress PluginWaste resources, then you can also use the following method to manually create a file to automatically add image watermarks (actually the same principle as plugins)
1. Create a class folder in the theme directory, then put theimage.phpfile into it
2. Open the functions.php file and add the following code:
Reference:Safe Method to Add Code to the functions.php File: Code Snippets
/**
* WordPress上传图片添加水印
*/
function uimoban_watermark($attachment_ID)
{
$attachment = get_post($attachment_ID);
switch($attachment->post_mime_type){
case 'image/jpeg':
case 'image/png':
case 'image/gif':
require THEME_FILES . '/class/image.php';
$image = new image(true);
$image->set('watermark.png', 1);
$image->watermark($attachment->guid);
break;
default:return ;
}
}
add_action('add_attachment', 'uimoban_watermark');
Explanation:$image->set(‚watermark.png‘, 1);In this, „watermark.png“ specifies the watermark image, which should match the watermark.png in the data/watermark/ directory from the first step„s code, though you can modify it as needed. The “1„ represents the watermark position.
WordPress Upyun/Qiniu watermark method:
Some users utilize image hosting services like Upyun or Qiniu, which natively support watermark settings. To have WordPress call images with watermarks added, the following method is required.
Upyun Automatic Watermark Addition
1. Open the functions.php file and add the following code:
/**
* 又拍云图片添加水印
*/
function fa_hack_image_url($matches) {
    $prefix = '!boob';// 自定义版本或者水印字符串
    return $matches[1] . $matches['2'] . $prefix;
}

function fa_image_add_watermelon( $content ){
    $content = preg_replace_callback("/(<img[^>]*src *= *[\"']?)([^\"']*)/i", 'fa_hack_image_url' , $content);
    return $content;
}
add_filter('the_content','fa_image_add_watermelon');
2. Then set Upyun watermark rules by configuring watermarks in the thumbnail creation settings.

The generated watermark address can be manually constructed by concatenating the URL:
/watermark/url/base64-encoded-watermark-path/align/southeast
The watermark path needs to be base64 encoded. For example, if the path is /watermark.png, after base64 encoding it becomes L3dhdGVybWFyay5wbmc=, so the suffix to add to the image is:
!/watermark/url/L3dGVybWFyay5wbmc=/align/southeast
The 'align' parameter specifies the direction, which can be adjusted based on your needs. The simplest approach is to set it directly when creating the rule.
Qiniu Automatic Watermark Addition
1. Open the functions.php file and add the following code:
add_filter('the_content', 'QiNiuThumbnail');
function QiNiuThumbnail($content) {
global $post;
$pattern ="/<img(.*?)src=('|\")(.*?).(bmp|gif|jpeg|jpg|png)('|\")(.*?)>/i";
/* 下面这行代码中的300表示缩略图的大小,请根据实际需求修改即可 */
$replacement = '<img$1src=$2$3.$4?imageMogr2/thumbnail/300x$5$6>';
$content = preg_replace($pattern, $replacement, $content);
/* 此处预留位置,可删除 */
return $content;
}
PS: In the above code,?imageMogr2/thumbnail/300xReplace with the required characters to complete image processing.
2. Create a new image style in the Qiniu backend, then create an image watermark style, which can also be a text watermark.

The above methods referenceZhang Ge's Blogand fatesinger.
If you don't mind the trouble,you can also manually add watermarks to imagesonline watermark tool or PS, because sometimes automatic watermarking may cover important parts of the image.
For batch adding watermarks to images on a computer, you can use the software XnConvert:
Method for Batch Processing Images on Mac: Resizing, Adding Watermarks, Rotating(There is a Windows version; the article originally mentioned the Mac version only.)