Paid reading has become a popular method for content monetization in recent years, as also introduced in the article
30 Ways to Make Money with a WebsiteSo, how can we implement partial content visibility after payment on our personal websites? Today, Naibabiji will introduce methods to set up partial paid content visibility on WordPress websites.
Basic Requirements for WordPress Content Paid Reading
To achieve content visibility after payment on a website, the following basic conditions must be met:
- A website built with WordPress
- A paid reading plugin
- An available payment gateway
A WordPress website is easy to set up—just buy a domain and server, and follow the
WordPress Installation Tutorialtutorial, and you're done. For the paid reading plugin, Naibabiji currently uses the
WordPress Paid Content Plugindeveloped by Lightning Blog, which is a one-time purchase with lifetime upgrades.
Plugin PurchaseThe payment gateway applied for is Hupijiao, which individuals can sign up for without a company, enabling fully automated payments.
WordPress Content Paid Reading Setup Tutorial
First, once you have your WordPress website and have purchased the paid reading plugin, we can proceed with the paid reading setup. The payment gateway can be applied for during the plugin configuration.
1. Upload the payment plugin to the website for installation. 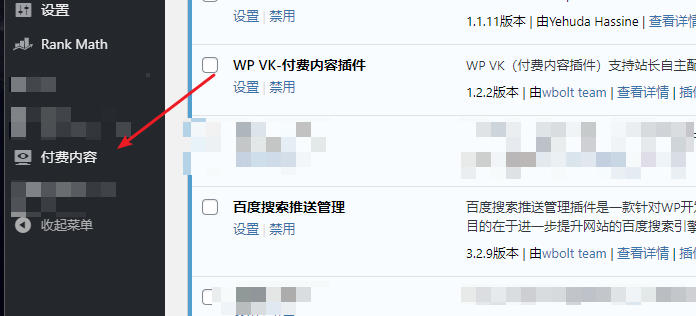 2. Enter the plugin settings. First, you need to enter the activation code to activate it. After activation, you can configure the prompts and colors for paid reading.
 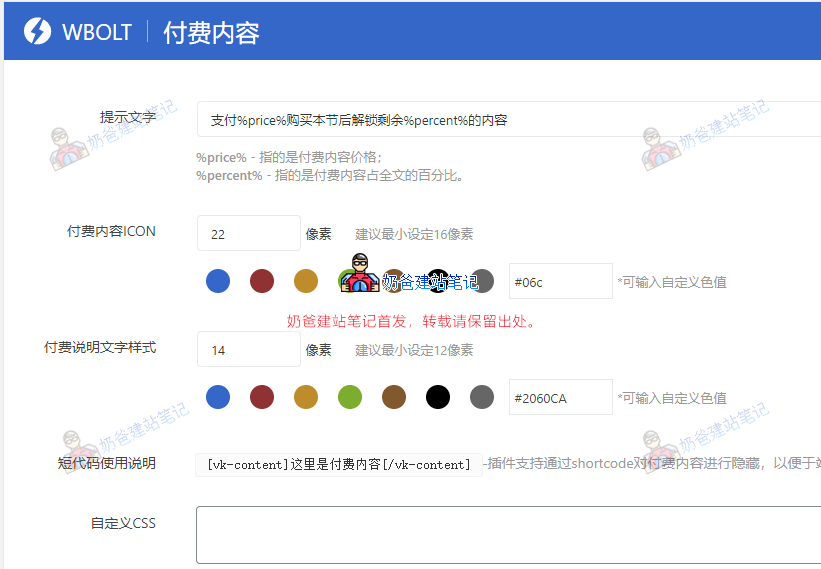 3. Set up the payment gateway
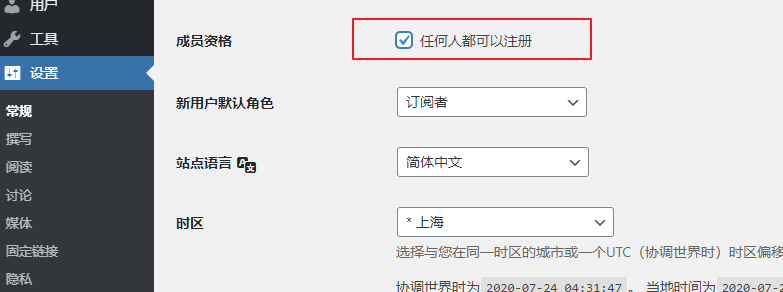
 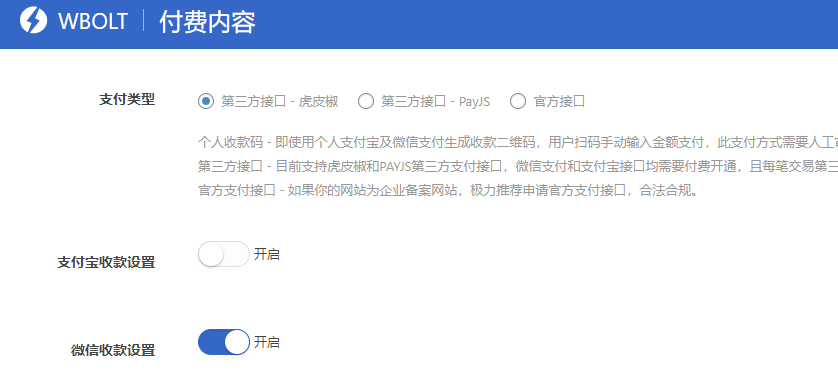 4. Enable user registration on the website
Because without registration, there is no way to record the paid articles that users have purchased, so the website needs to have the registration feature enabled.
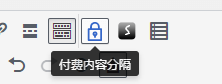
 5. When publishing an article, use code to hide the paid content.
This paid Plugin uses shortcodes to hide content. We just need to wrap the content that requires payment to view with shortcodes when publishing the article.

If you want the entire article or the latter half to be paid reading, then simply insert a paid reading button and write the paid content after it.
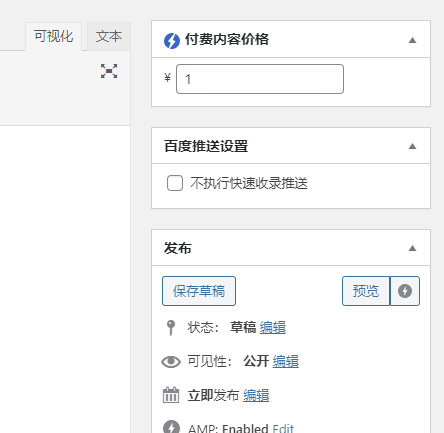
 6. Set the paid reading price.
For the Classic Editor, the default price setting is in the top right corner. Naiba hasn't tested the Gutenberg Editor, but it should also be on the right side; you can look carefully.
Then publish the article, and it will be visible on the website Frontend. Visitors can view the paid content after scanning the code to pay.
Paid Content Visibility Test
Below is test content. If interested, you can pay to test the effect. [vk-content]I am paid content, thank you for your support, boss.

[\/vk-content] The Plugin supports full-article paid reading, latter-half paid reading, and custom-section paid reading.
 2. Enter the plugin settings. First, you need to enter the activation code to activate it. After activation, you can configure the prompts and colors for paid reading.
  3. Set up the payment gateway
  4. Enable user registration on the websiteBecause without registration, there is no way to record the paid articles that users have purchased, so the website needs to have the registration feature enabled.
 5. When publishing an article, use code to hide the paid content.This paid Plugin uses shortcodes to hide content. We just need to wrap the content that requires payment to view with shortcodes when publishing the article.
 [\/vk-content] The Plugin supports full-article paid reading, latter-half paid reading, and custom-section paid reading.
Comments are closed
The comment function for this article is closed. If you have any questions, please feel free to contact us through other channels.