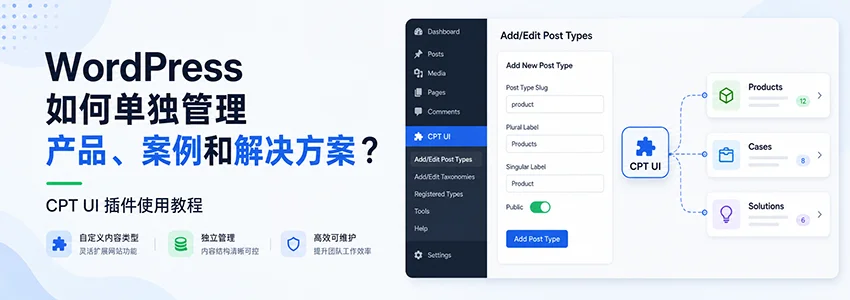
Many friends who are new to building websites with WordPress encounter a headache: I want to showcase products, cases, and solutions on my site, but the default Posts and Pages are simply not enough. Especially for corporate or foreign trade websites, content types like products, cases, and solutions are completely different, and managing them together is a disaster. Don't worry, today Naiba will teach you step by step how to use a free plugin—Custom Post Type UI(abbreviated as CPT UI), to create and manage products, cases, and solutions separately in WordPress, keeping your website content organized.
Why Do You Need Custom Post Types?
By default, WordPress only has two content types: „Posts“ and „Pages.“ If you want to publish product introductions, customer cases, and technical solutions simultaneously, stuffing them all into „Posts“ will not only make the backend messy but also make it difficult to differentiate frontend display. For example, products need prices, cases need client logos, and solutions need associated download documents.Custom Post Typeallows you to create independent content containers, each with its own categories, custom fields, and templates. Managing them is like having a built-in „Product Center,“ „Case Center,“ and „Solution Center.“
Naiba previously wrote an articleHow to Publish Products in WordPress (Sharing Several WP Product Management Methods), which mentioned multiple implementation methods, among which theCPT UIplugin is one of the most flexible and lightweight options. Today's tutorial focuses on the specific operations of CPT UI, guiding you step by step to create your own products, cases, and solutions.
Example: Creating a Solution Custom Post Type
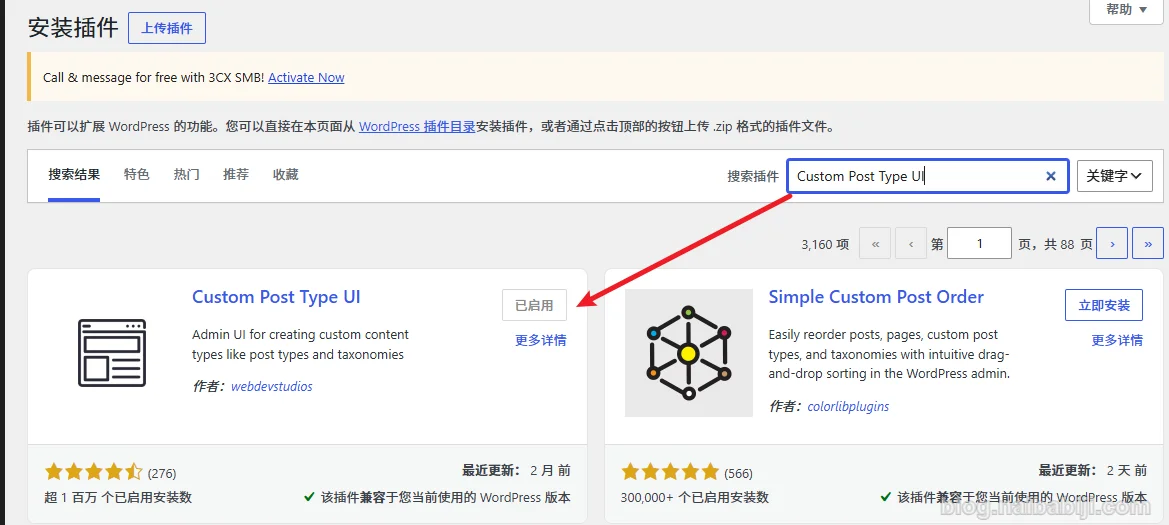
Step 1: Install and Activate the Custom Post Type UI Plugin
First, go to your WordPress backendPlugin → Install Plugin, search for „Custom Post Type UI“, find it, install and activate.
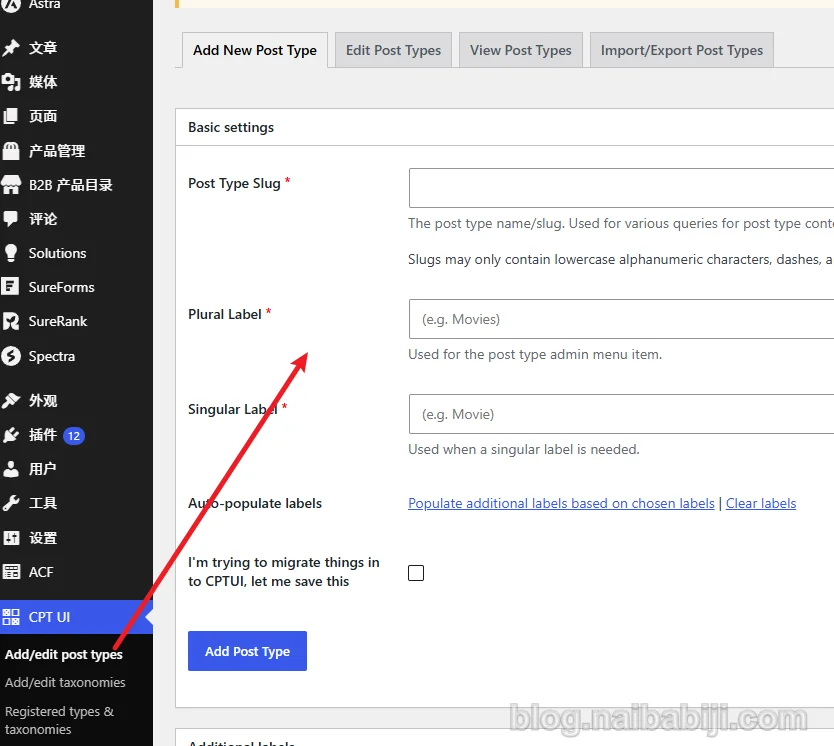
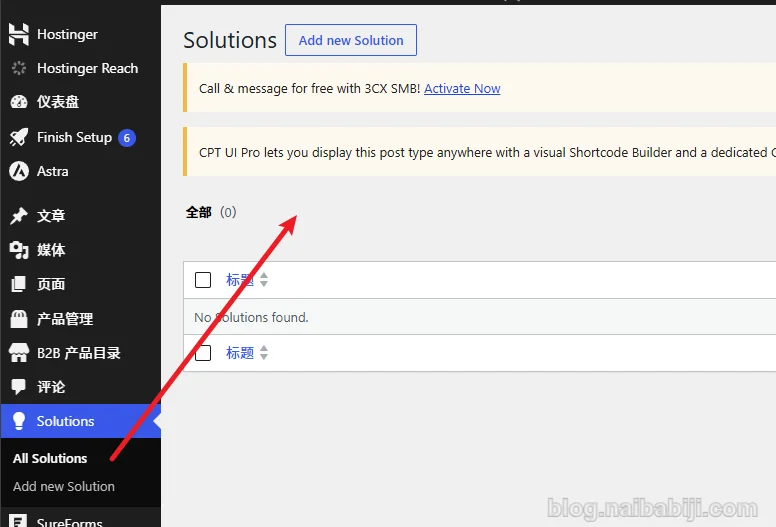
After activation, a new „CPT UI“ menu item will appear in the left menu.
Step 2: Create the „Solution“ Post Type
ClickAdd/Edit Post Types, enter the add page. You will see many settings, don't panic, we only need to fill in a few key places:
- Post Type Slug: fill in
solution(recommended all lowercase, no spaces). This will appear in the URL. - Plural Label: fill in
解决方案或Solutions(depending on whether you want to create Chinese or English). - Singular Label: fill in
解决方案或Solution。
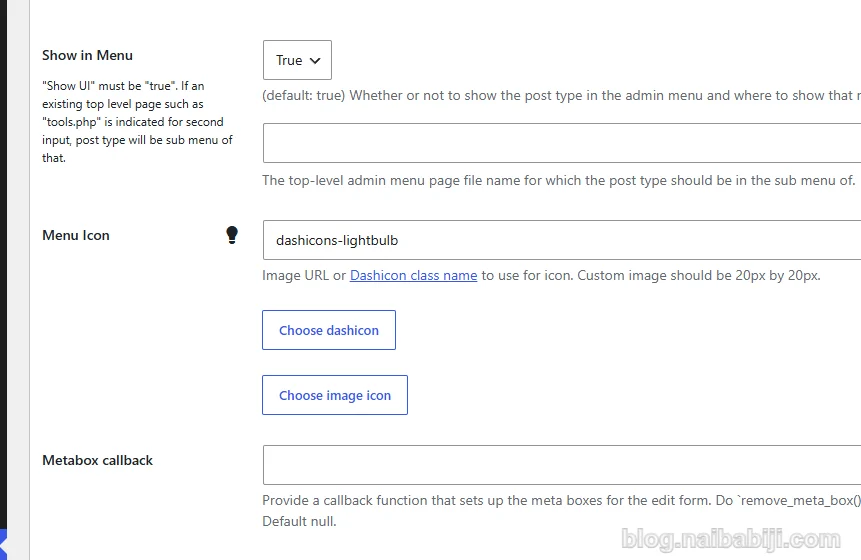
Scroll down, in theAdvanced Options section, check a few common features:
- Public: set to true, so the frontend can access it.
- Show UI: set to true, display in the admin.
- Show in Menu: set to true, display in the left admin menu.
- Menu Icon: here you can fill in a Dashicons icon name. Naiba suggests filling in
ddashicons-lightbulb, so the admin menu shows a small light bulb icon, very intuitive. You can also check the Dashicons official list to choose other icons.
Keep other options as default. Click theSave Post Type button at the bottom. Refresh the admin, and the left menu will have a „Solutions“ section.
Step 3: Add „Solutions“
After creation, you can see the newly appeared Solutions menu in the left menu.
Click „Add New“ under „Solutions“ to publish your first solution case. Products and cases follow the same operation. Each content type has its own independent editing interface without interference.
Advanced: Add Independent Taxonomies to Products, Cases, and Solutions
If you also want to categorize products (e.g., „Electronics“, „Office Supplies“) or classify cases by industry (e.g., „Manufacturing“, „Medical“), then you need to useAdd/Edit TaxonomiesThe operation is similar to creating a custom post type:
- On the Taxonomies page of CPT UI, fill in the slug (e.g.,
product_category), plural label (e.g.,产品分类), singular label (e.g.,产品分类). - 在Associated Post TypesCheck the post type you want to associate (e.g., only check „Products“).
- Save it. Then, on the product editing page, you will see the taxonomy bar for „Product Categories“.
This method is more flexible than WordPress's default categories, allowing you to customize a dedicated taxonomy system for each content type.
How to Make Product Display More Professional?
With custom post types, the next step is front-end display. You can usecustom field plugins(such as ACF) to add fields like price, specifications, image gallery, etc. to products. If you don't want it to be too complex, you can also use some specialized product display plugins. For example, Naiba previously recommended our developedNaibabaiji B2B Product Showcase, which is more convenient and professional than creating product pages with CPT UI yourself, and is very suitable for business websites.
Frequently Asked Questions (FAQ)
1. I created a new custom type, but the frontend URL shows 404?
Go to WordPress AdminSettings → PermalinksSelect any format other than „Plain“, then click „Save Changes“ to refresh the permalink cache.
2. How to customize templates for products, cases, and solutions?
Create a new file in the theme foldersingle-product.php、archive-product.phpfiles (replace product with your slug), or use the conditional template feature of a page builder (such as Elementor).
3. Is this plugin free? Will it slow down the website?
Completely free, the plugin itself is very lightweight, only registering custom post types without affecting frontend loading speed, so feel free to use it.
Summary
With the Custom Post Type UI plugin, you can easily create independent management modules for products, cases, and solutions in WordPress, without having to mix all content together. The entire operation takes less than 10 minutes and is free. If you find this article helpful, feel free to share it with your friends.
If you have any questions, feel free to leave a comment, and Naiba will reply as soon as he sees it. Your support is the greatest motivation for me to keep writing!