Hostinger Chinese Beginner Tutorial: Buying Hosting, Installing WordPress with hPanel, and Website Setup
This page is a buying, installation, and setup tutorial specifically for beginners who have chosen or are close to choosing Hostinger. If you are still hesitating between Hostinger, SiteGround, ChemiCloud, or VPS, we recommend reading the WordPress hosting comparison first.
Chinese-friendly interface
Supports beginners in building websites
Verify price before purchase
Page Operations
Due to browser security restrictions, the webpage cannot directly add bookmarks for you. You can manually bookmark the current page using the following methods:
Windows / Linux: Press Ctrl + D.
macOS: Press Command + D.
Mobile browser: Open the browser menu and select „Bookmark“, „Add Bookmark“, or „Add to Home Screen“.
Open WeChat, scan the QR code to view the current page.
Quick Conclusion: Hostinger is suitable for budget-conscious beginners with WordPress websites
Hostinger is better for beginners who want to start WordPress at a lower cost, prefer a more Chinese-friendly interface, and smoother payment. For formal projects, still pay attention to resource limits, backups, renewal fees, and future migration.
Beginners can judge like this
Limited budget, want to start quickly: Hostinger can be an entry-level choice.
Foreign trade showcase sites, small business sites, personal blogs: You can start with a suitable plan.
If you are leaning towards Hostinger, you can directly follow this article to complete the purchase, install WordPress via hPanel, and perform basic setup.
Highly value customer service, backups, and formal business stability: also compareSiteGround Tutorials。
Willing to learn server management: continue readingVPS Recommendations, don't just compare shared hosting.
Review the introductory price, renewal price, refund policy, data center, and plan resources before purchasing.
Purchase Link
Already decided to buy Hostinger? First open the official website to check current prices and renewal
It is recommended to open the Hostinger official website in a new window, and while following the process in this article, confirm the introductory price, renewal price, payment method, data center, and refund policy.
How is Hostinger? Who is it suitable for and who is it not suitable for
If you are still hesitating among several WordPress hosts, you can first checkWordPress Hosting Recommendations; if you already lean towards Hostinger, continue with the purchase and installation steps below.
Hostinger Applicability Boundaries
Type
Suitable for Hostinger
Reason
Personal Blog / Learning Site
Suitable
Low price threshold, and the backend is more suitable for beginners than traditional virtual hosting.
Small Business Website
Suitable
If traffic and functionality are not complex, Hostinger can be a low-cost starting solution.
Foreign Trade Display Site
Considerable
Suitable for foreign trade beginners with limited budget, but pay attention to server location, image optimization, backups, and inquiry stability.
Important Business Site
Cautious
Don't just look at low prices; for formal projects, evaluate resources, backups, customer support response, and renewal fees.
Want Full Control of Server
Not Suitable
Hostinger hosting is not a VPS; the degree of freedom and underlying control are different.
Before purchasing, focus on checking plan resources, introductory price, renewal price, server location, and current promotions. The actual interface is subject to the Hostinger official website.
How to Choose Between Hostinger and SiteGround
Don't just look at the first-year promotional price. Hostinger is more about low entry barriers and Chinese-friendliness, while SiteGround is more about hassle-free experience and formal project support.
Boundary for Choosing Hostinger vs SiteGround
Comparison Item
Hostinger
SiteGround
Target Audience
Beginners who are budget-sensitive, prefer a Chinese interface, and want smoother payment
Beginners with a larger budget who value support and WordPress tool integration
Main Advantages
Low price threshold, more modern hPanel, more friendly Chinese support
Complete Site Tools, integrated WordPress tools, more hassle-free for formal projects
Notes Before Purchase
Low-cost plan resources, backups, renewals, and long-term purchase years
First-year discounts vs. renewal price differences, plan resources, and current promotions
Situations suitable for continuing to read
You have already decided on Hostinger and want to complete the purchase and installation
You have already decided on SiteGround and want to see the corresponding purchase and installation process
Hostinger Hosting Purchase Tutorial
The Hostinger official website promotions and backend interface often change. The following retains stable purchase logic. The specific prices and purchase process are subject to the actual online interface.
Step 1
Choose the appropriate plan
Open theHostinger Official WebsiteAfter that, choose a plan that suits you. Generally, the middle recommended plan offers the best value for money. The longer the purchase period, the lower the price. Select the plan and purchase period based on your actual situation.
On the plan selection page, focus on plan differences, purchase period, and discounted monthly price. The middle recommended plan is usually more suitable for formal website building, but you should still choose based on budget and website purpose.
Step 2
View Shopping Cart
After selecting a plan, you will enter the shopping cart page. On this page, you can choose a free domain or enter a coupon code. If you haven„t registered a domain yet, you can claim it. If you already have one, you don“t need the free one. The price difference for the free domain will be recovered in subsequent renewals, so it„s not a loss to skip it. You can enter the coupon code “COUPONSPAGE„.
On the shopping cart page, confirm the purchase period, free domain, coupon code, taxes, and final amount payable. You can try entering the coupon code COUPONSPAGE.
Step 3
Register an account and complete payment
Hostinger is relatively friendly to Chinese users, with common advantages such as a Chinese interface and localized payment experience. Payment methods, coupon codes, and taxes are subject to the checkout page. After payment, save your login email, order information, and renewal date.
Verify Email
Save Order
Record Renewal Time
Before payment, confirm the login email, payment method, billing amount, and renewal date. After payment, wait for the page to automatically redirect and save the order email.
Step 4
Enter hPanel to Start Website Building Guide
After purchase, enter Hostinger hPanel. The guide may vary over time; the core goal is to create a new site, install WordPress, and bind a domain.
Go to Websites
Select Setup
Prepare Domain and Admin Information
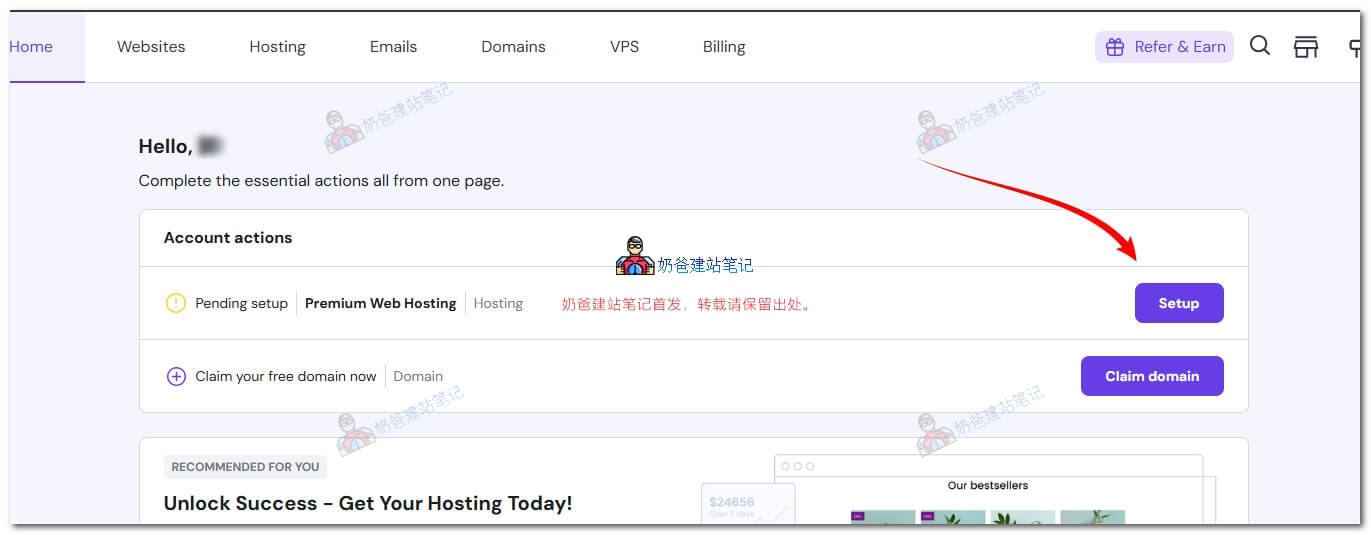
After activating the plan, enter hPanel, find the purchased hosting or website guide entry, then follow Setup to create a WordPress site.
Hostinger Pre-Purchase Checklist
Purchase Item
What You Need to Confirm
Why It Matters
promo code
If the page automatically shows a discount, confirm the discounted total; if a promo code is available, check if it can be stacked.
Avoid seeing only the advertised price and discovering different price, term, or discount conditions at checkout.
Payment Method
Hostinger supports Alipay; also check if credit/debit card, PayPal, UnionPay, etc. are currently available; WeChat Pay is not supported.
Different regions, currencies, and account statuses may show different payment methods; the checkout page is final.
Data Center Location
Common available regions include the US, Europe, Singapore, India, Indonesia, Brazil, etc., depending on the current plan and hPanel display.
Choose a data center closer to your target customers.
Renewal Price
Renewal is usually billed at the original price, subject to Hostinger's actual billing.
If you initially purchase a 4-year plan and the site is still running before expiration, decide whether to renew, switch accounts, or migrate to another provider.
Affiliate Link Notice
Before purchasing, confirm the plan and renewal price.
You can access Hostinger via the affiliate link on this site; I may earn a commission at no extra cost to you. Before purchasing, refer to the official website for current prices, renewal, and refund policies.
After successful payment, log in to the Hostinger dashboard and follow the hPanel guide to create a website and install WordPress. Hostinger may adjust the interface from time to time. If the button text changes, just follow the logic of „Create Website, Select WordPress, Set Up Admin, Bind Domain“.
Step 1
Enter the Hostinger dashboard and click Setup
After payment, the service will be activated. Log in to the Hostinger dashboard to see the purchased hosting plan. Since Hostinger may update its interface, the screen you see may differ slightly from the screenshot. Follow the same logic and click Setup to start configuration.
Follow the hPanel guide to create a website, select WordPress, set up the admin account, and complete the installation. The interface may change over time; follow the current prompts in the dashboard.
Step 2
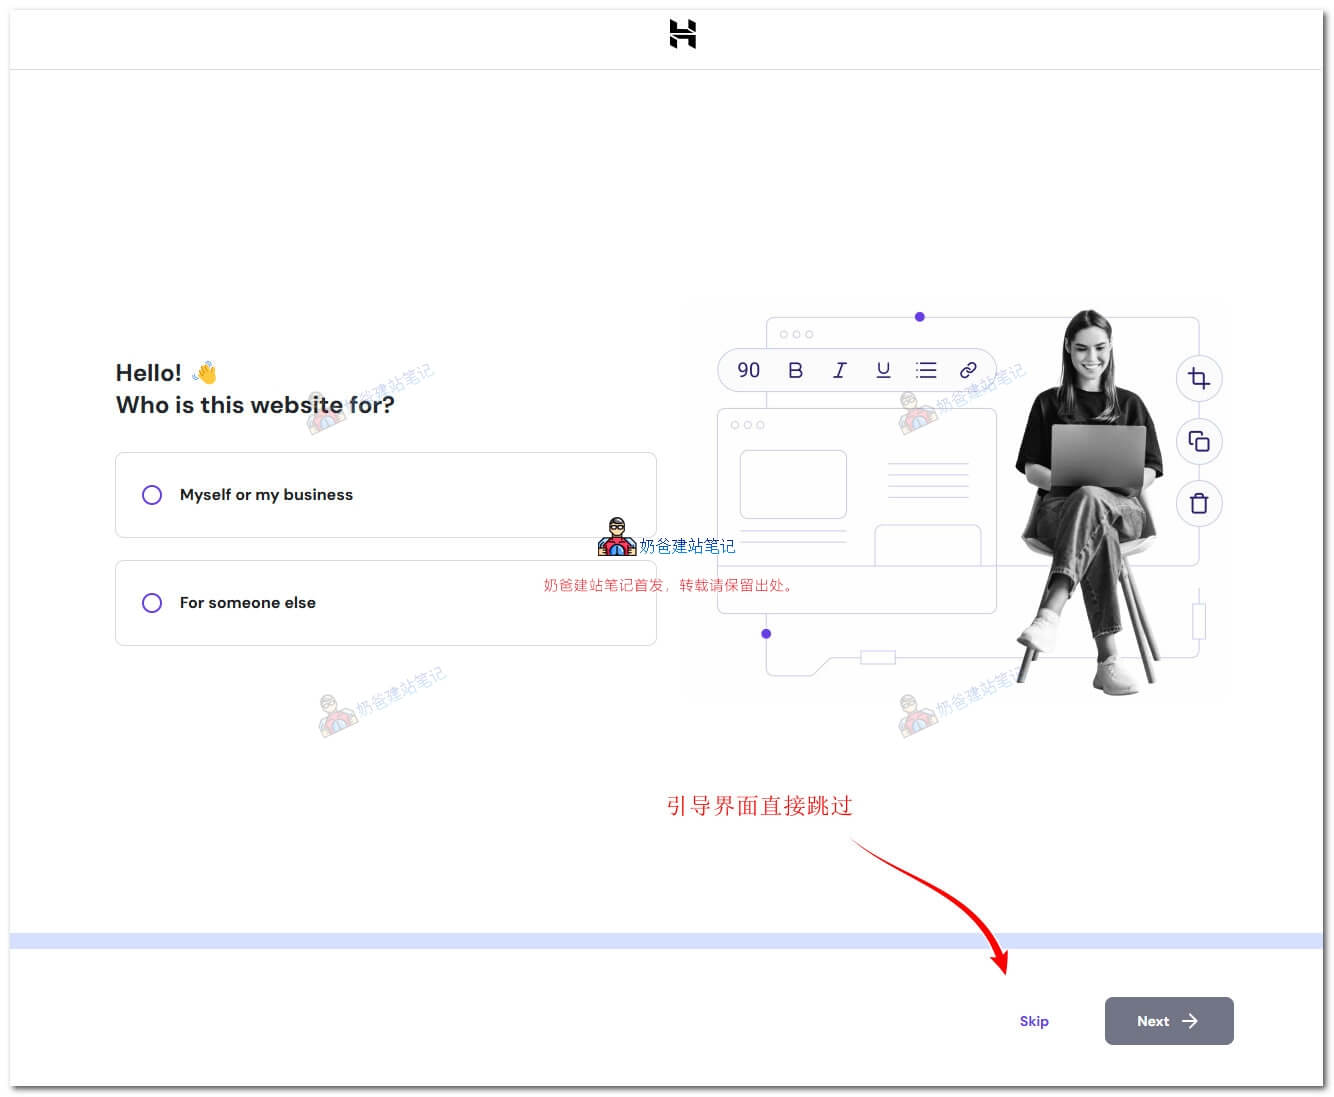
Skip the purpose guide
If the guide asks "Who is this website for?", just skip it. This question does not affect WordPress installation.
Follow the hPanel guide to create a website, select WordPress, set up the admin account, and complete the installation. The interface may change over time; follow the current prompts in the dashboard.
Step 3
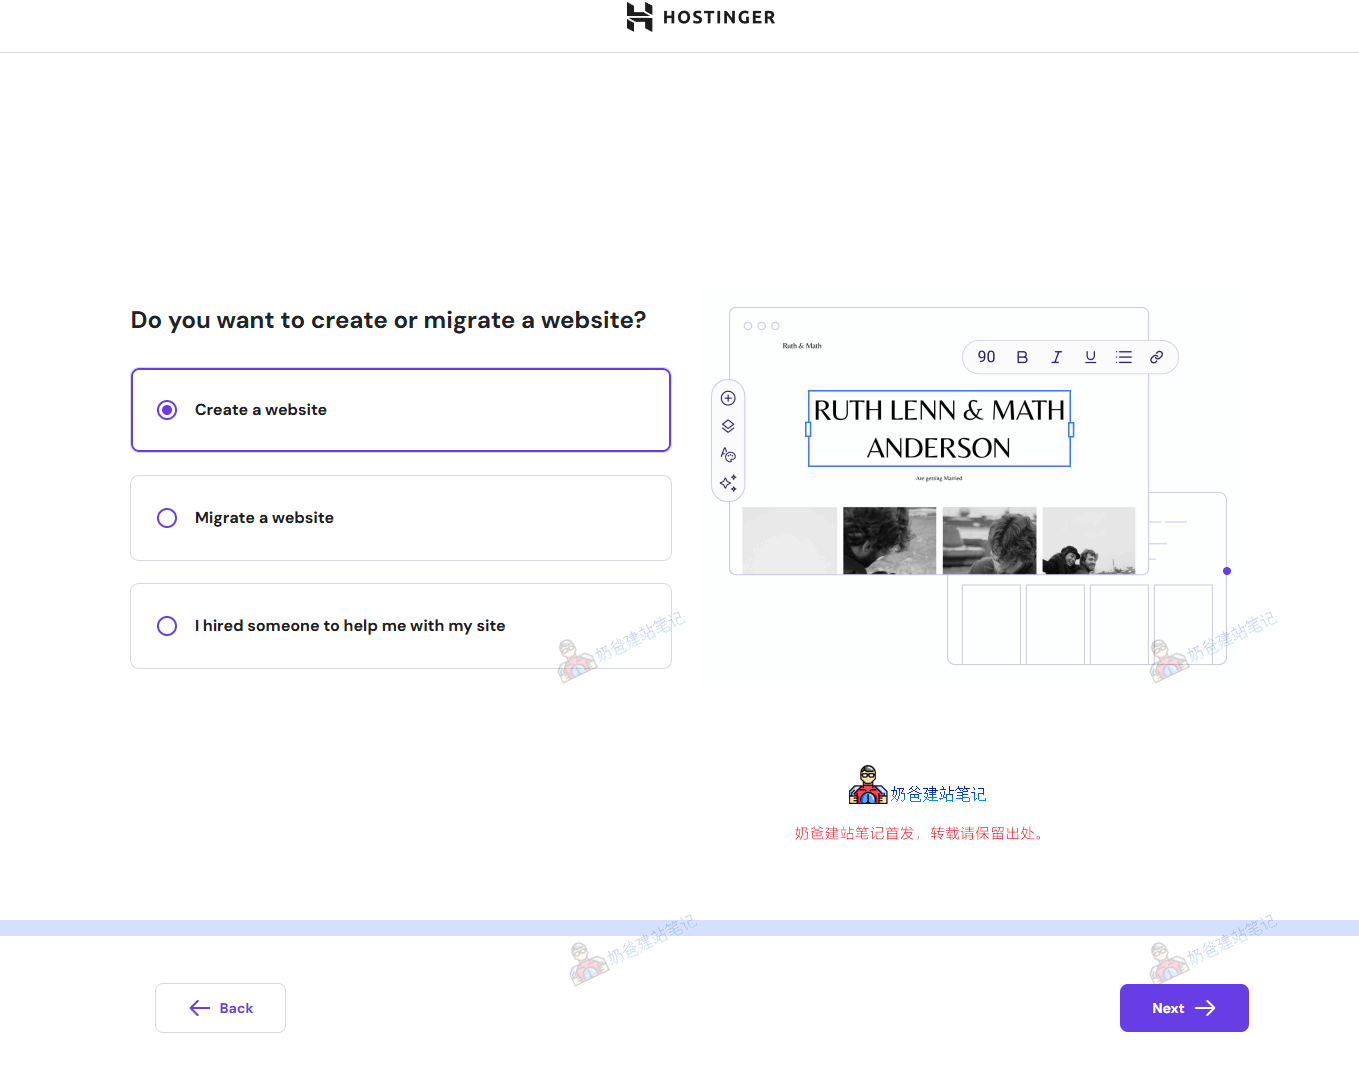
Choose to create a new website
Select to create a new website. If you are migrating from another server, you can choose to migrate the site, but automatic migration may not be stable. For a production site, it is recommended to back up first.
Follow the hPanel guide to create a website, select WordPress, set up the admin account, and complete the installation. The interface may change over time; follow the current prompts in the dashboard.
Step 4
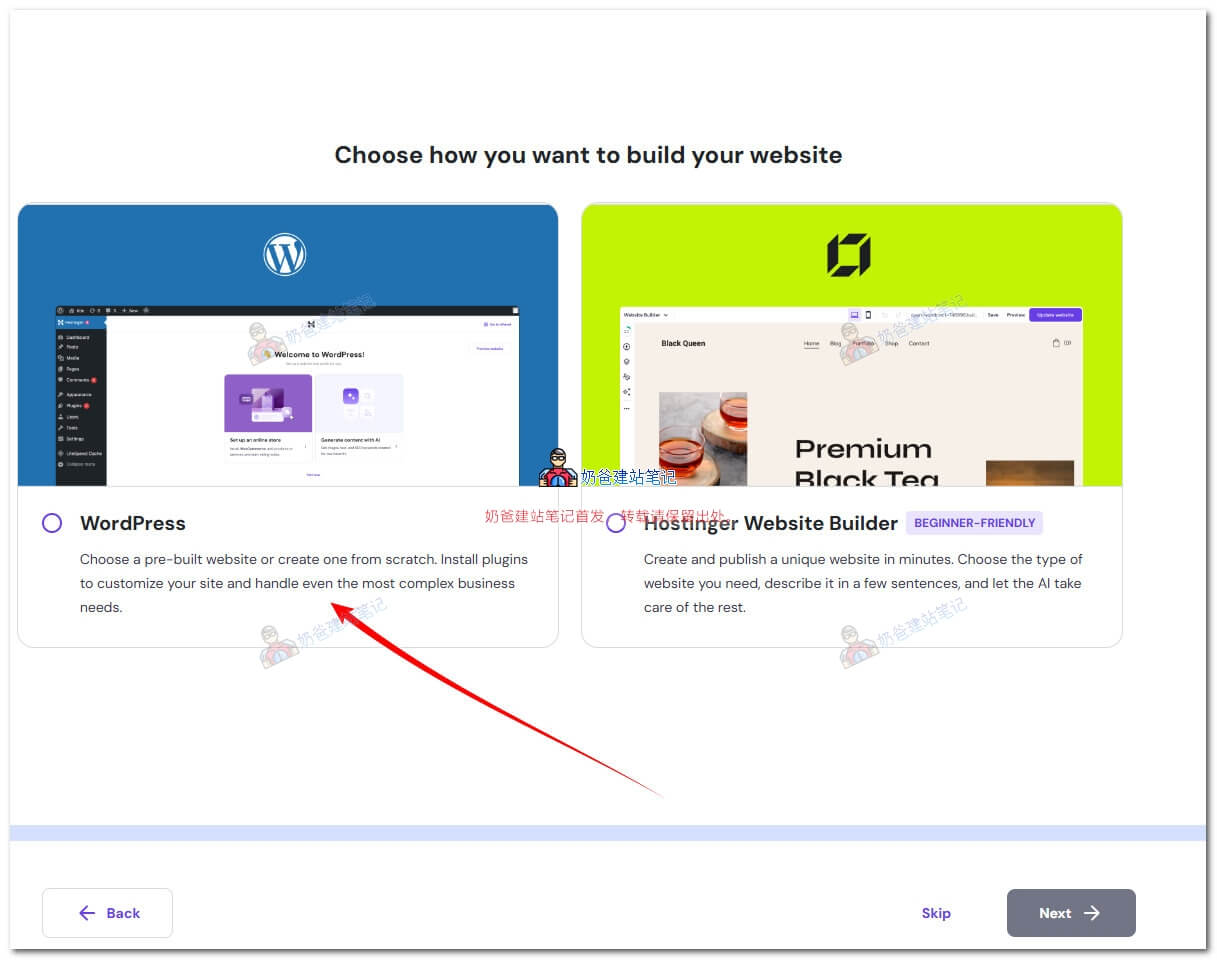
Select WordPress as the website program
Choose WordPress as the website program. For general display sites, blogs, and foreign trade independent websites, you can start with WordPress.
Follow the hPanel guide to create a website, select WordPress, set up the admin account, and complete the installation. The interface may change over time; follow the current prompts in the dashboard.
Step 5
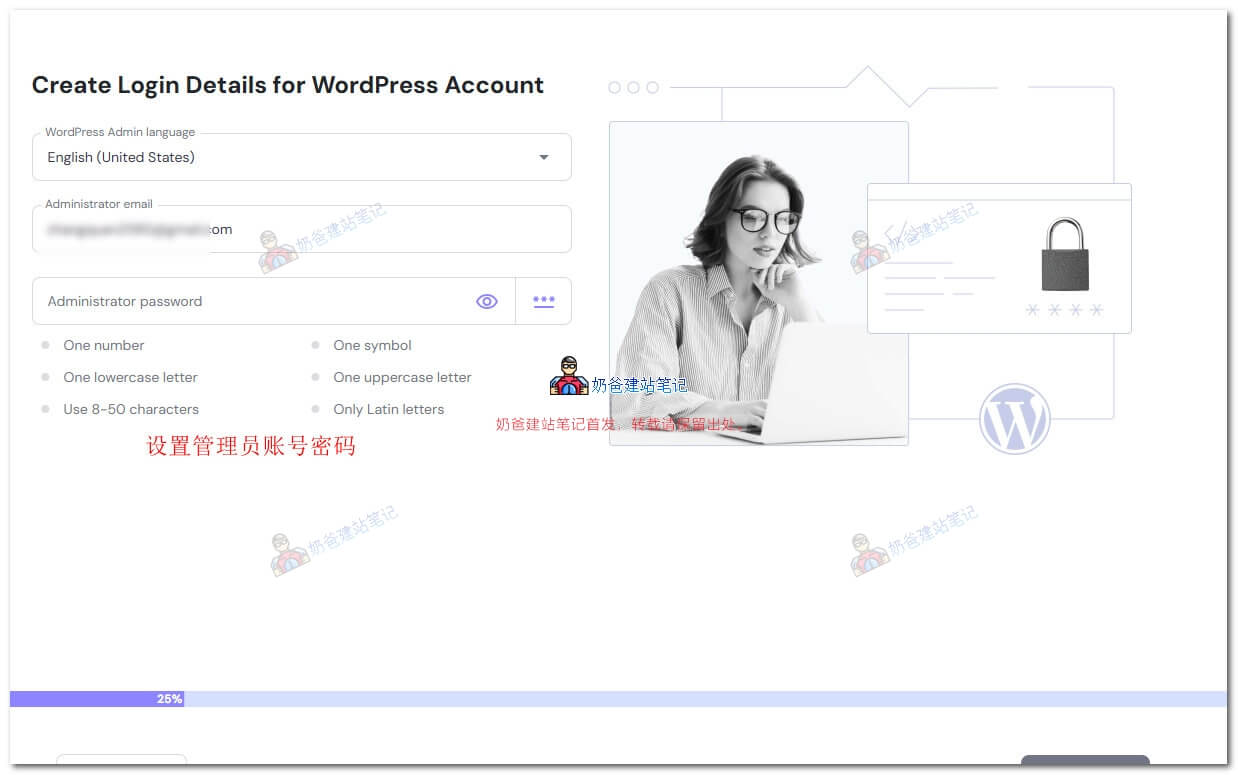
Set up the WordPress admin account
Fill in the email and password for the website admin. The email should be able to receive emails long-term, and the password should not be too simple. The subsequent login address is usually the domain name followed by /wp-admin/.
Follow the hPanel guide to create a website, select WordPress, set up the admin account, and complete the installation. The interface may change over time; follow the current prompts in the dashboard.
Step 6
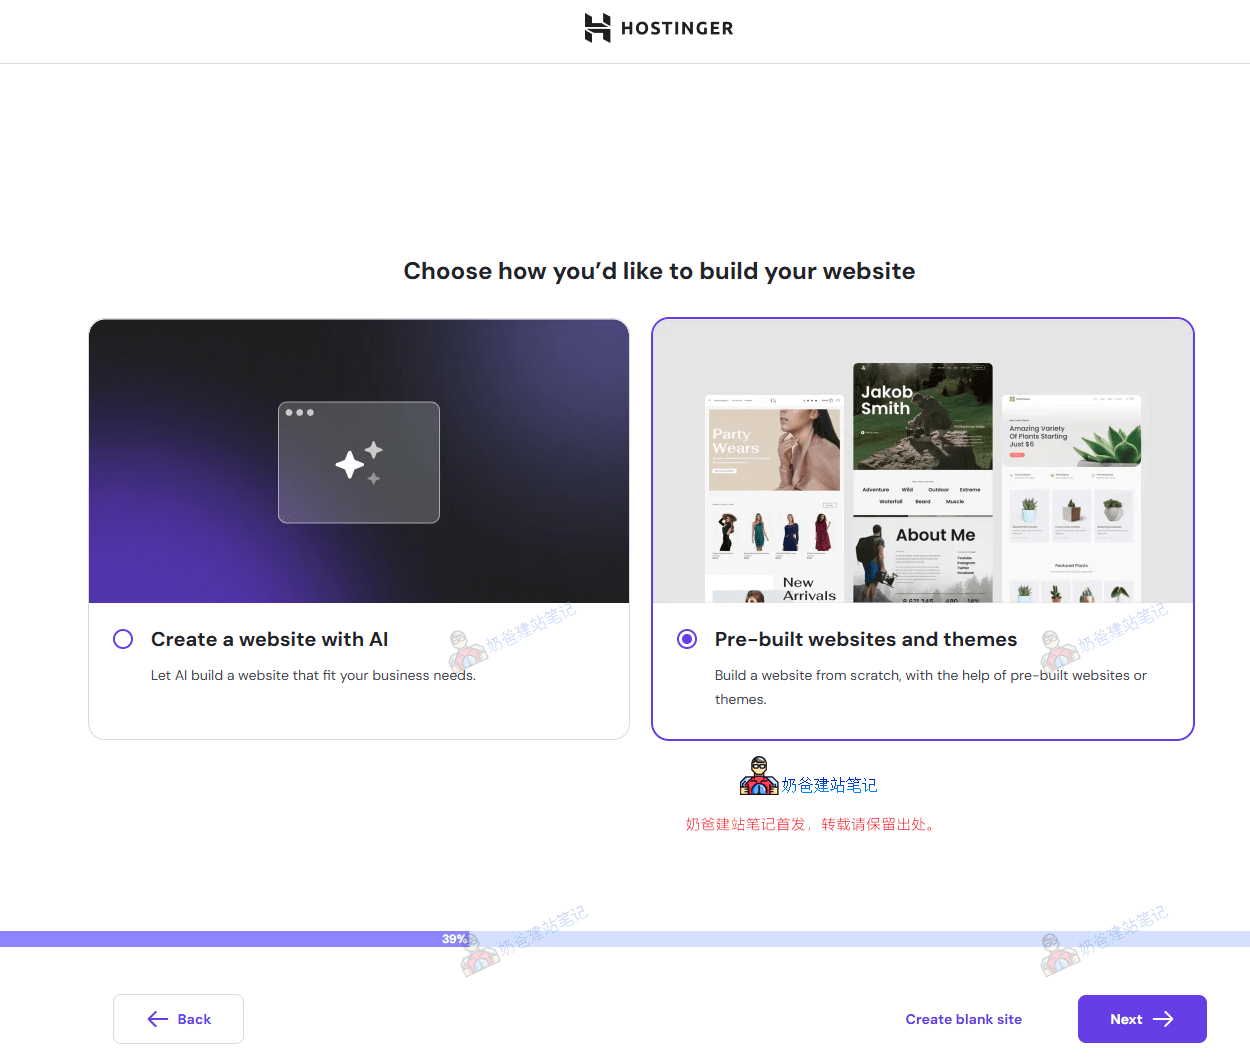
Do not choose AI website builder
Do not choose to use AI website builder. AI is not yet that versatile. It is recommended to select "website and themes" to install a standard WordPress site first.
Follow the hPanel guide to create a website, select WordPress, set up the admin account, and complete the installation. The interface may change over time; follow the current prompts in the dashboard.
Step 7
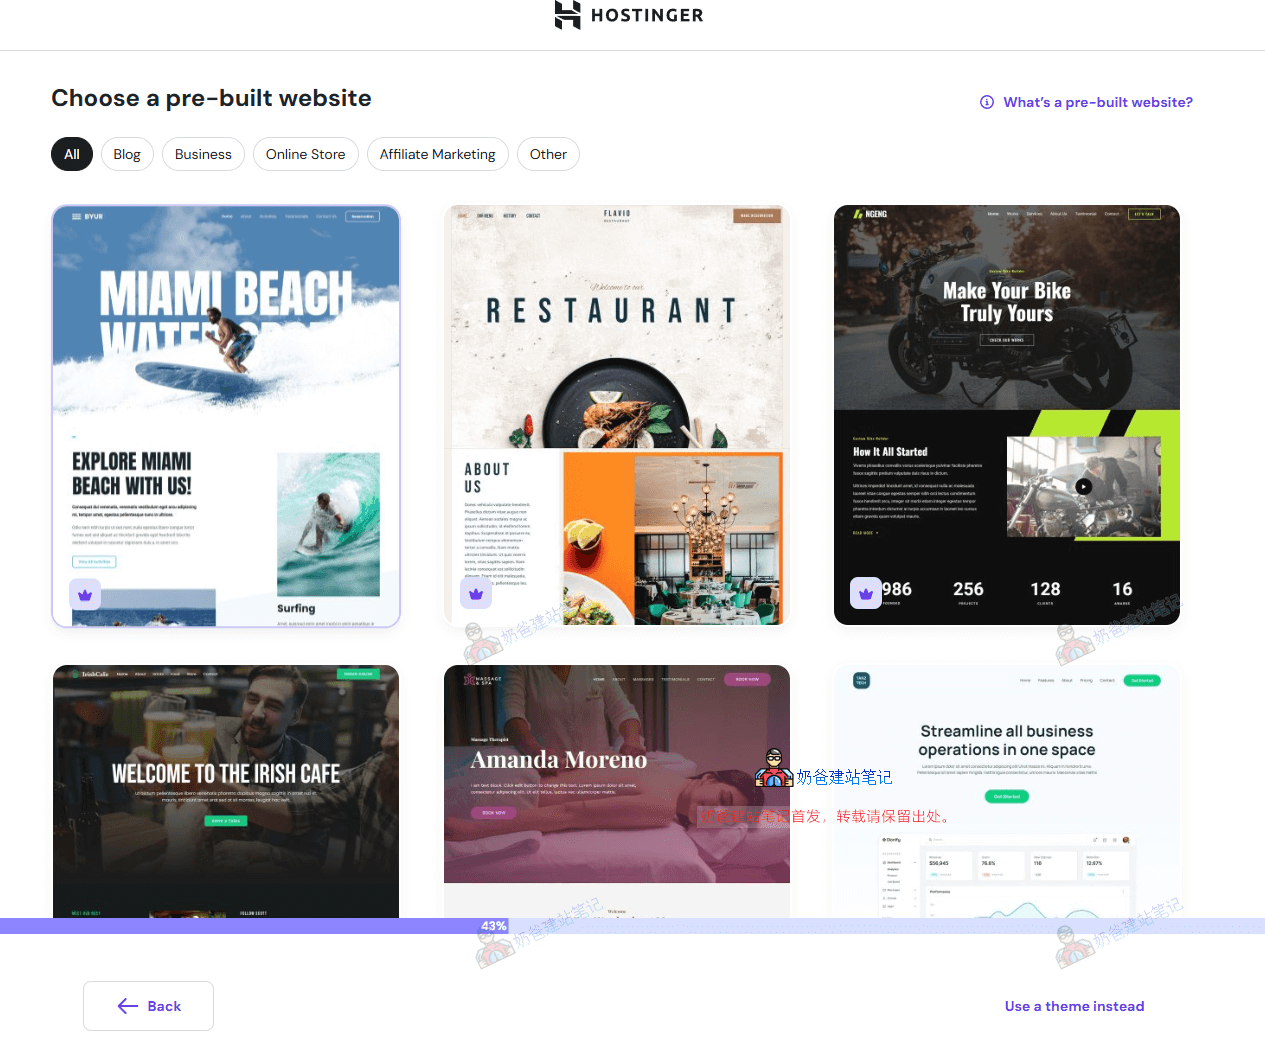
Choose to use a theme template
Select "use a theme instead" in the bottom right corner. Themes can be changed later in the WordPress dashboard, so don't spend too much time on this during installation.
Follow the hPanel guide to create a website, select WordPress, set up the admin account, and complete the installation. The interface may change over time; follow the current prompts in the dashboard.
Step 8
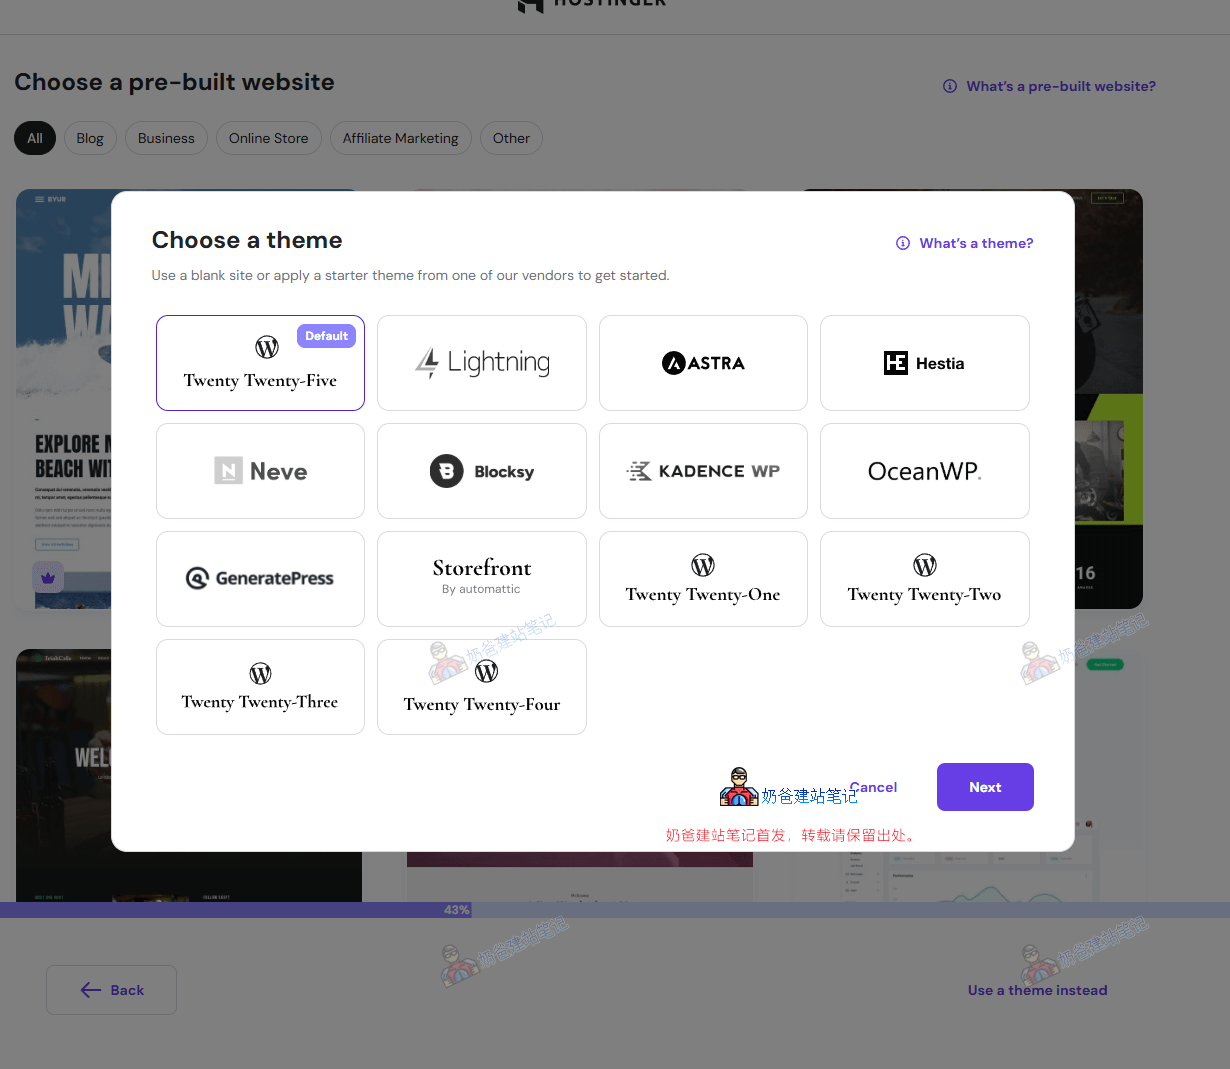
Select the default theme first
Choose the first default theme. After WordPress installation is complete, you can re-plan the theme, pages, and content structure based on the site's purpose.
Follow the hPanel guide to create a website, select WordPress, set up the admin account, and complete the installation. The interface may change over time; follow the current prompts in the dashboard.
Step 9
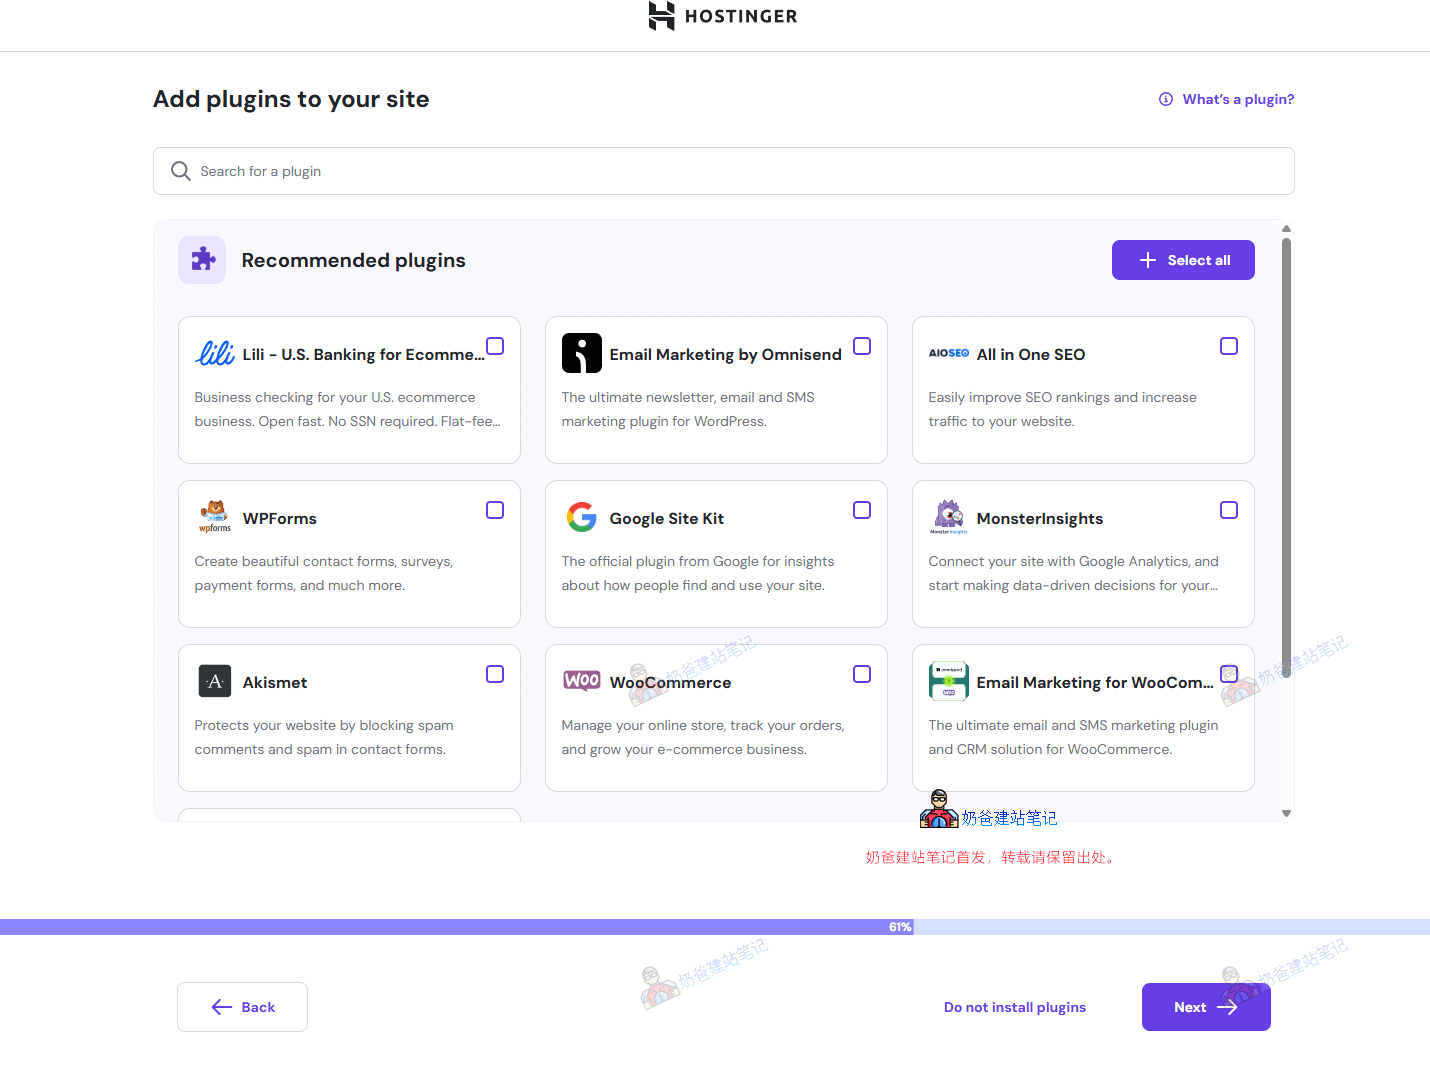
Do not select any recommended plugins
Do not select any recommended plugins during the installation process. Keep the new site clean first, and install plugins as needed after WordPress is accessible.
Follow the hPanel guide to create a website, select WordPress, set up the admin account, and complete the installation. The interface may change over time; follow the current prompts in the dashboard.
Step 10
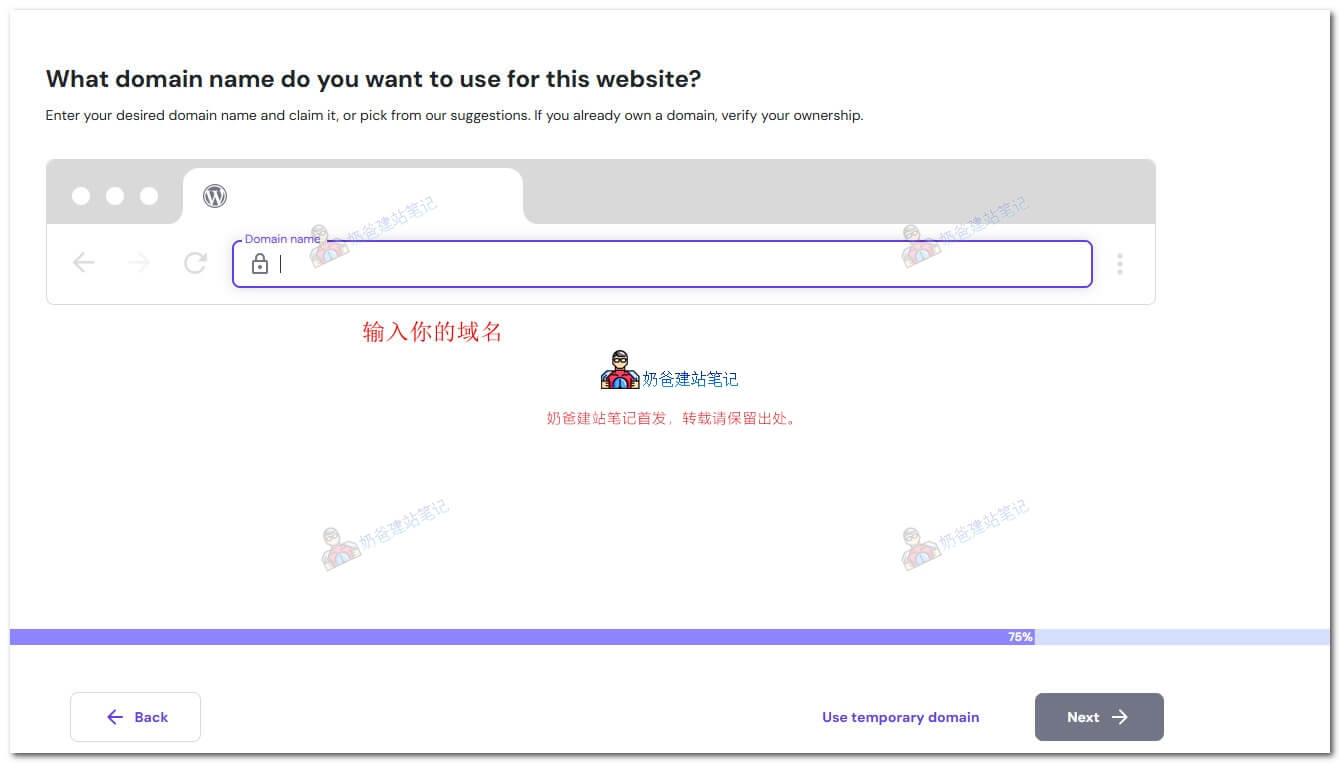
Enter the website domain
Enter the domain you have already registered. If you haven't registered one yet, you can first checkDomain Registration Tutorial, or register directly with Hostinger or claim a free domain from the plan.
Follow the hPanel guide to create a website, select WordPress, set up the admin account, and complete the installation. The interface may change over time; follow the current prompts in the dashboard.
Step 11
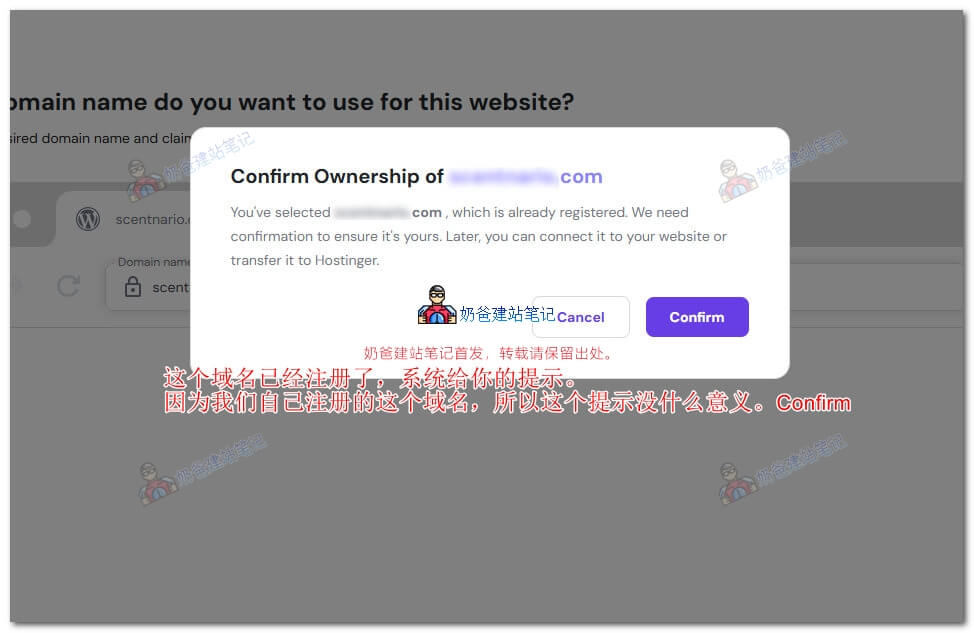
Confirm the registered domain
If you enter a domain that has already been registered, Hostinger may prompt that the domain is registered. Simply click Confirm to continue.
Follow the hPanel guide to create a website, select WordPress, set up the admin account, and complete the installation. The interface may change over time; follow the current prompts in the dashboard.
Step 12
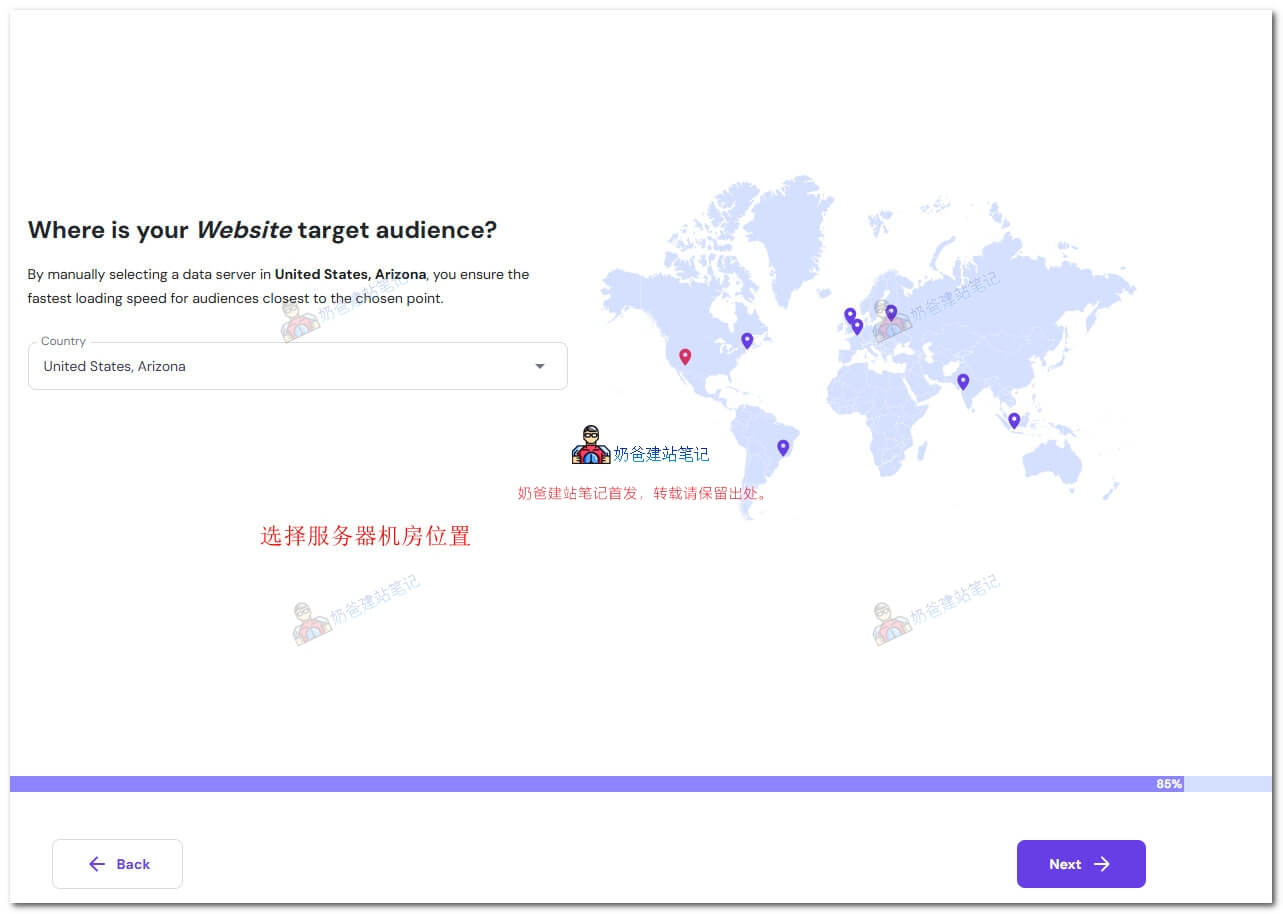
Select server location
When selecting a server location, generally choose a region closer to your target customers. For foreign trade websites, consider the main customer market; for Chinese user-oriented websites, also consider access speed and ICP filing boundaries.
Follow the hPanel guide to create a website, select WordPress, set up the admin account, and complete the installation. The interface may change over time; follow the current prompts in the dashboard.
Step 13
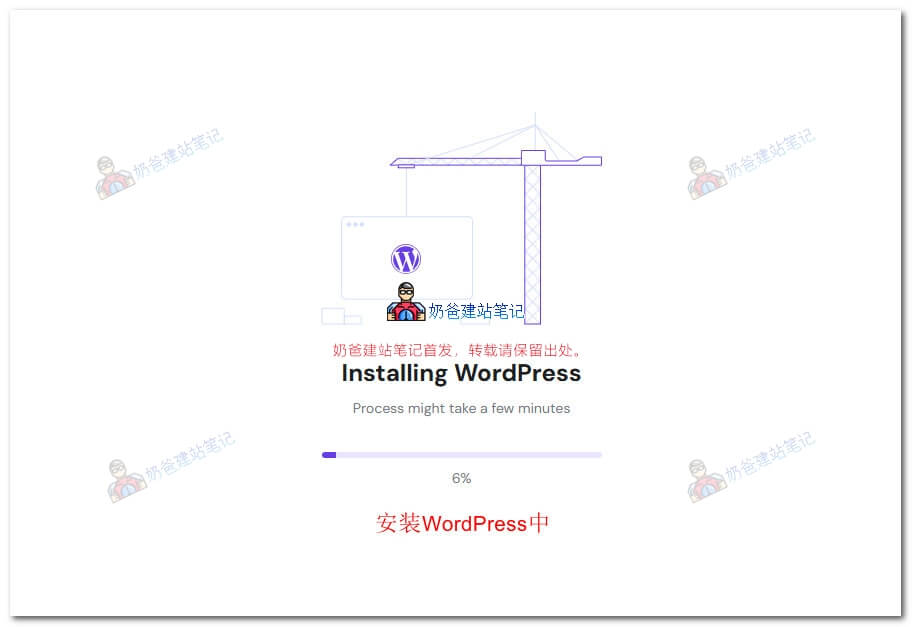
Wait for WordPress installation to complete
After submission, wait for the system to install WordPress. Once installation is complete, enter hPanel or the WordPress admin dashboard to continue with domain resolution, SSL, and basic settings.
Follow the hPanel guide to create a website, select WordPress, set up the admin account, and complete the installation. The interface may change over time; follow the current prompts in the dashboard.
Hostinger Domain Resolution and SSL Installation Tutorial
After WordPress installation, you need to ensure the domain correctly points to the website and enable HTTPS. Beginners can follow Hostinger's guidance to modify Nameservers first; for basics on domain, DNS, and renewal, you can first checkEnglish Domain Registration and Resolution Guide。
Domain Resolution 1
Enter the website Dashboard
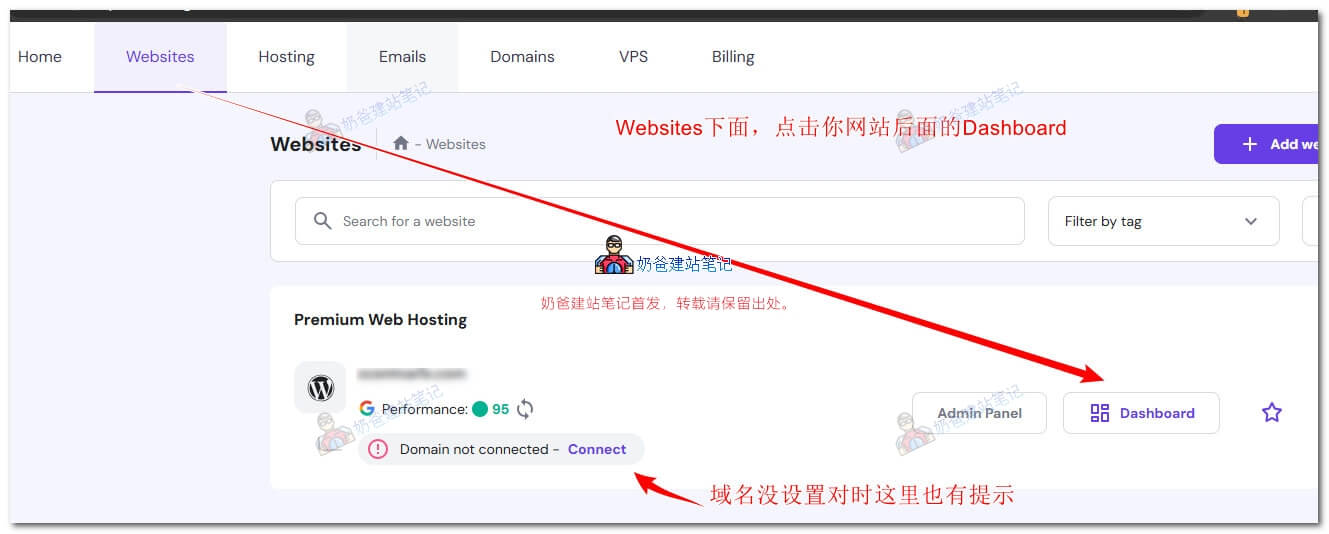
After installing WordPress, you need to set up domain resolution so that others can access your website via the domain. In the Hostinger admin panel, select Websites at the top, then click Dashboard next to the website list.
Hostinger domain resolution settings interface; actual entry may vary based on current hPanel.
Domain Resolution 2
View domain resolution prompts
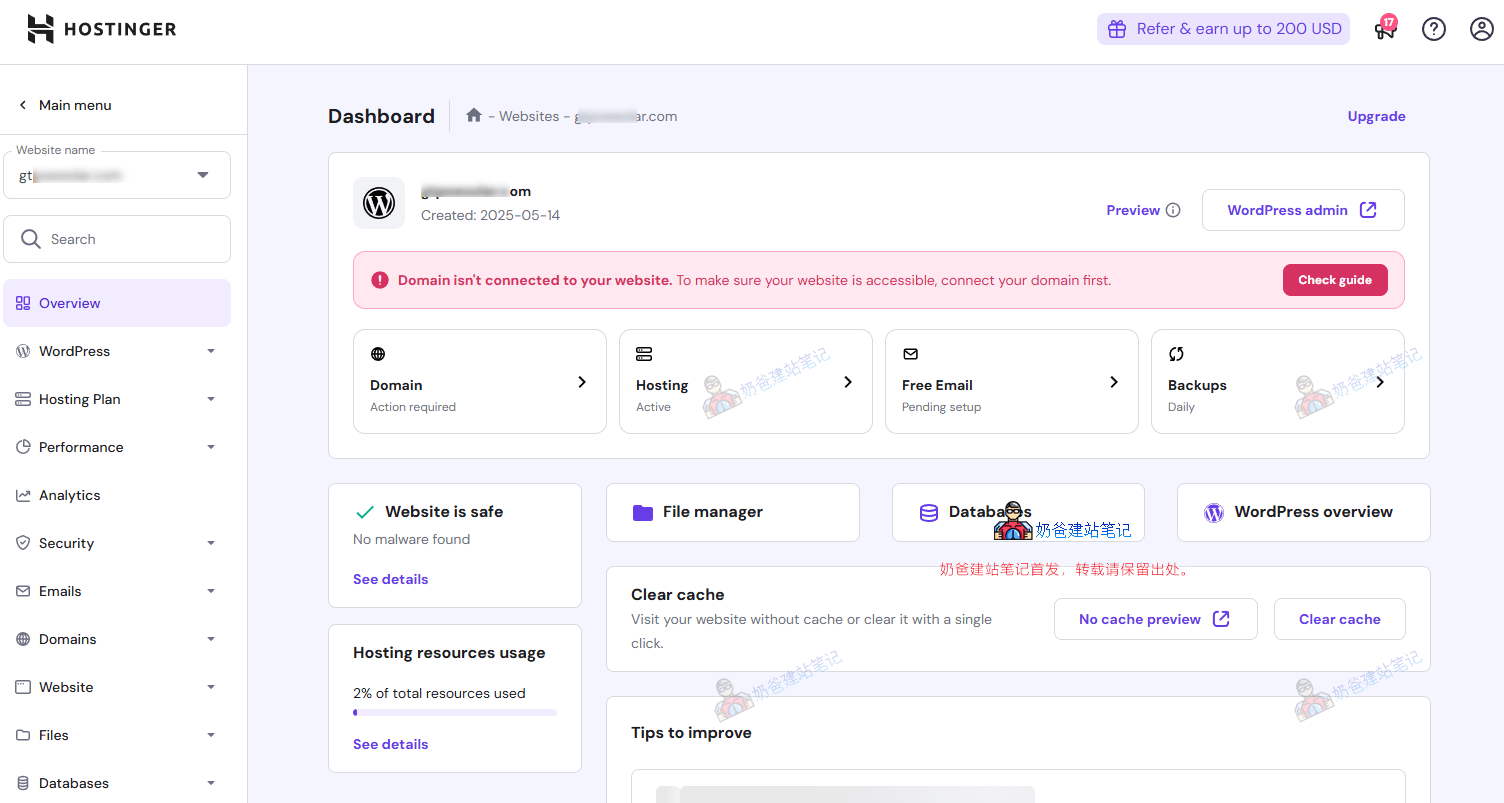
At the top of the Dashboard interface, if there is a red prompt message, click Check guide to view domain resolution help.
Hostinger domain resolution settings interface; actual entry may vary based on current hPanel.
Domain Resolution 3
Modify DNS as prompted
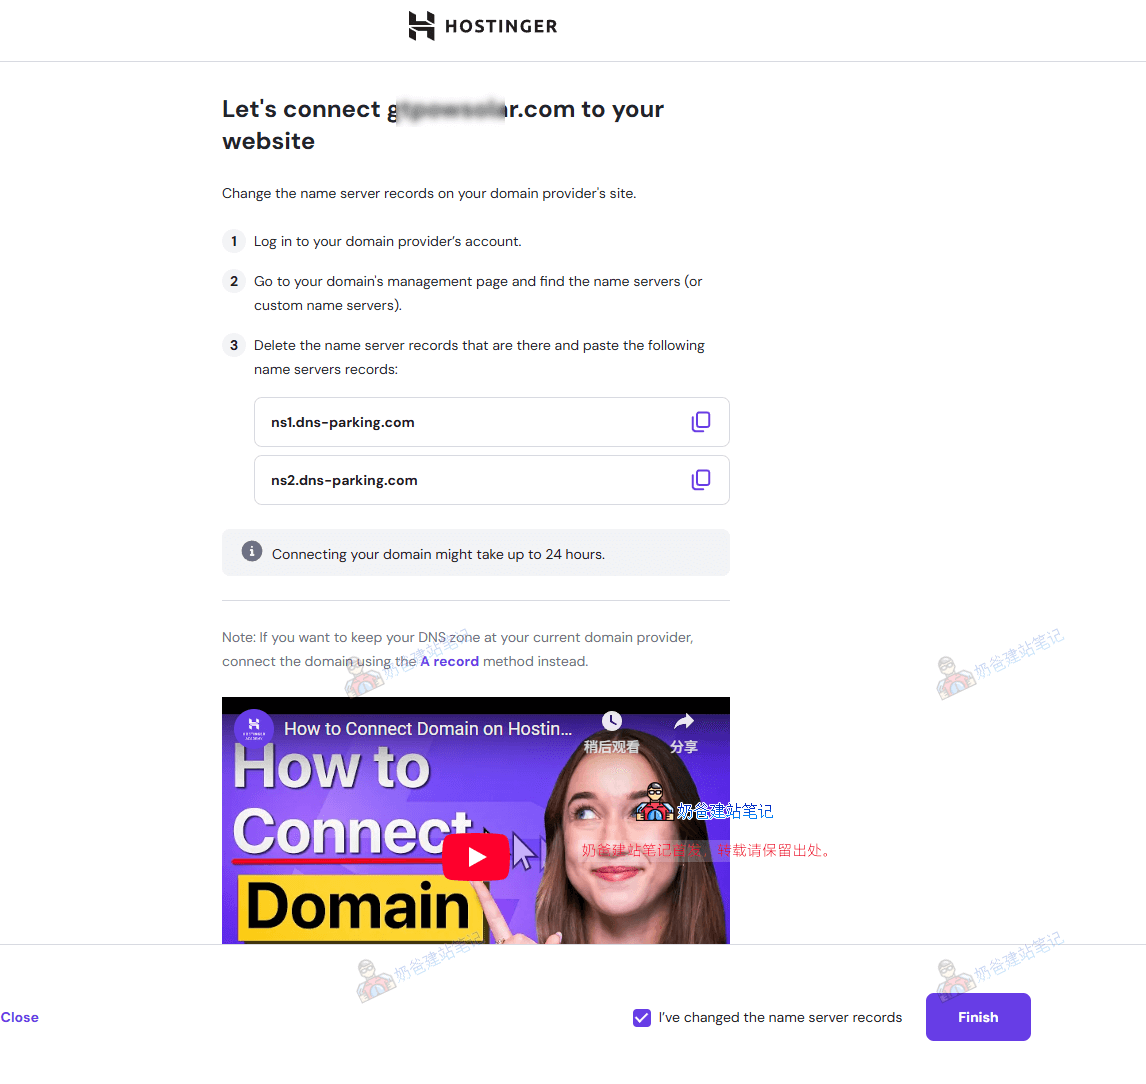
This help usually instructs you to change the domain DNS directly to Hostinger's Nameservers. For beginners, changing DNS servers only needs to be done once; subsequent resolution will be handled by Hostinger, which is more convenient.
Hostinger domain resolution settings interface; actual entry may vary based on current hPanel.
SSL Setup 1
Install SSL after resolution takes effect
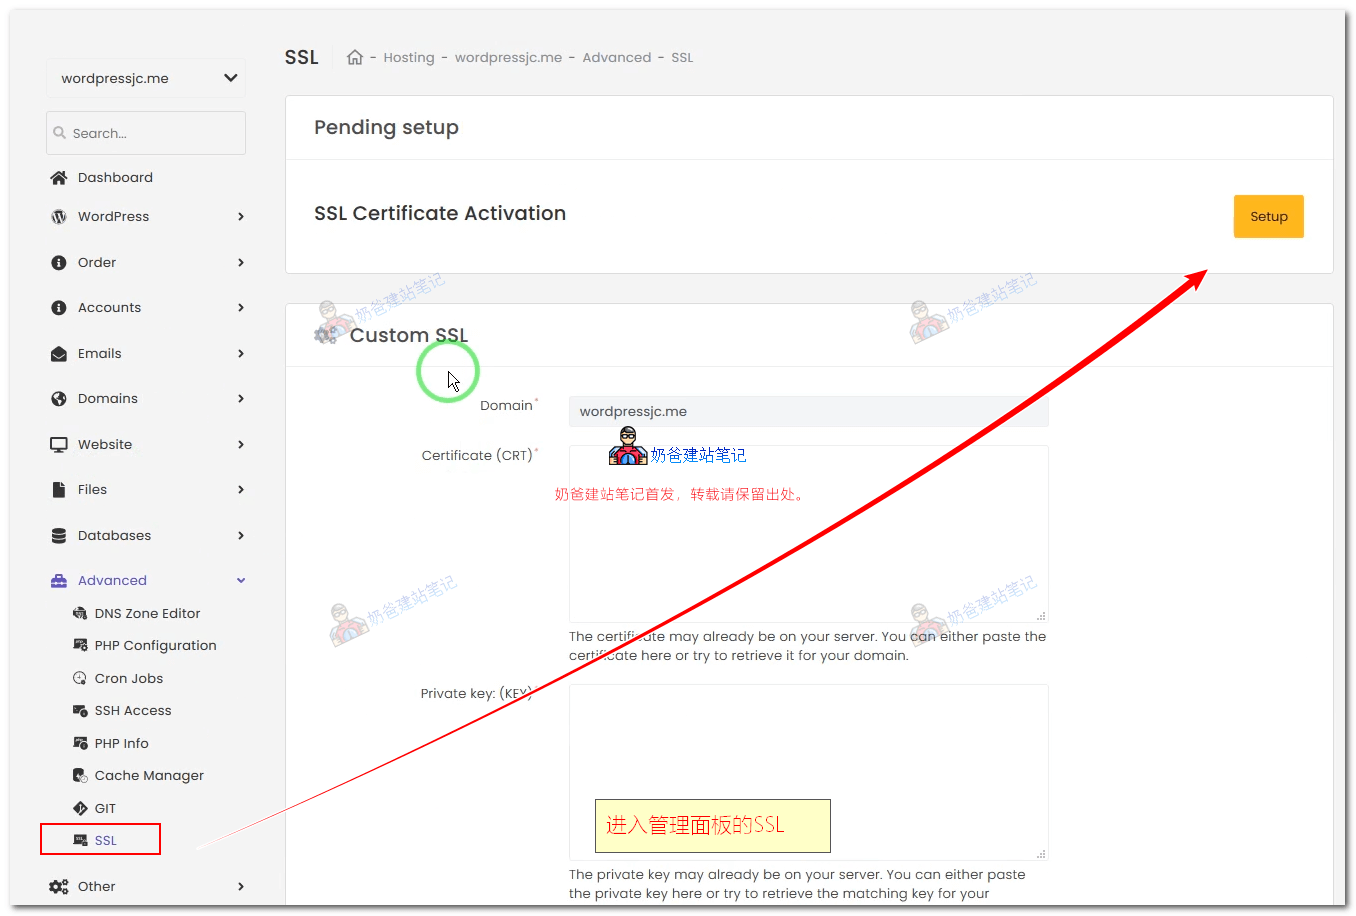
Hostinger supports one-click SSL certificate installation, but it requires domain resolution to take effect first. If you purchased a paid SSL certificate, you can also manually upload and install the certificate.
Hostinger SSL and HTTPS settings interface; actual entry may vary based on current hPanel.
SSL Setup 2
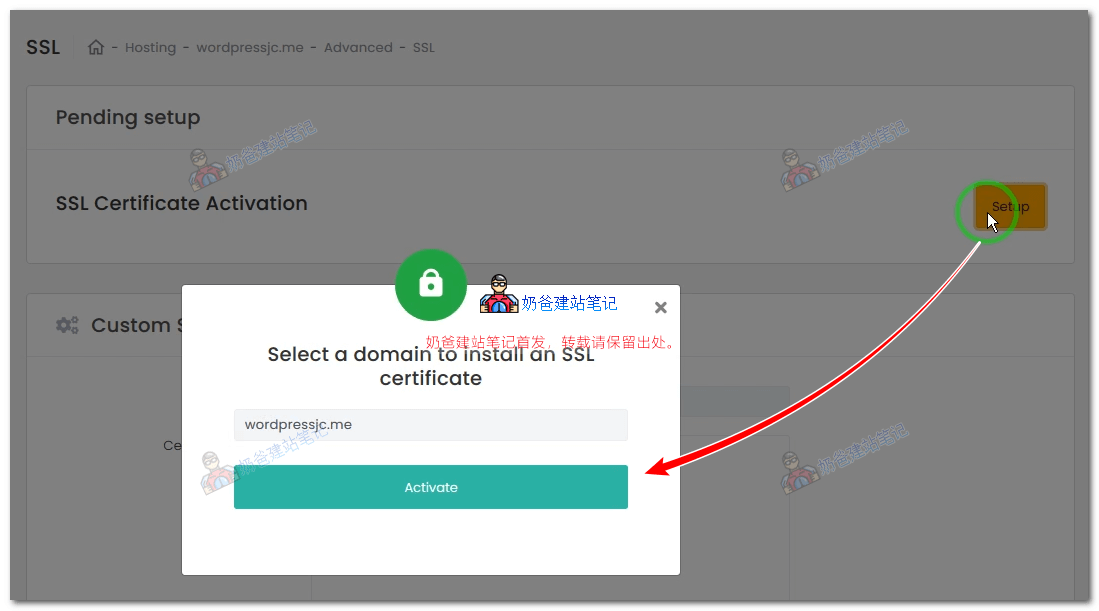
Click Setup and activate SSL
After clicking Setup, select Activate SSL in the pop-up interface. The button text in the admin panel may change over time, but the logic is always to enable SSL for the current website.
Hostinger SSL and HTTPS settings interface; actual entry may vary based on current hPanel.
SSL Setup 3
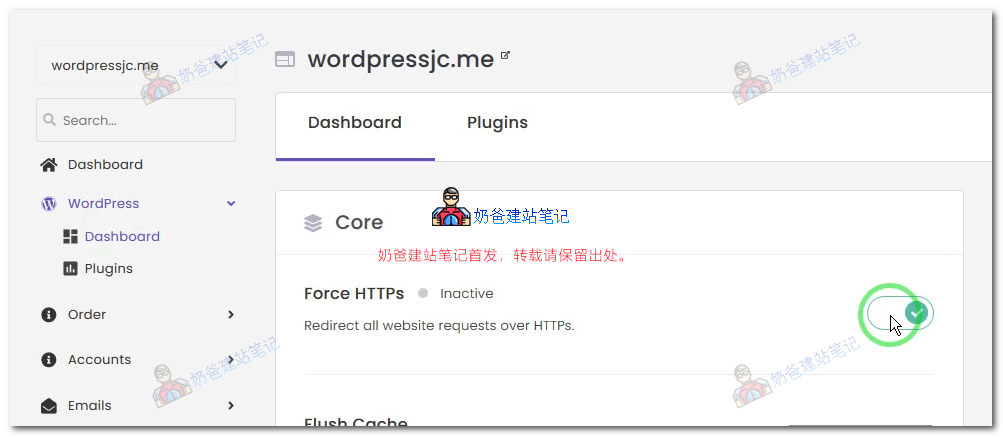
Enable HTTPS Redirect
After successfully activating the SSL certificate, go back to the WordPress menu and enable the HTTPS redirect function so that HTTP automatically redirects to HTTPS.
Hostinger SSL and HTTPS settings interface; actual entry may vary based on current hPanel.
SSL Settings 4
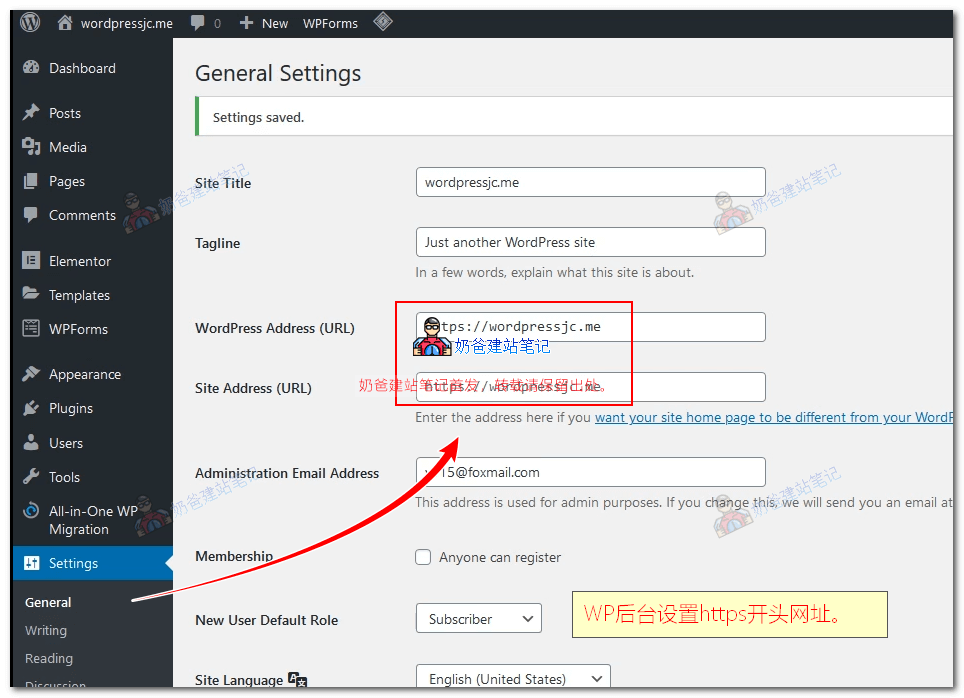
Change the WordPress Address to HTTPS
Reopen the website and confirm it is accessed via HTTPS. Then go to the WordPress backend, and in General Settings, confirm that the site address starts with https.
Hostinger SSL and HTTPS settings interface; actual entry may vary based on current hPanel.
If you want to resolve using an A record, the record value is usually the Website IP Address in the Hostinger product details. If you cannot find the IP, follow Hostinger's resolution wizard or contact support for confirmation.
After SSL takes effect, reopen the website to confirm it is accessed via HTTPS, then go to the WordPress backend and set the site address to start with https. At this point, you have completed the basic process of purchasing hosting on Hostinger, installing WordPress, resolving the domain, and enabling SSL.
What to Check After Installation
Being able to open the website does not mean it is ready for official launch. First check these basics, then continue with page decoration, content writing, and SEO; for foreign trade sites, continue readingForeign Trade Independent Website Planning, and proceed after launchGoogle SEO。
Backend
Confirm you can log in to /wp-admin/
Save the admin email and password, and confirm that you can log in to the backend normally under HTTPS.
Backup
Confirm the backup function and restore entry point
Before installing themes, plugins, and page builders, know where to back up and restore.
Performance
Control the Number of Plugins, Images, and Templates
For low-cost plans, avoid stacking too many plugins, animations, and large images.
Content
Plan the Columns and Homepage Structure First
Do not randomly apply templates after installing WordPress. First determine the website goals, columns, and conversion paths.
These questions mainly come from WordPress beginners who are purchasing and using Hostinger for the first time.
Is Hostinger suitable for beginners?
It is suitable for beginners who are budget-sensitive and prefer a Chinese interface and low barrier to entry. However, for formal business sites, you still need to consider resources, backups, renewal, customer support, and migration capabilities as the site grows.
Which is better, Hostinger or SiteGround?
There is no absolute better. Hostinger is more budget-friendly and Chinese-friendly, while SiteGround is more worry-free and suitable for formal projects. The choice depends on budget, maintenance capability, and project importance.
Can Hostinger directly install WordPress?
Yes. hPanel usually provides a WordPress installation wizard. Follow the process to create a site, set up an admin account, bind a domain, and enable SSL.
Does Hostinger support foreign trade independent websites?
It can be used for foreign trade display sites and small business sites. For foreign trade sites, you also need to consider the target customer location, image optimization, inquiry forms, email, SEO, and ongoing maintenance.
Is it worth buying a multi-year Hostinger plan?
Long-term plans usually have a lower monthly average price but require a larger one-time payment. Before purchasing, determine whether you will continue to maintain the site, and confirm the renewal price and refund policy.
Does Hostinger support Alipay or WeChat Pay?
Hostinger supports Alipay but not WeChat Pay. Payment methods may still be affected by region, currency, account, and promotions. Before purchasing, check the actual display on the Hostinger checkout page; if Alipay is unavailable, you can try credit/debit card, PayPal, UnionPay, etc.
How much does Hostinger renewal cost?
The renewal price is based on the actual bill and is usually the original price. However, if you initially purchased a 4-year plan and the site is still running before expiration, you can register a new account or switch to another provider, so don't worry too much about the renewal price. In reality, most websites shut down within 4 years, so there's often no need to stress about renewal prices after 4 years.
Does Hostinger have Chinese customer support?
Hostinger is relatively friendly to Chinese users, with a Chinese interface and help resources, but the specific support language and response experience may vary. Public reviews indicate that Hostinger mainly provides 24/7 online chat, email, or ticket support, with no phone support. For important issues, it is recommended to keep English screenshots, order numbers, and error messages.
Hostinger Assistance
If you are stuck on purchase, installation, DNS resolution, or SSL setup, you can consult based on the issue.
It is recommended to follow the tutorial first. If you encounter issues with plan selection, hPanel installation, domain resolution, SSL, backend login, or page planning, contact me to determine if one-time assistance or website building coaching is suitable.


Is the Hostinger (Business plan) mentioned above a shared WordPress hosting or a WordPress VPS hosting? Do I need to configure Baota Panel myself?
Shared hosting, no need to install Baota Panel.